Author

Mike

Browsing

Discover the Joy of Mexican Quinoa Wraps

Welcome to a delightful culinary adventure where flavor meets nutrition! In this article, we’re diving into the world of Mexican quinoa wraps. These wraps are not just meals; they’re a fusion of wholesome ingredients that come together to create a satisfying and healthy dish. With quinoa as our star ingredient, we’ll explore how to make these wraps a staple in your kitchen, perfect for quick lunches, snacks, or even a light dinner. So, let’s roll up our sleeves and get started!

Why You’ll Love This Recipe

These Mexican quinoa wraps have so much to offer! Here are five specific benefits that make this recipe a favorite:

  • Nutritious base: Packed with protein-rich quinoa, these wraps are perfect for maintaining energy levels throughout the day.
  • Vegan and gluten-free: Ideal for those with dietary restrictions, you can easily modify the recipe to suit your needs.
  • Flavor explosion: The combination of spices and fresh veggies creates a tantalizing taste experience.
  • Quick and easy: With minimal preparation and cooking time, you can whip up these wraps in no time.
  • Customizable: Whether you want to add more veggies or adjust the spice level, these wraps can be tailored to your personal preferences!

Ingredients Breakdown

Let’s take a closer look at what you need to create these delightful Mexican quinoa wraps. Here’s the list of ingredients along with some potential substitutions:


Professional Chef Knife Set

★ Recommended Kitchen Tool

Professional Chef Knife Set

Make this recipe even easier with a quality Professional Chef Knife Set — a must-have kitchen staple!


🛒 See Deals on Amazon →

As an Amazon Associate, we earn from qualifying purchases.
  • 1 cup quinoa, uncooked: A fantastic source of protein. You can substitute with brown rice if needed.
  • 15 oz black beans: Canned black beans save time; you can also use kidney beans for a different taste.
  • 7 oz corn: Fresh or frozen corn works well. Skip it if you prefer a lower-carb option.
  • 1 onion, chopped: Yellow or red onions add sweetness; shallots can be used for a milder flavor.
  • 1 chili, chopped: Adjust the spice by using less or opting for a milder pepper like bell pepper.
  • 1 red pepper, diced: Any color bell pepper can work here; they all add sweetness and crunch!
  • BBQ sauce: Choose a vegan brand or make your own for added flavor.
  • Wraps (gluten-free): Use your favorite tortilla, or try lettuce leaves for a low-carb alternative.
  • Salt and pepper to taste: Always season to bring out the best flavors!
  • Guacamole and vegan sour cream (optional): These add creaminess and flavor; feel free to skip or substitute your favorite toppings!

Step-by-Step Instructions
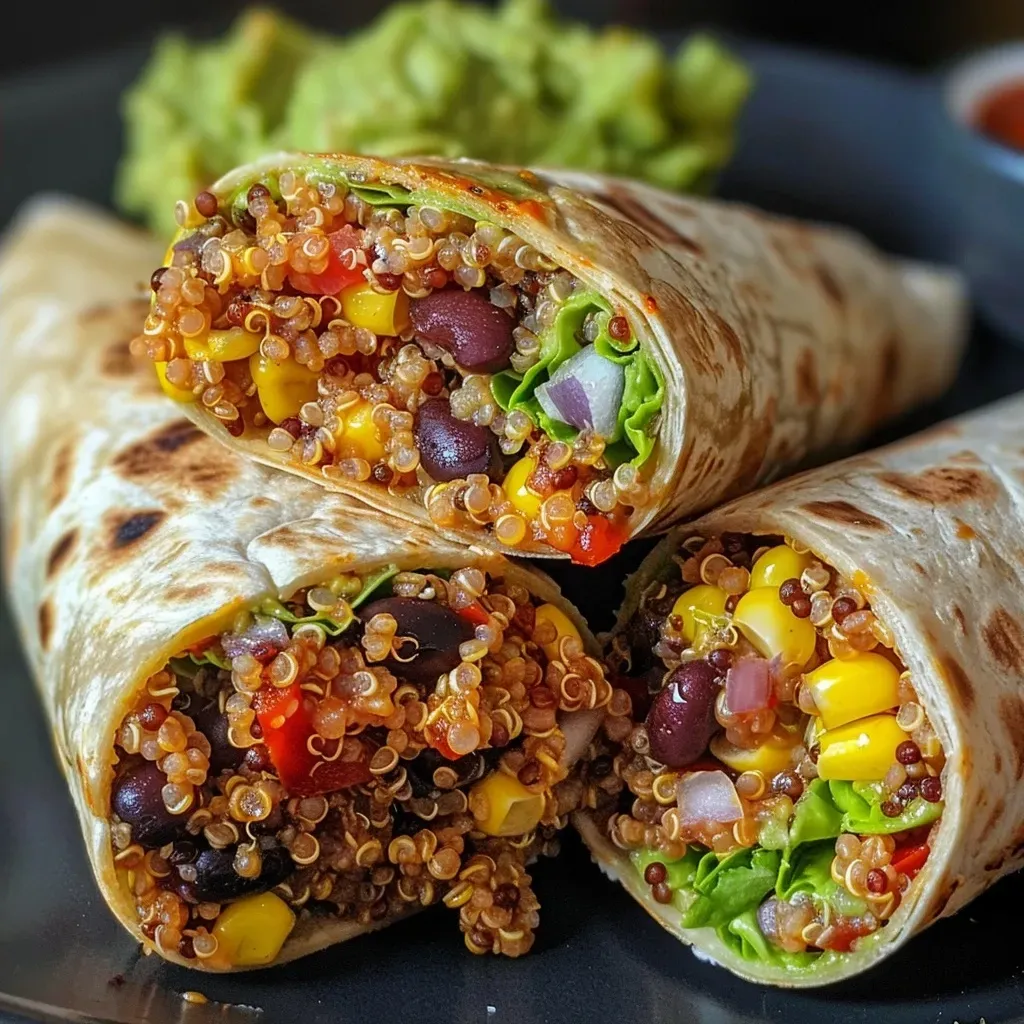
A close-up side view of a Mexican quinoa wrap filled with vibrant ingredients.

Now that we have our ingredients ready, let’s get cooking! Follow these easy steps to make your Mexican quinoa wraps:

  1. Cook the quinoa according to the manufacturer’s instructions, usually about 15 minutes.
  2. In the meantime, prepare the vegetables. Peel and chop the onion, seed and dice the chili and red pepper.
  3. Heat a saucepan and add a little oil. Sauté the onion, chili, and red pepper for about five minutes until they begin to soften.
  4. When the quinoa is ready, take a wrap and fill it with the vegetable mix, corn, and black beans. Add a bit of guacamole and sour cream, plus a dash of BBQ sauce, if you like. Roll it up and enjoy!

Pro Tips for Perfect Mexican Quinoa Wraps

Here are some expert insights to elevate your cooking:

  • Rinse quinoa: Always rinse quinoa before cooking to remove its natural coating, which can make it taste bitter.
  • Prep ahead: Cook quinoa and chop veggies in advance to save time on busy days.
  • Keep it colorful: Use a variety of colored veggies for a visually appealing and nutrient-rich wrap.
  • Wrap it right: Don’t overfill your wraps to avoid tearing; a little goes a long way!
  • Experiment with spices: Try adding cumin, paprika, or even lime juice for extra flavor.
  • Serve warm or cold: These wraps are versatile and delicious at any temperature!
  • Garnish creatively: Fresh herbs like cilantro or parsley can enhance the flavor.
  • Make it a meal: Pair with a side salad or soup for a complete dining experience.

Avoid Common Mistakes

Even the best chefs make mistakes! Here are some common pitfalls to watch out for:

  • Overcooking quinoa: This can lead to a mushy texture. Follow the recommended cooking times.
  • Skipping seasoning: Don’t forget to taste and adjust your seasoning as you go for maximum flavor.
  • Not letting quinoa cool: Allow it to cool slightly before assembling to prevent soggy wraps.
  • Using stale wraps: Fresh tortillas or wraps make a big difference in taste and texture.
  • Ignoring dietary needs: Always consider your guests’ dietary restrictions when preparing meals.

Delicious Variations

Get creative! Here are a few variations to try:

  • Spicy Southwest: Add jalapeños or hot sauce for a kick!
  • Italian twist: Substitute Italian herbs and sun-dried tomatoes for a Mediterranean flavor.
  • Breakfast burrito: Use scrambled eggs or tofu in place of beans for a hearty breakfast option.
  • Asian-inspired: Incorporate soy sauce and sesame oil with shredded carrots and cabbage.

Storage & Make-Ahead Instructions

These Mexican quinoa wraps are perfect for meal prep! Here’s how to store them:

  • Refrigerate: Wrap tightly in plastic wrap or store in an airtight container. They’ll last up to 3 days.
  • Freeze: For longer storage, freeze individual wraps. Thaw in the fridge overnight before enjoying.
  • Make-ahead filling: Prepare the quinoa and veggie mix in advance; assemble wraps when ready to eat.

Frequently Asked Questions (FAQ)

Let’s address some common queries about making Mexican quinoa wraps:

  • Can I use a different type of grain? Yes! Brown rice or farro can be excellent substitutes for quinoa.
  • Are these wraps suitable for meal prep? Absolutely! They hold up well in the fridge and are great for quick meals.
  • What can I use instead of BBQ sauce? Try salsa, hot sauce, or a homemade vinaigrette for different flavor profiles.
  • How can I make them spicier? Add more chili or some cayenne pepper to the veggie mix for an extra kick.
  • Can I make them ahead of time? Yes, prepare the filling and store it separately until you’re ready to assemble your wraps.
  • What toppings are best? Guacamole, salsa, or a sprinkle of cheese can enhance the flavors beautifully.
  • Can I use canned beans? Yes, canned beans are convenient and save time; just rinse and drain them before use.
  • Are these wraps gluten-free? Yes, if you use gluten-free wraps, they will be safe for those avoiding gluten.

Nutritional Tips & Dietary Adaptations

The nutritional profile of these Mexican quinoa wraps can vary based on the ingredients used. Here are some tips for healthier adaptations:

  • High protein: Consider adding lentils or chickpeas for an extra protein boost.
  • Lower carbs: Use lettuce leaves instead of wraps for a fresh, low-carb option.
  • Increase fiber: Add more vegetables or use whole grain wraps to enhance fiber content.
  • Reduce sodium: Opt for low-sodium beans and sauces to keep the dish heart-healthy.

Essential Equipment Recommendations

To ensure your cooking experience is seamless, here’s a list of equipment that can make your life easier:

  • Large saucepan: For cooking quinoa efficiently.
  • Cutting board: A sturdy board is essential for prepping your veggies.
  • Chef’s knife: A sharp knife will make chopping quick and easy.
  • Skillet: Ideal for sautéing the vegetables.

Serving Suggestions

Present your Mexican quinoa wraps beautifully! Here are some serving ideas:

  • Plate them up: Serve with a side of fresh salsa or a light salad.
  • Garnish: Top with chopped cilantro or avocado slices for added freshness.
  • Pair with drinks: A refreshing drink like lemonade or iced tea complements these wraps perfectly!

Conclusion

Creating your own Mexican quinoa wraps can be an exciting and rewarding experience. With the right ingredients and a bit of creativity, you can prepare a meal that is not only delicious but also nutritious. Remember, cooking is about enjoying the process, so don’t hesitate to experiment with flavors and textures. Thanks for joining me, Mike, on this culinary journey. I can’t wait for you to try this recipe and share it with your loved ones. Happy cooking!

Mexican Quinoa Wraps

Prep Time 10 minutes
Cook Time 15 minutes
Total Time 25 minutes
Servings 4 wraps
Calories 450
Enjoy these flavorful vegan wraps filled with quinoa, black beans, and colorful vegetables, topped with BBQ sauce and optional guacamole or sour cream.

Ingredients

Grains

  • 1 cup quinoa, uncooked

Beans and Vegetables

  • 15 oz black beans
  • 7 oz corn
  • 1 unit onion, chopped
  • 1 unit chili, chopped, seeds removed (optional)
  • 1 unit red pepper, diced

Condiments and Extras

  • to taste BBQ sauce
  • 4 units wraps (gf)
  • to taste salt, pepper
  • optional guacamole, vegan sour creme

Instructions 

  • Cook the quinoa according to package instructions.
  • Chop onion, chili, and red pepper.
  • Sauté onion, chili, and red pepper in a pan with oil for 5 minutes.
  • Fill wraps with cooked quinoa, vegetables, corn, and black beans. Add guacamole, sour creme, and BBQ sauce if desired. Roll up and serve.

Notes

Feel free to customize with your favorite toppings or additional vegetables.
Calories: 450kcal
Cost: $12
Course: Main Course
Cuisine: Mexican
Keyword: quinoa

Transform Your Weeknight Dinners with One-Pan Honey BBQ Chicken Rice

As a professional chef with over two decades of culinary experience, I know that weeknight dinners can often feel like a rush. But what if I told you that you could create a delicious, satisfying meal in just one pan? This One-Pan Honey BBQ Chicken Rice recipe not only simplifies your cooking process but also delights your taste buds with perfectly balanced flavors. Whether you’re a seasoned home cook or just starting your culinary journey, this dish is designed to bring joy and comfort to your dining table.

In this comprehensive guide, I’ll walk you through every step of this delightful recipe while sharing expert tips, variations, and troubleshooting advice to ensure your meal is a success every time. Let’s dive in!

Why You’ll Love This Recipe

  • Minimal Clean-Up: With just one pan to worry about, you can enjoy your meal without the dread of doing the dishes afterward.
  • Flavor Explosion: The combination of sweet honey and smoky BBQ sauce creates a rich, bold flavor that makes this dish irresistible.
  • Quick and Easy: Ready in under 30 minutes, it’s perfect for busy weeknights when you need a satisfying meal without the fuss.
  • Nutritious and Balanced: Packed with protein, whole grains, and vegetables, this dish makes a wholesome option for the whole family.
  • Customizable: This recipe is flexible, allowing you to swap out ingredients based on what you have at home or your dietary preferences.

Ingredients for One-Pan Honey BBQ Chicken Rice

To make this delightful dish, gather the following ingredients:


Air Fryer XL

★ Recommended Kitchen Tool

Air Fryer XL

Make this recipe even easier with a quality Air Fryer XL — a must-have kitchen staple!


🛒 Check Price on Amazon →

As an Amazon Associate, we earn from qualifying purchases.
  • 1 lb boneless, skinless chicken thighs or breasts: Thighs provide juiciness, while breasts are leaner.
  • 1 cup long-grain rice: This type of rice cooks evenly and absorbs flavors well.
  • 2 cups chicken broth: Use low-sodium for better control over saltiness.
  • ½ cup BBQ sauce: Choose your favorite brand or homemade for the best flavor.
  • ¼ cup honey: Adds sweetness and helps with caramelization.
  • 1 cup mixed vegetables: Fresh or frozen, these add color and nutrients.
  • 1 tsp garlic powder: Enhances the overall flavor of the dish.
  • 1 tsp onion powder: Adds depth to the taste.
  • ½ tsp smoked paprika: Provides a smoky flavor that complements the BBQ sauce.
  • Salt and pepper to taste: Essential for seasoning.

Step-by-Step Instructions

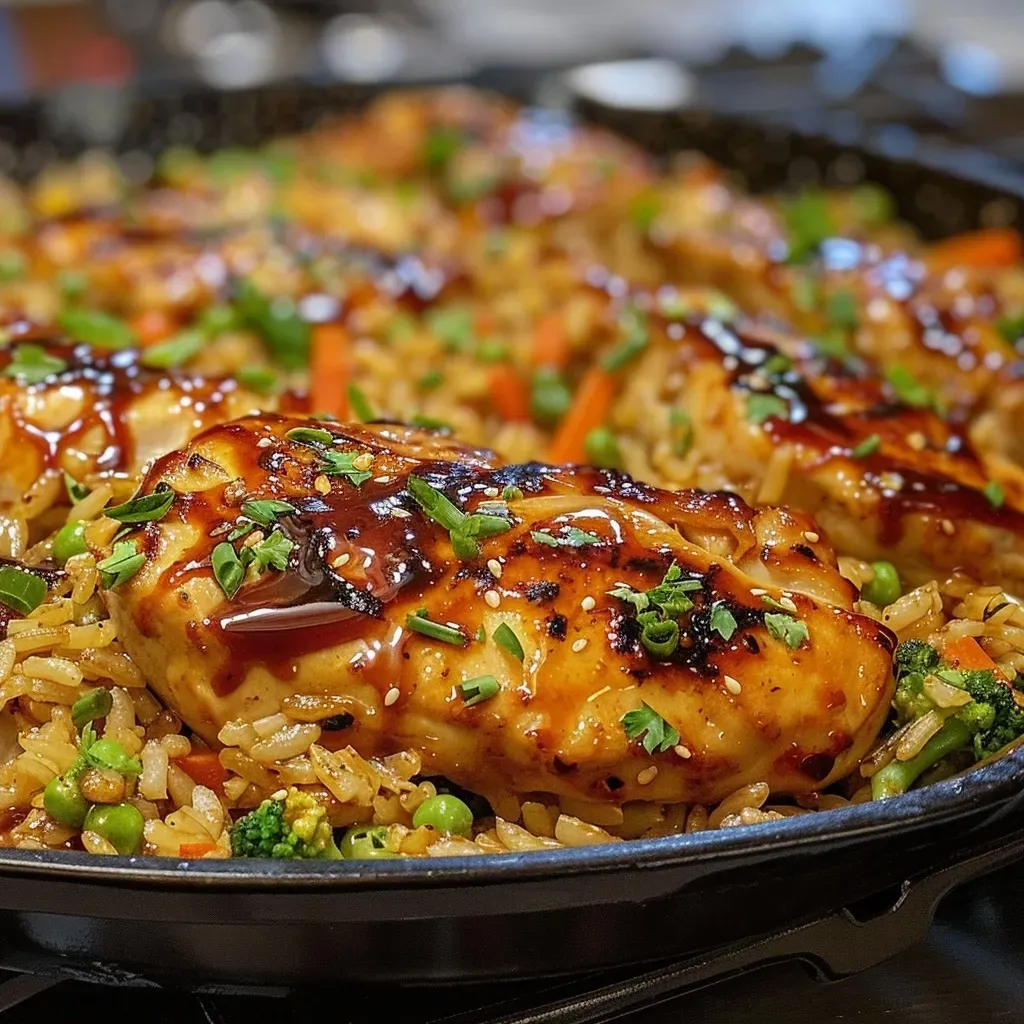
Juicy honey BBQ chicken served over vibrant rice and mixed vegetables in a close-up view.

Follow these simple steps to create your One-Pan Honey BBQ Chicken Rice:

  1. In a large skillet over medium heat, sear the seasoned chicken for about 5 minutes on each side until browned.
  2. In a small bowl, whisk together the BBQ sauce and honey, then pour it over the chicken.
  3. Add the rice and chicken broth; stir to combine thoroughly.
  4. Bring the mixture to a simmer; cover and reduce the heat to low, cooking for about 20 minutes until the rice is tender.
  5. During the last 5 minutes of cooking, add mixed vegetables on top to steam.
  6. Let the dish sit for 5 minutes before fluffing the rice with a fork and serving.

Expert Tips for Perfect Honey BBQ Chicken Rice

  • Use Chicken Thighs: They stay juicier than breasts, making your dish more flavorful.
  • Toast the Rice: Briefly toasting the rice before adding liquid enhances its nutty flavor.
  • Check Your BBQ Sauce: Opt for a sauce that balances sweetness and smokiness for the best results.
  • Don’t Overcrowd the Pan: Ensure there’s enough space for the chicken to sear properly, which locks in moisture.
  • Adjust the Broth: Depending on your rice, you may need to tweak the liquid amounts for perfect texture.
  • Let it Rest: Allowing the dish to rest before serving helps the flavors meld together beautifully.

Common Mistakes and Troubleshooting

Even the best chefs make mistakes, but here’s how to avoid common pitfalls:

  • Chicken is Dry: Ensure you don’t overcook the chicken; use a meat thermometer to check for doneness (165°F).
  • Rice is Mushy: This can happen if there’s too much liquid. Adjust your broth based on the rice type.
  • Flavors are Bland: Always taste and season at each step to ensure the dish is well-balanced.
  • Vegetables Overcooked: Add them during the last few minutes of cooking to retain their color and crunch.

Variations on One-Pan Honey BBQ Chicken Rice

This recipe is versatile, so feel free to experiment with these variations:

  • Spicy Kick: Add red pepper flakes or diced jalapeños to the BBQ sauce for a spicy twist.
  • Asian Fusion: Substitute soy sauce for BBQ sauce and add sesame oil and green onions for an Asian-inspired dish.
  • Herb-Infused: Mix in fresh herbs like cilantro or parsley for added freshness and flavor.
  • Vegetarian Option: Replace chicken with firm tofu or chickpeas, and adjust cooking time accordingly.

Storage and Make-Ahead Instructions

This dish is great for meal prep:

  • Refrigerator: Store leftovers in an airtight container for up to 4 days.
  • Freezer: Freeze portions for up to 3 months. Thaw overnight in the fridge before reheating.
  • Reheating: Warm in the microwave or on the stovetop with a splash of broth to retain moisture.

Frequently Asked Questions

  • Can I use brown rice instead of white rice? Yes, but adjust cooking time and liquid as brown rice takes longer to cook.
  • What can I substitute for chicken broth? Vegetable broth works well for a lighter flavor.
  • Can I make this dish in advance? Absolutely! Prepare the meal and store it in the fridge for easy reheating.
  • Is there a gluten-free option? Use gluten-free BBQ sauce and check your broth’s ingredients.
  • Can I add other proteins? Yes! Shrimp or pork can also be used; adjust cooking times accordingly.
  • What vegetables work best? Bell peppers, peas, or carrots are great options that complement the dish nicely.
  • How do I make it less sweet? Reduce the amount of honey or use a tangy BBQ sauce.
  • What can I serve with this dish? Pair it with a simple green salad or some crusty bread for a complete meal.

Nutrition Tips and Dietary Adaptations

This One-Pan Honey BBQ Chicken Rice can be adapted to suit various dietary needs:

  • Low-Carb: Substitute rice with cauliflower rice for a lower-carb option.
  • Dairy-Free: The recipe is naturally dairy-free; just ensure your BBQ sauce is free from dairy.
  • High-Protein: Add beans or legumes to boost protein content while keeping it plant-based.

Equipment Recommendations

For this recipe, you’ll need:

  • Large Skillet: A sturdy skillet with a lid is essential for even cooking.
  • Measuring Cups and Spoons: Precision is key in cooking for balanced flavors.
  • Whisk: Useful for mixing sauces and ensuring even flavor distribution.

Serving Suggestions

To elevate your dining experience:

  • Garnish: Top with sliced green onions or freshly chopped parsley for a fresh touch.
  • Accompaniments: Serve with a side of garlic bread or a light salad to balance the richness of the dish.
  • Pairing: A chilled glass of white wine or sparkling water complements the meal beautifully.

In conclusion, this One-Pan Honey BBQ Chicken Rice recipe is not just a meal; it’s an experience that brings flavor, comfort, and joy to your table. With its simplicity and versatility, it’s bound to become a weeknight favorite in your home. Happy cooking!

One-Pan Bold Honey BBQ Chicken Rice

Prep Time 10 minutes
Cook Time 25 minutes
Total Time 35 minutes
Servings 4 servings
Calories 650
A quick and flavorful one-pan meal combining tender chicken, rice, and vegetables with a sweet and smoky BBQ glaze.

Ingredients

Protein

  • 1 lb boneless, skinless chicken thighs or breasts

Grains

  • 1 cup long-grain rice

Broth & Sauces

  • 2 cups chicken broth
  • ½ cup BBQ sauce
  • ¼ cup honey

Vegetables

  • 1 cup mixed vegetables (frozen or fresh)

Spices & Seasonings

  • 1 tsp garlic powder
  • 1 tsp onion powder
  • ½ tsp smoked paprika
  • to taste N/A Salt and pepper

Instructions 

  • Season chicken and sear in a skillet for 5 minutes per side until browned.
  • Mix BBQ sauce and honey; pour over chicken.
  • Add rice and chicken broth; stir and bring to a simmer.
  • Cover and cook on low for 20 minutes until rice is tender.
  • In the last 5 minutes, add vegetables on top to steam.
  • Let sit for 5 minutes, then fluff rice and serve.

Notes

Feel free to customize vegetables or spice levels to your preference.
Calories: 650kcal
Cost: $15
Course: Main Course
Cuisine: American
Keyword: BBQ, Chicken, Rice

Unveiling the Art of Appam: The Perfect Breakfast Delight

Welcome to the world of Appam, a traditional delicacy that perfectly marries the flavors of rice and coconut milk. Originating from South India and Sri Lanka, these delightful pancakes are not only a feast for the taste buds but also a celebration of culinary heritage. In this comprehensive guide, we will dive deep into the intricacies of making the perfect Appam, ensuring you have all the secrets to create these light and fluffy pancakes that charm everyone—from family breakfasts to special gatherings.

With over two decades of culinary experience, I’m excited to share with you everything I’ve learned about this magical dish. Let’s embark on this culinary journey together!

Why You’ll Love This Recipe

Here’s what makes this Appam recipe a must-try:


Silicone Baking Cups Set

★ Recommended Kitchen Tool

Silicone Baking Cups Set

Make this recipe even easier with a quality Silicone Baking Cups Set — a must-have kitchen staple!


🛒 Check Price on Amazon →

As an Amazon Associate, we earn from qualifying purchases.
  • Easy to Make: With simple ingredients and straightforward steps, you’ll be whipping up Appam in no time.
  • Versatile Dish: Appam can be paired with a variety of sides, from savory curries to sweetened coconut milk, making it suitable for any meal.
  • Healthy Ingredients: Made primarily from rice and coconut, this pancake is naturally gluten-free and can be adapted for various dietary needs.
  • Fermentation Benefits: The fermentation process enhances the flavor and nutritional value of the batter, making it a wholesome choice.
  • Impressive Presentation: The unique bowl-like shape of Appam is visually appealing, perfect for impressing guests at any gathering.

Ingredients Breakdown

To create perfect Appam, you’ll need the following ingredients:

  • 1 teaspoon active dry yeast: Essential for fermentation, which gives Appam its characteristic texture.
  • 1/2 teaspoon sugar: Helps activate the yeast and aids in the fermentation process.
  • 3 tablespoons warm water: Necessary for dissolving yeast and sugar.
  • 2 1/2 cups rice: Use raw rice, long grain, short grain, or basmati rice—rinsed thoroughly for best results.
  • 400 ml coconut milk: The star ingredient that adds richness and flavor.
  • 3/4 cup water: Adjusts the consistency of the batter.
  • 1 cup cooked rice: Improves the texture of the batter.
  • Salt to taste: Enhances the overall flavor of your Appam.

Ingredient Substitutions

If you don’t have certain ingredients on hand, here are some substitutions you can make:

  • Yeast: You can use instant yeast instead of active dry yeast, reducing the activation time.
  • Coconut Milk: Substitute with almond milk or any other nut milk for a different flavor profile, though the taste will vary.
  • Rice: For a quicker option, use rice flour instead of soaked rice—just adjust the water accordingly.

Pro Tips for Perfect Appam

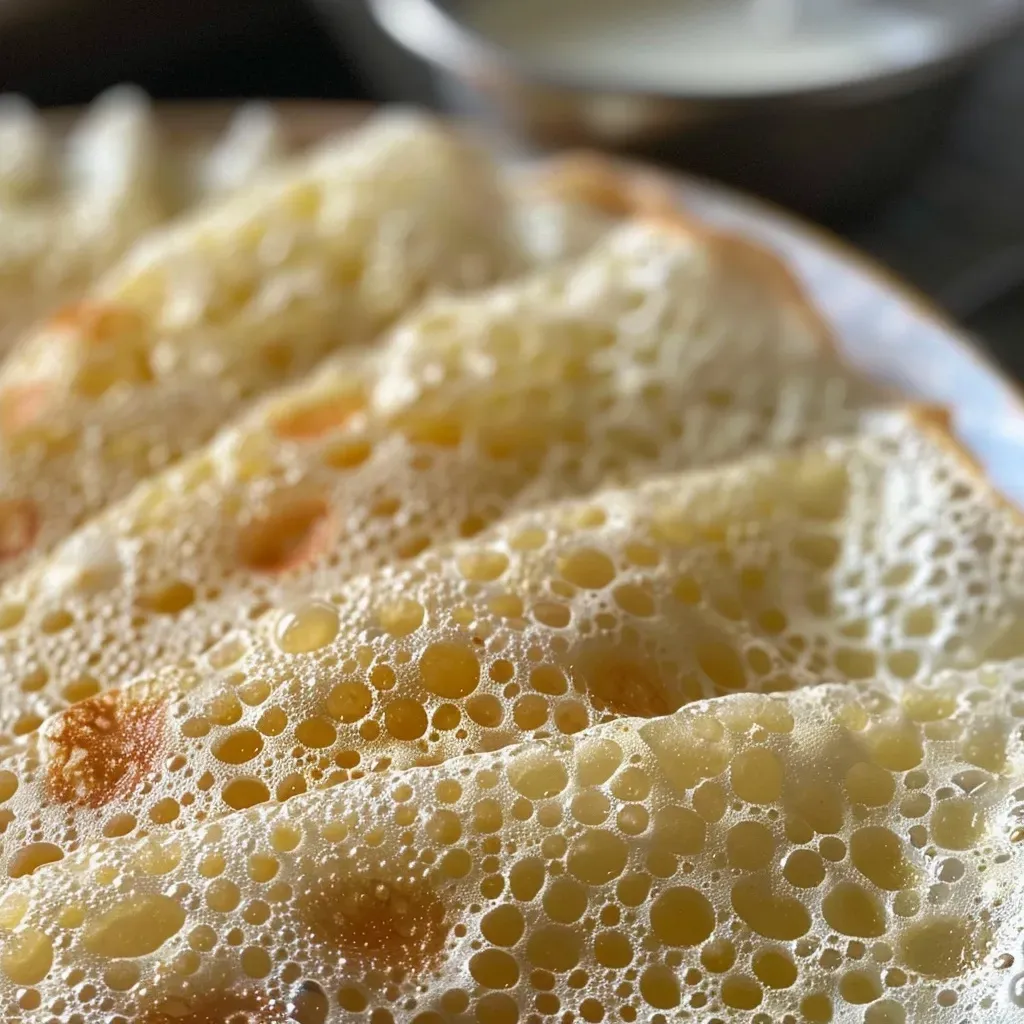
Close-up of a fluffy Appam pancake with a soft texture, garnished with coconut.

Here are my top expert tips to ensure your Appam turns out perfectly every time:

  • Soak the Rice: Soak the rice for at least 5-6 hours to ensure it blends smoothly.
  • Fermentation Time: Allow your batter to ferment overnight for optimal flavor and texture.
  • Temperature Control: Ferment the batter in a warm spot; a cold kitchen may hinder the fermentation process.
  • Batter Consistency: Ensure your batter is smooth yet pourable—too thick will prevent proper cooking.
  • Use Fresh Ingredients: Fresh yeast and coconut milk enhance the flavor profile significantly.
  • Cook on Medium Heat: This helps achieve a golden-brown edge while cooking the soft center perfectly.
  • Use a Non-Stick Pan: It prevents the Appam from sticking and allows easy flipping.
  • Try a Lid: Cover the Appam while cooking to trap steam, ensuring a soft and fluffy texture.

Common Mistakes and Troubleshooting

Even the best of us can run into challenges when making Appam. Here are common mistakes and how to fix them:

  • Batter Not Fermenting: Ensure the yeast is fresh and the batter is kept in a warm place. If it’s cold, try placing it in an oven with the light on.
  • Appam Breaking: This could be due to the batter being too thick or cooking at too high a heat. Adjust the consistency and lower the temperature.
  • Sticky Appam: If your Appam sticks to the pan, ensure it’s adequately greased and that you’re using a non-stick surface.

Variations of Appam

Get creative! Here are four delightful variations you can try:

  • Vegetable Appam: Add finely chopped vegetables to the batter for a colorful and nutritious twist.
  • Sweet Appam: Mix in some jaggery or coconut sugar to sweeten the batter for a delightful dessert option.
  • Spiced Appam: Incorporate spices like cardamom or cinnamon into the batter for an aromatic version.
  • Herbed Appam: Add fresh herbs like coriander or mint to the batter for a refreshing taste.

Storage and Make-Ahead Instructions

Planning ahead? Here’s how to store your Appam batter and maximize freshness:

  • Refrigeration: Once fermented, store the batter in an airtight container in the refrigerator for up to 2 days.
  • Freezing: You can freeze the batter for up to a month. Thaw it in the refrigerator overnight before use.
  • Pre-cooked Appam: Cooked Appam can be stored in the refrigerator for 2-3 days. Reheat gently on a skillet before serving.

Comprehensive FAQ

Got questions? Here are the most common inquiries about Appam:

  • How long does the batter need to ferment? Typically, it needs about 8-12 hours to ferment, depending on the temperature.
  • Can I use brown rice instead of white rice? Yes, but it may change the texture and flavor slightly.
  • What can I serve with Appam? Appam pairs beautifully with vegetable stews, spicy curries, or sweetened coconut milk.
  • Is Appam gluten-free? Absolutely! Appam is naturally gluten-free, making it suitable for those with gluten sensitivities.
  • Can I make Appam without yeast? Yes, but the texture will differ. You can use fermented cooked rice to achieve a similar effect.
  • How do I know if my batter is ready? The batter should be bubbly and have increased in volume, indicating successful fermentation.
  • Can I add eggs to the batter? Yes, you can add eggs for a richer flavor, but it will alter the traditional texture.
  • What is the best way to cook Appam? Use a non-stick pan or Appachatti, pouring the batter and swirling to create the characteristic shape.

Nutritional Tips and Dietary Adaptations

Here are some nutritional insights and adaptations for various diets:

  • Vegan Option: This recipe is naturally vegan, as it contains no animal products.
  • High-Protein Variation: Add ground nuts or seeds to the batter for added protein content.
  • Low-Carb Alternative: Try using cauliflower rice or a mix of almond flour as a base for a low-carb version.

Essential Equipment Recommendations

To make your cooking experience smooth, here are some essential tools you’ll need:

  • Non-Stick Pan: For easy cooking and flipping of the Appam.
  • Blender or Wet Grinder: For smooth batter consistency.
  • Measuring Cups and Spoons: Precision is key in baking and cooking.
  • Spatula: A thin spatula is helpful for lifting the Appam out of the pan.

Serving Suggestions

Here are some delightful ways to serve your Appam:

  • With Coconut Milk: Serve with warm, sweetened coconut milk for a traditional touch.
  • Accompanied by Curries: Pair it with your favorite vegetable or meat curry for a hearty meal.
  • As a Snack: Enjoy Appam with a side of chutney or pickles for a quick snack.

Conclusion: Bring the Joy of Appam to Your Table

As we wrap up this delightful exploration of Appam, I hope you feel inspired to try this recipe in your kitchen. The combination of rice and coconut milk creates a unique flavor that is sure to be a hit with everyone. Remember, cooking is not just about following a recipe; it’s about creating moments of joy and connection around the table. So gather your loved ones, whip up a batch of Appam, and enjoy the beautiful moments that follow. Happy cooking!

Appam | Rice and Coconut Milk Pancakes | Video

Prep Time 6 hours
Cook Time 15 minutes
Total Time 6 hours 15 minutes
Servings 4 pieces
Calories 250
Enjoy these soft, fluffy rice and coconut milk pancakes that are perfect for breakfast or snacks.

Ingredients

Yeast and Sugar

  • 1 teaspoon active dry yeast
  • 0.5 teaspoon white or raw sugar
  • 3 tablespoons warm water

Rice

  • 2.5 cups rice (raw rice, long grain, short grain, or basmati) (rinsed)
  • 400 ml coconut milk
  • 0.75 cup water
  • 1 cup cooked rice
  • to taste N/A Salt

Instructions 

  • You have to start the recipe a day ahead. Soak rice for 5-6 hours. Drain. Set aside.

Notes

Ensure the batter ferments overnight for best results.
Calories: 250kcal
Cost: $10
Course: Breakfast, Snack
Cuisine: Indian
Keyword: Appam, Coconut Milk, Rice

Welcome to a culinary journey where comfort meets convenience! If you’re looking for a dish that combines the rich flavors of garlic and parmesan with the tenderness of slow-cooked chicken and potatoes, you’ve landed in the right place. This Garlic Parmesan Crockpot Chicken and Potatoes recipe is not just a meal; it’s a family gathering on a plate. With a little preparation, you can create a comforting dish that will become a new family favorite, perfect for busy weeknights or cozy weekends.

Why You’ll Love This Recipe

  • Effortless Preparation: With a simple prep time of just 15 minutes, you can toss everything into the crockpot and let it do the work for you.
  • Flavor Explosion: The combination of garlic, parmesan, and Italian seasoning creates an aromatic experience that will have everyone asking for seconds.
  • Customizable Ingredients: Whether you have chicken thighs on hand or want to swap out the baby potatoes for sweet potatoes, this recipe is forgiving and adapts beautifully to what you have.
  • Family-Friendly: The mild flavors appeal to both kids and adults, making it a hit at the dinner table.
  • Great for Meal Prep: Make a big batch and enjoy the leftovers for lunch or freeze portions for future meals.

Ingredients Breakdown

Before diving into the cooking process, let’s look at what you need. Here’s a detailed list of ingredients along with some smart substitutions:

  • 4 boneless, skinless chicken breasts: Feel free to substitute with chicken thighs for a juicier result.
  • 1.5 pounds baby potatoes: You can use any small potatoes or even diced larger potatoes.
  • 1 cup chicken broth: Vegetable broth works well for a lighter flavor.
  • 1/2 cup grated parmesan cheese: For a dairy-free option, use a plant-based cheese substitute.
  • 4 cloves garlic, minced: Fresh garlic is recommended for the best flavor, but garlic powder can be used in a pinch.
  • 1 tablespoon Italian seasoning: A mix of dried herbs such as oregano, basil, and thyme can be used.
  • 1 teaspoon salt: Adjust based on your taste or dietary needs.
  • 1/2 teaspoon black pepper: Freshly ground black pepper is ideal for maximum flavor.
  • 1/2 teaspoon red pepper flakes (optional): Adds a nice kick if you like some heat.
  • 2 tablespoons olive oil: Can be replaced with melted butter for a richer flavor.
  • Fresh parsley for garnish (optional): Adds a pop of color and freshness to your dish.

Step-by-Step Instructions

Making Garlic Parmesan Crockpot Chicken and Potatoes is straightforward. Follow these simple steps to create a delicious meal:


Nonstick Grill Pan

★ Recommended Kitchen Tool

Nonstick Grill Pan

Make this recipe even easier with a quality Nonstick Grill Pan — a must-have kitchen staple!


🛒 Check Price on Amazon →

As an Amazon Associate, we earn from qualifying purchases.
  1. Prep the Ingredients: Begin by washing the baby potatoes and halving them. Mince the garlic cloves and set aside.
  2. Season the Chicken: Rub the chicken breasts with olive oil, Italian seasoning, salt, black pepper, and red pepper flakes (if using) until evenly coated.
  3. Layer in the Crockpot: Place the halved potatoes in the bottom of the crockpot. Lay the seasoned chicken breasts on top.
  4. Add Chicken Broth: Pour the chicken broth over the chicken and potatoes, ensuring they are well coated.
  5. Add Garlic and Cheese: Sprinkle the minced garlic evenly over the chicken. Then, add the grated parmesan cheese on top, making sure it covers the chicken nicely.
  6. Cook the Mixture: Cover the crockpot and set it to cook on low for 6–7 hours or high for 3–4 hours, until the chicken is tender and cooked through.
  7. Check for Doneness: After the recommended cooking time, check if the chicken reaches an internal temperature of 165°F (75°C). The potatoes should be fork-tender.
  8. Serve and Enjoy: Once cooked, remove the chicken and potatoes gently from the crockpot. Spoon any remaining sauce over the top for extra flavor.
  9. Garnish: If desired, chop fresh parsley and sprinkle over the dish for added color and flavor before serving.

Pro Tips for Perfect Results

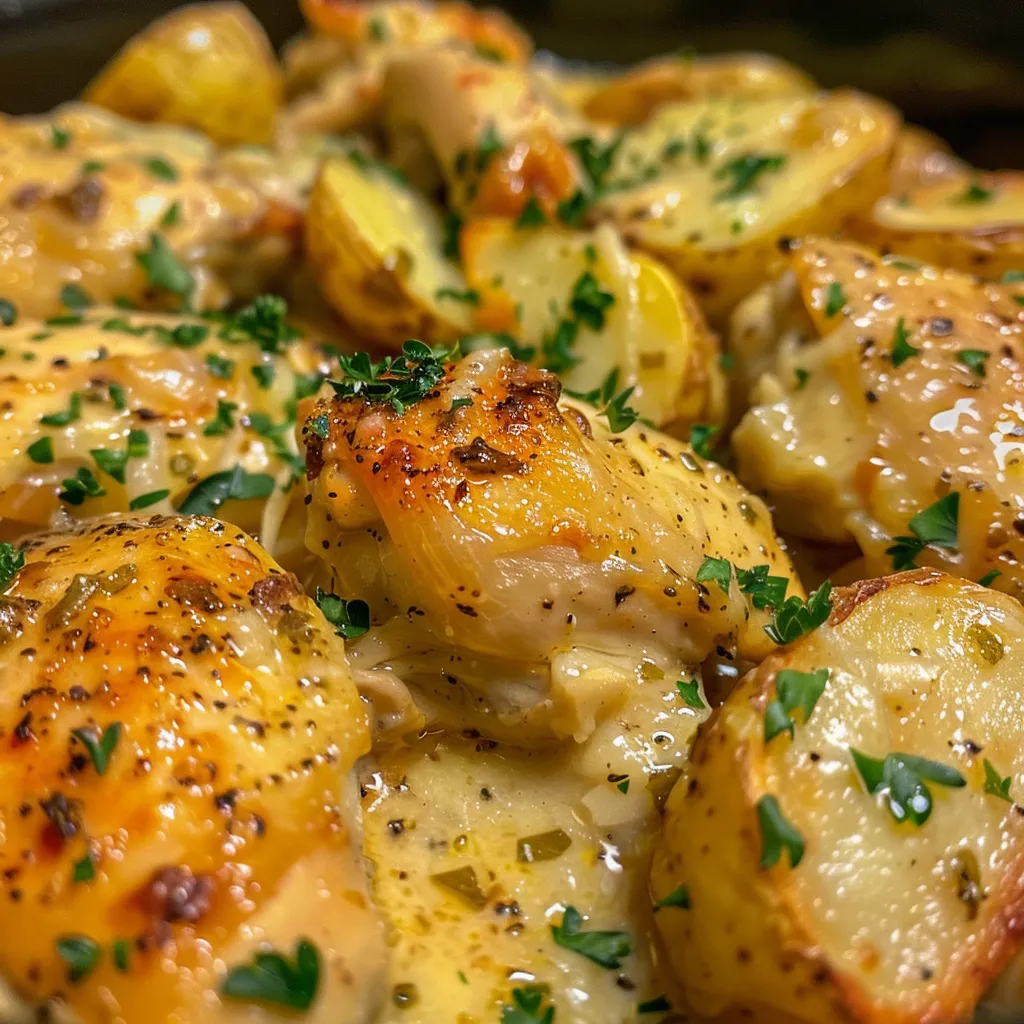
Close-up view of tender garlic parmesan chicken with baby potatoes in a crockpot.

To ensure your dish turns out perfectly every time, here are some expert insights:

  • Don’t Peek!: Each time you lift the lid, you let steam escape, which can affect cooking times. Trust the process!
  • Use Quality Ingredients: Fresh garlic and high-quality parmesan cheese make a significant difference in flavor.
  • Adjust Cooking Times: Different crockpots have varying heat levels; keep an eye on your dish the first time you make it.
  • Let It Rest: Allow the dish to rest for a few minutes after cooking to let the flavors meld.
  • Consider Cooking in Batches: If you’re making a large quantity, cook in batches to ensure even cooking.
  • Save the Leftovers: This dish tastes even better the next day, so don’t hesitate to make extra!
  • Experiment with Herbs: Feel free to add fresh herbs like thyme or basil for extra flavor.
  • Keep It Covered: Keep the lid on as much as possible during cooking to maintain moisture.

Common Mistakes and Troubleshooting

Even the best chefs can run into issues. Here’s how to avoid common pitfalls:

  • Chicken Not Cooked Through: Ensure your chicken reaches an internal temperature of 165°F. If not, continue cooking and check again.
  • Potatoes Too Firm: If your potatoes are not fork-tender, they may need more cooking time. Remember to keep the lid on!
  • Flavor Too Mild: If the flavors aren’t strong enough, consider adding more seasoning next time or letting it cook longer.
  • Too Much Liquid: If you find the dish too watery, you can remove the lid in the last hour of cooking to allow some steam to escape.

Variations to Try

Looking to mix things up? Here are four delicious variations:

  • Vegetable Medley: Add carrots, bell peppers, or green beans for added nutrition and flavor.
  • Spicy Kick: Add diced jalapeños or use spicy chicken sausage for an extra kick.
  • Herb-Infused: Swap out Italian seasoning for fresh herbs like rosemary or thyme for a different flavor profile.
  • Cheesy Delight: Mix in cream cheese or mozzarella cheese for a richer, creamier texture.

Storage and Make-Ahead Instructions

This dish is perfect for meal prep! Here’s how to store it:

  • Refrigeration: Store leftovers in an airtight container in the fridge for up to 3–4 days.
  • Freezing: Freeze in individual portions for up to 3 months. Thaw in the refrigerator overnight before reheating.
  • Reheating: Reheat in the microwave or on the stovetop, adding a splash of chicken broth to maintain moisture.

Frequently Asked Questions

Here are some common questions about this recipe:

  • Can I use frozen chicken? Yes, but increase the cooking time by 1–2 hours.
  • Is it necessary to brown the chicken first? No, this recipe works perfectly without browning. Just season and place in the crockpot.
  • Can I add other vegetables? Absolutely! Carrots, green beans, or even corn can be great additions.
  • What can I serve with this dish? Consider serving with a side salad or some crusty bread to soak up the delicious sauce.
  • Can I make this dairy-free? Yes, use dairy-free cheese and omit the parmesan.
  • What do I do if it’s too salty? Add a splash of water or broth to dilute the saltiness.
  • Can I cook this on the stovetop? Yes, simmer on low heat for about 2 hours, checking to ensure the chicken is cooked through.
  • How can I enhance the flavor? Consider marinating the chicken overnight for deeper flavor.

Nutrition Tips and Dietary Adaptations

This dish can be easily adapted for various dietary needs:

  • Low-Carb Option: Replace potatoes with cauliflower for a low-carb version.
  • Gluten-Free: This recipe is naturally gluten-free, just ensure that any broth used is certified gluten-free.
  • High-Protein: Add more chicken or include beans for an extra protein boost.

Equipment Recommendations

To make this recipe, you’ll need:

  • Crockpot: A 6-quart crockpot is ideal for this recipe.
  • Cutting Board and Knife: For prepping your ingredients.
  • Measuring Cups and Spoons: For accurate ingredient measurements.
  • Serving Spoon: To serve up that delicious chicken and potatoes!

Serving Suggestions

When it comes to serving this dish, presentation matters! Here are some ideas:

  • Garnish with Fresh Herbs: A sprinkle of chopped parsley or chives adds color and freshness.
  • Pair with a Salad: A light salad balances the richness of the dish.
  • Serve with Crusty Bread: Perfect for soaking up the flavorful sauce.

In conclusion, the Garlic Parmesan Crockpot Chicken and Potatoes is more than just a meal; it’s a cozy experience that brings loved ones together. With its simple preparation and mouthwatering flavors, it’s destined to become a staple in your kitchen. So go ahead, gather your ingredients, and let your crockpot work its magic. Happy cooking!

Garlic Parmesan Crockpot Chicken and Potatoes: An Incredible Ultimate Recipe

Prep Time 15 minutes
Cook Time 4 hours
Total Time 4 hours 15 minutes
Servings 4 servings
Calories 450
This flavorful crockpot dish combines tender chicken and potatoes with garlic and parmesan for a comforting meal.

Ingredients

Protein

  • 4 pieces boneless, skinless chicken breasts

Vegetables

  • 1.5 pounds baby potatoes, halved

Liquids

  • 1 cup chicken broth

Cheese

  • 1/2 cup grated parmesan cheese

Aromatics & Seasonings

  • 4 cloves garlic, minced
  • 1 tablespoon Italian seasoning
  • 1 teaspoon salt
  • 1/2 teaspoon black pepper
  • 1/2 teaspoon red pepper flakes (optional)

Other

  • 2 tablespoons olive oil

Garnish

  • Fresh parsley for garnish (optional)

Instructions 

  • Layer halved potatoes in crockpot, then place seasoned chicken on top.
  • Pour chicken broth over ingredients, then sprinkle garlic and parmesan evenly.
  • Cover and cook on low for 6–7 hours or high for 3–4 hours until chicken is tender.
  • Check internal temperature; serve with parsley garnish if desired.

Notes

Ensure chicken reaches an internal temperature of 165°F (75°C) before serving.
Calories: 450kcal
Cost: $15
Course: Main Course
Cuisine: American
Keyword: Chicken, crockpot, Potatoes

When it comes to comfort food, few dishes can compete with a warm bowl of turkey soup, especially when it’s made using your leftover turkey in a slow cooker. This Slow Cooker Turkey Soup recipe is not just a meal; it’s a celebration of flavors and the perfect way to utilize holiday leftovers. In just minutes of prep, you can have a hearty, nourishing soup that will warm your heart and home.

Why You’ll Love This Recipe

Making this crockpot turkey soup isn’t just about the ease of preparation; it’s about creating a delicious experience. Here are five reasons why you’ll absolutely love this recipe:

  • Convenience: The dump and go style means you can throw everything into the slow cooker and let it do the work for you.
  • Flavorful Depth: The combination of tender turkey, fresh vegetables, and aromatic herbs creates a soup that is rich in flavor.
  • Health Benefits: Packed with nutritious ingredients, this soup is not only comforting but also offers a healthy option for dinner.
  • Customizable: You can easily make variations to suit your taste or dietary needs.
  • Perfect for Leftovers: It’s an excellent way to use up leftover turkey after holiday meals, reducing food waste.

Ingredients Breakdown

To make this delightful soup, you’ll need the following ingredients:


Meal Prep Container Set

★ Recommended Kitchen Tool

Meal Prep Container Set

Make this recipe even easier with a quality Meal Prep Container Set — a must-have kitchen staple!


🛒 Check Price on Amazon →

As an Amazon Associate, we earn from qualifying purchases.
  • 2 cups cooked turkey: Shredded or diced; feel free to substitute with chicken if needed.
  • 8 cups chicken broth: Homemade or store-bought, low-sodium options are great for controlling salt levels.
  • 1 cup diced carrots: Adds a natural sweetness; can substitute with parsnips for a different flavor.
  • 1 cup diced celery: For a crunchy texture; you can also use leeks or fennel for a unique taste.
  • 0.5 cup diced onion: Essential for flavor; shallots can be a good alternative.
  • 1 tsp dried thyme: Fresh thyme works well too; feel free to experiment with other herbs like rosemary or sage.

Pro Tips for Perfect Turkey Soup

Here are some expert insights to ensure your soup turns out perfectly:

  • Shred, Don’t Cube: Shredding your leftover turkey allows it to absorb more flavors from the broth.
  • Don’t Skip the Bay Leaf: Adding one bay leaf enhances the soup’s flavor profile significantly; just remember to remove it before serving.
  • Adjust Consistency: If you like a thicker soup, consider adding a cornstarch slurry towards the end of cooking.
  • Fresh Herbs at the End: Stir in fresh herbs just before serving for a burst of flavor.
  • Temperature Control: If your soup is too hot, let it sit for a few minutes; it will also allow the flavors to meld.
  • Cook with the Lid On: Keeping the lid on retains moisture and flavor, cooking the turkey thoroughly.

Common Mistakes and Troubleshooting

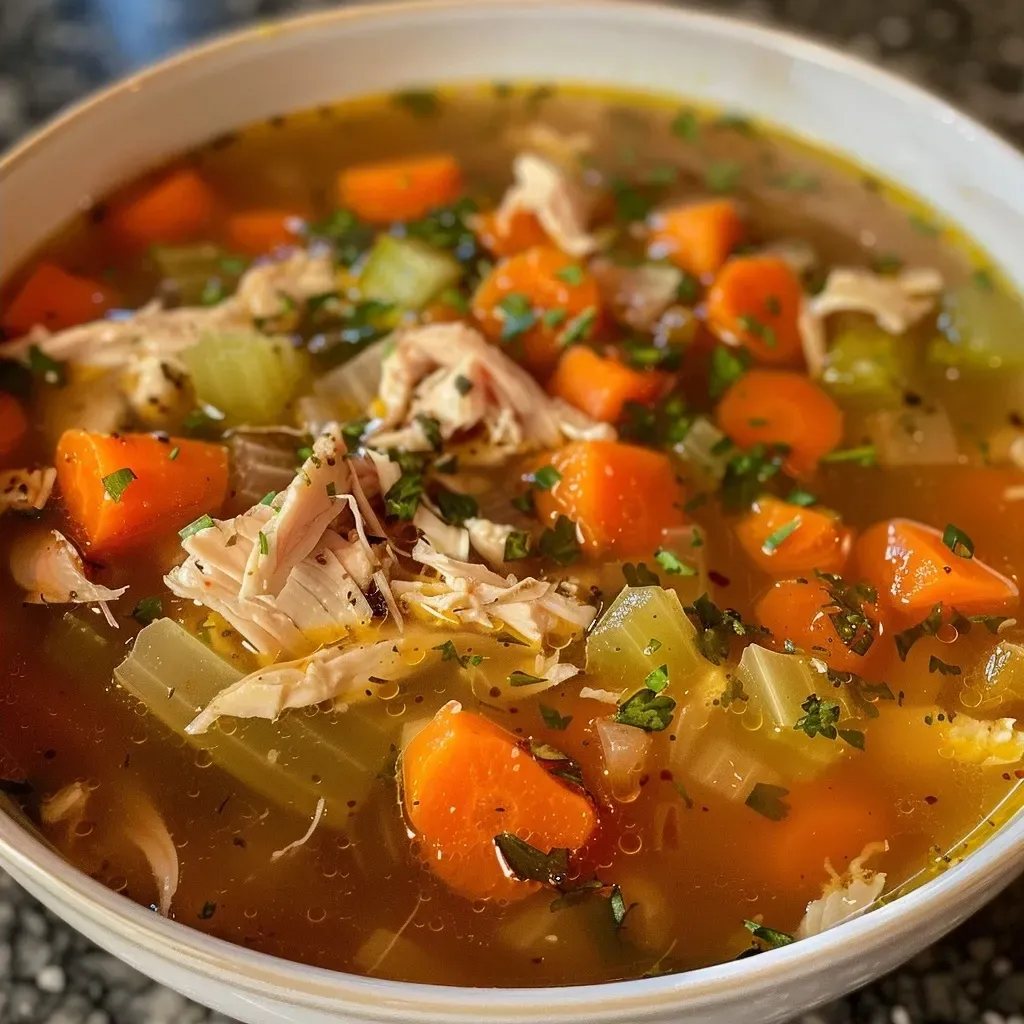
Close-up view of a bowl of Slow Cooker Turkey Soup with colorful vegetables.

Even the best chefs can make mistakes! Here are some common pitfalls to avoid:

  • Overcooking Vegetables: Adding delicate vegetables like peas too early can make them mushy. Add them in the last 30 minutes of cooking for perfect texture.
  • Too Much Salt: Start with low-sodium broth and season gradually to avoid overly salty soup.
  • Insufficient Liquid: Always ensure there’s enough broth to prevent the soup from drying out.

Variations to Try

Once you’ve mastered the basic recipe, feel free to mix things up with these fun variations:

  • Spicy Turkey Soup: Add diced jalapeños or a few dashes of hot sauce for a kick.
  • Creamy Turkey Soup: Stir in a cup of heavy cream or coconut milk at the end for a rich finish.
  • Mushroom Turkey Soup: Sautéed mushrooms add an earthy flavor that complements the turkey well.
  • Vegetable-Loaded Turkey Soup: Incorporate your favorite vegetables like green beans or corn for added nutrition and texture.

Storing and Make-Ahead Instructions

This turkey soup stores beautifully, making it perfect for meal prep:

  • Refrigerate: Store in airtight containers for up to 4 days.
  • Freeze: Freeze soup in portions for up to 3 months. Thaw overnight in the fridge before reheating.
  • Make Ahead: Prep the ingredients the night before, so you can simply toss them in the slow cooker in the morning.

Comprehensive FAQ

  • Can I use raw turkey in this recipe? Yes! Just ensure it cooks thoroughly; it may take longer than leftover turkey.
  • What if I don’t have chicken broth? Vegetable broth is a great substitute, or you can use water with seasoning.
  • Can I make this in an Instant Pot? Absolutely! Use the sauté function first, then pressure cook for about 10 minutes.
  • How can I make it gluten-free? Ensure your broth is gluten-free and avoid using any thickeners that contain gluten.
  • Can I add other proteins? Sure! Feel free to include beans or lentils for a different protein source.
  • What’s the best way to reheat frozen soup? Thaw it in the fridge overnight, then reheat on the stove or microwave until hot.
  • Can I use other vegetables? Yes, almost any vegetable can be added; just adjust cooking times as necessary.
  • How do I enhance the flavor? Fresh herbs, spices, or a splash of lemon juice can elevate the flavors significantly.

Nutrition Tips and Dietary Adaptations

This turkey soup is inherently healthy, but you can enhance its nutritional value by:

  • Adding Greens: Toss in some spinach or kale for added vitamins and minerals.
  • Low-Fat Options: Use skinless turkey and low-fat broth to reduce calories.
  • Protein Boost: Include beans or legumes for extra protein and fiber.

Equipment Recommendations

To make this recipe, ensure you have:

  • Slow Cooker: A programmable slow cooker can make adjusting cooking times easy.
  • Sharp Knife: A good knife is essential for chopping vegetables efficiently.
  • Cutting Board: A sturdy cutting board provides a safe surface for food preparation.

Serving Suggestions

This soup can be enjoyed on its own or paired with:

  • Crusty Bread: A warm baguette or sourdough for dipping.
  • Salad: A fresh green salad to balance the meal.
  • Rice or Quinoa: Serve over a bed of grains for a heartier option.

In conclusion, this Slow Cooker Turkey Soup is more than just a recipe; it’s a way to create warmth and comfort in your home. With its ease of preparation and rich flavors, you can enjoy a bowl of goodness that not only nourishes your body but also brings a smile to your face. Embrace the joy of cooking and the magic of sharing food with loved ones. Happy cooking!

Slow Cooker Turkey Soup

Prep Time 10 minutes
Cook Time 4 hours
Total Time 4 hours 10 minutes
Servings 6 servings
Calories 250
A hearty and comforting soup perfect for using leftover turkey, cooked slowly to develop rich flavors.

Ingredients

Main ingredients

  • 2 cups cooked turkey
  • 8 cups chicken broth
  • 1 cup diced carrots
  • 1 cup diced celery
  • 0.5 cup diced onion
  • 1 tsp dried thyme

Instructions 

  • Add all ingredients to the slow cooker.
  • Cook on low for 4 hours.
  • Stir and check seasoning before serving.

Notes

You can add fresh herbs for extra flavor.
Calories: 250kcal
Cost: $15
Course: Soup
Cuisine: American
Keyword: Turkey

Welcome to a culinary journey where flavor meets simplicity! In this article, we will dive deep into the delicious world of Spicy Honey Garlic Salmon. This dish is not just easy to prepare; it’s packed with a perfect blend of sweet and spicy flavors that will leave your taste buds dancing. Whether you’re a seasoned chef or a home cook, this recipe will become a staple in your kitchen. Let’s explore why this recipe is a must-try, the ingredients you need, and some expert tips to ensure your salmon turns out perfectly every time.

Why You’ll Love This Recipe

  • Quick Preparation: This dish can be on your table in under 30 minutes, making it ideal for busy weeknights.
  • Flavor Explosion: The combination of honey, garlic, and spices creates a mouthwatering glaze that’s hard to resist.
  • Nutrient-Dense: Salmon is rich in Omega-3 fatty acids, providing heart-healthy benefits while being delicious.
  • Versatile Dish: Perfect for any occasion, from casual family dinners to elegant gatherings.
  • Simple Ingredients: Most of the ingredients are pantry staples, so you won’t need to make a special trip to the store.

Gather The Ingredients

To create the perfect Spicy Honey Garlic Salmon, you will need the following ingredients:

  • 4 (8 oz) salmon fillets (center cuts)
  • 1 tbsp olive oil (light tasting)
  • 1 tsp smoked paprika (or normal paprika)
  • 1 tsp garlic powder
  • ¾ tsp fresh ground black pepper (more or less to taste)
  • ½ tsp cayenne pepper (optional, adjust for spice preference)
  • 3 tbsp honey
  • 4 cloves garlic (minced or chopped)
  • 1 tbsp rice vinegar
  • 1 tsp onion powder
  • ⅓ cup water or broth
  • ⅓ cup soy sauce (low-sodium)
  • ½ tsp chili flakes (optional)
  • 1 tbsp sesame oil
  • 2 tsp corn starch (for thickening the sauce)
  • 1 tsp ginger powder
  • Green onion (optional, for garnish)
  • Toasted sesame seeds (optional, for garnish)
  • Lemon wedges (optional, for serving)

Pro Tips for Perfect Salmon

  • Pat the Salmon Dry: Before seasoning, ensure the salmon fillets are patted dry to achieve a better sear.
  • Season Generously: Ensure you season both sides of the salmon well. It enhances the overall flavor.
  • Use a Hot Pan: Preheat your skillet before adding the salmon to get a perfect crust.
  • Baste for Flavor: During the cooking process, use a spoon to baste the salmon with the sauce; it adds moisture and flavor.
  • Check for Doneness: The salmon is done when it flakes easily with a fork and has an internal temperature of 145°F.
  • Let it Rest: Allow the salmon to rest for a couple of minutes before serving to retain juices.
  • Garnish for Presentation: Use sesame seeds and green onions to elevate the dish visually.
  • Pair with Sides: Consider serving with steamed vegetables or rice to complement the dish.

Common Mistakes and Troubleshooting

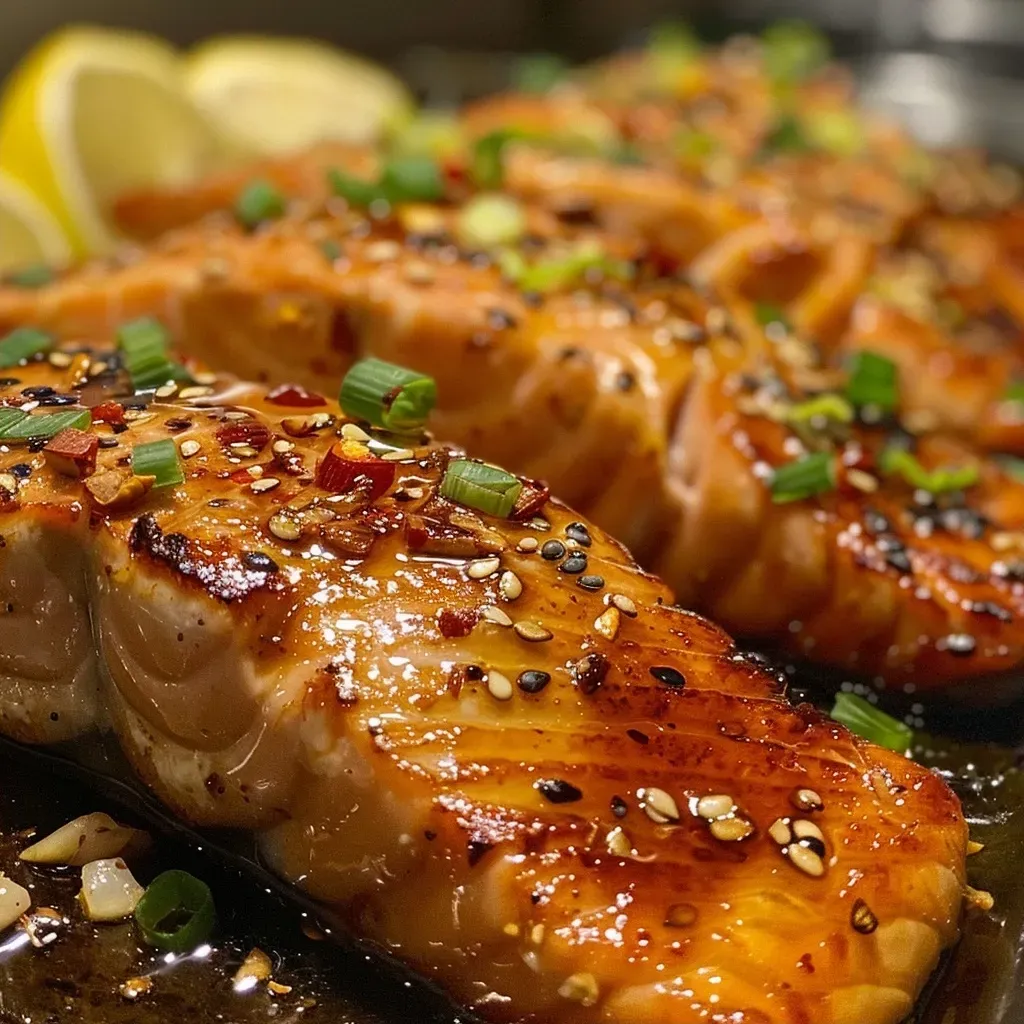
Close-up view of Spicy Honey Garlic Salmon garnished with sesame seeds and green onions.

Even the best chefs make mistakes! Here are some common pitfalls and how to avoid them:


Flexible Fish Spatula

★ Recommended Kitchen Tool

Flexible Fish Spatula

Make this recipe even easier with a quality Flexible Fish Spatula — a must-have kitchen staple!


🛒 See Deals on Amazon →

As an Amazon Associate, we earn from qualifying purchases.
  • Overcooking the Salmon: Watch the time closely; overcooked salmon can become dry. Keep an eye on the color and texture.
  • Inadequate Seasoning: Don’t skimp on spices! Proper seasoning enhances the flavors significantly.
  • Ignoring the Sauce: The sauce is key; make sure to simmer it down to your desired thickness for optimal flavor.
  • Not Preheating the Pan: A cold pan can lead to sticking and uneven cooking. Always preheat!

Variations to Try

Looking to shake things up? Here are some delicious variations to consider:

  • Maple Glazed Salmon: Substitute honey with maple syrup for a different sweet profile.
  • Spicy Sriracha Salmon: Add a tablespoon of sriracha to the sauce for an extra kick.
  • Lemon Garlic Salmon: Incorporate fresh lemon juice and zest for a refreshing twist.
  • Herb-Crusted Salmon: Add herbs like dill or parsley to the seasoning for an aromatic flavor.

Storage and Make-Ahead Instructions

This recipe can easily fit into your meal prep routine:

  • Storing Leftovers: Keep any leftover salmon in an airtight container in the fridge for up to 3 days.
  • Reheating: To reheat, place the salmon in a skillet over medium-low heat until warmed through, or in the microwave for a quick option.
  • Make-Ahead Option: Marinate the salmon in the sauce for up to 2 hours before cooking for enhanced flavor.

Comprehensive FAQ

Got questions? Here are some commonly asked questions about this recipe:

  • Can I use frozen salmon? Yes, but make sure to thaw it completely before cooking for even results.
  • What sides pair with this dish? Rice, quinoa, or steamed vegetables work wonderfully as sides.
  • Is this recipe gluten-free? Use gluten-free soy sauce or coconut aminos to make it gluten-free.
  • Can I use a different fish? Yes, this sauce works well with other fish like trout or tilapia.
  • How can I make it less spicy? Reduce or omit the cayenne pepper and chili flakes for a milder flavor.
  • How do I know when the salmon is done? It should flake easily with a fork and have an internal temperature of 145°F.
  • Can I make this in the oven? Yes, bake at 400°F for about 12-15 minutes, basting halfway through.
  • What if I don’t have rice vinegar? You can substitute it with apple cider vinegar or white wine vinegar.

Nutrition Tips and Dietary Adaptations

Here are some nutritional insights and adaptations:

  • Healthy Fats: Salmon is an excellent source of Omega-3 fatty acids, beneficial for heart health.
  • Low-Calorie Option: This dish is naturally low in calories and can be paired with low-calorie sides for a complete meal.
  • Dairy-Free: This recipe is inherently dairy-free, making it suitable for lactose-intolerant individuals.
  • Low-Carb Option: Pair with vegetables instead of grains for a low-carb meal.

Equipment Recommendations

For this recipe, you’ll need:

  • Skillet: A heavy-bottomed skillet is ideal for achieving a perfect sear.
  • Whisk: For mixing the marinade and sauce evenly.
  • Meat Thermometer: To check for doneness accurately.

Serving Suggestions

To elevate your dining experience:

  • Plate with Color: Serve with vibrant vegetables like asparagus or bell peppers for a colorful plate.
  • Garnish Creatively: Use fresh herbs or citrus slices for a pop of color and flavor.
  • Pair with Wine: A chilled white wine, such as Sauvignon Blanc, complements the dish beautifully.

Conclusion

This Spicy Honey Garlic Salmon recipe is more than just a meal; it’s a delightful experience that adds flavor and nutrition to your dining table. With the right ingredients, a few expert tips, and a bit of creativity, you can create a dish that impresses family and friends alike. So, roll up your sleeves and dive into this culinary adventure—thank you for joining me on this journey, and I can’t wait to hear how you enjoyed it!

Spicy Honey Garlic Salmon

Prep Time 10 minutes
Cook Time 10 minutes
Total Time 20 minutes
Servings 4 servings
Calories 350
A flavorful and easy-to-make salmon dish with a spicy honey garlic glaze, perfect for a quick dinner.

Ingredients

Salmon

  • 4 oz salmon fillets (center cuts)
  • 1 tbsp olive oil (light tasting)
  • 1 tsp smoked paprika (or normal paprika)
  • 1 tsp garlic powder
  • 0.75 tsp fresh ground black pepper (more or less to taste)
  • 0.5 tsp cayenne pepper (more or less to taste)
  • 3 tbsp honey
  • 4 cloves garlic (minced or chopped)
  • 1 tbsp rice vinegar
  • 1 tsp onion powder
  • 0.33 cup water or broth
  • 0.33 cup soy sauce (Low-sodium)
  • 0.5 tsp chili flakes (more or less to taste)
  • 1 tbsp sesame oil
  • 2 tsp corn starch
  • 1 tsp ginger powder

Green Onion (optional)

Toasted Sesame Seeds (optional)

Lemon wedges (optional)

Instructions 

  • Remove skin from salmon, slice into 8 oz. pieces, and pat dry.
  • Mix paprika, garlic powder, pepper, and cayenne; season both sides of salmon.
  • Whisk all sauce ingredients in a bowl and set aside.
  • Heat oil in skillet, sear salmon 4 minutes per side.
  • Pour sauce over salmon, simmer 2-3 minutes, basting until thickened.
  • Garnish with sesame seeds, green onion, and lemon wedges before serving.

Notes

Adjust spice levels to taste and serve with rice or vegetables for a complete meal.
Calories: 350kcal
Cost: $15
Course: Main Course
Cuisine: American
Keyword: Salmon

Welcome to a culinary journey that transforms your dinner into a delightful experience! With our High Protein Keto Garlic Mushroom Chicken Casserole, you’re not just preparing a meal; you’re creating a warm gathering around the table. This dish is perfect for those who want to indulge without the guilt, combining rich flavors and wholesome ingredients. Whether you’re following a keto diet or simply looking for a delicious way to enjoy chicken, this casserole has you covered.

In this comprehensive guide, we’ll explore everything you need to know about making this savory casserole, from ingredient breakdowns to expert tips. Let’s dive in!

Why You’ll Love This Recipe

This casserole isn’t just another chicken dish; it’s a crowd-pleaser that offers numerous benefits:


Air Fryer XL

★ Recommended Kitchen Tool

Air Fryer XL

Make this recipe even easier with a quality Air Fryer XL — a must-have kitchen staple!


🛒 Check Price on Amazon →

As an Amazon Associate, we earn from qualifying purchases.
  • High in Protein: Packed with chicken and cheese, this dish supports muscle growth and keeps you satisfied.
  • Keto-Friendly: With low-carb ingredients, it fits perfectly into your keto lifestyle.
  • Quick Preparation: This recipe can be ready in under an hour, making it perfect for a busy weeknight.
  • One-Pan Wonder: Less cleanup is always a win! You can cook everything in one baking dish.
  • Comfort Food: The creamy mushroom sauce gives you that warm and cozy feeling, making it ideal for family gatherings.

Ingredients You’ll Need

Here’s a detailed list of what you’ll need to make this delicious garlic mushroom chicken casserole:

  • 2 lbs boneless skinless chicken breasts, cut into 1-inch cubes
  • 16 oz cremini mushrooms, sliced
  • 4 cloves garlic, minced
  • 4 oz cream cheese, softened and cubed
  • 1/2 cup heavy whipping cream
  • 1/2 cup chicken bone broth
  • 2 cups fresh baby spinach
  • 1 1/2 cups shredded mozzarella cheese
  • 1/2 cup grated parmesan cheese
  • 2 tbsp olive oil
  • 1 tsp dried thyme
  • 1/2 tsp onion powder
  • 1/2 tsp sea salt
  • 1/2 tsp cracked black pepper

Step-by-Step Instructions

Let’s walk through the preparation of this mushroom chicken casserole step by step:

  1. Preheat the Oven: Set your oven to 375°F (190°C) and lightly grease a 9×13 inch baking dish.
  2. Season the Chicken: In a bowl, season the cubed chicken with salt, pepper, and onion powder.
  3. Sear the Chicken: Heat 1 tablespoon of olive oil in a large skillet over medium-high heat. Sear the chicken until browned on all sides (approximately 6-8 minutes). Transfer the chicken to the prepared baking dish.
  4. Sauté the Mushrooms: In the same skillet, add the remaining tablespoon of olive oil and the sliced mushrooms. Sauté for 8-10 minutes until the mushrooms release their moisture and turn golden brown.
  5. Add Garlic and Thyme: Stir in the minced garlic and dried thyme to the mushrooms and cook for 1 minute until fragrant.
  6. Make the Sauce: Reduce heat to medium. Add the chicken bone broth, heavy cream, and cubed cream cheese. Whisk continuously until the cream cheese is fully melted and the sauce is thickened and smooth.
  7. Add Spinach: Incorporate the fresh baby spinach into the skillet and stir until just wilted (about 1-2 minutes).
  8. Combine and Bake: Pour the mushroom and cream sauce over the chicken in the baking dish. Toss gently to ensure even distribution. Top with shredded mozzarella and grated parmesan cheese. Bake for 20-25 minutes until the sauce is bubbling and the cheese topping is golden brown.
  9. Rest and Serve: Let the casserole rest for 5 minutes before serving. Enjoy your delicious creation!

Pro Tips for Best Results

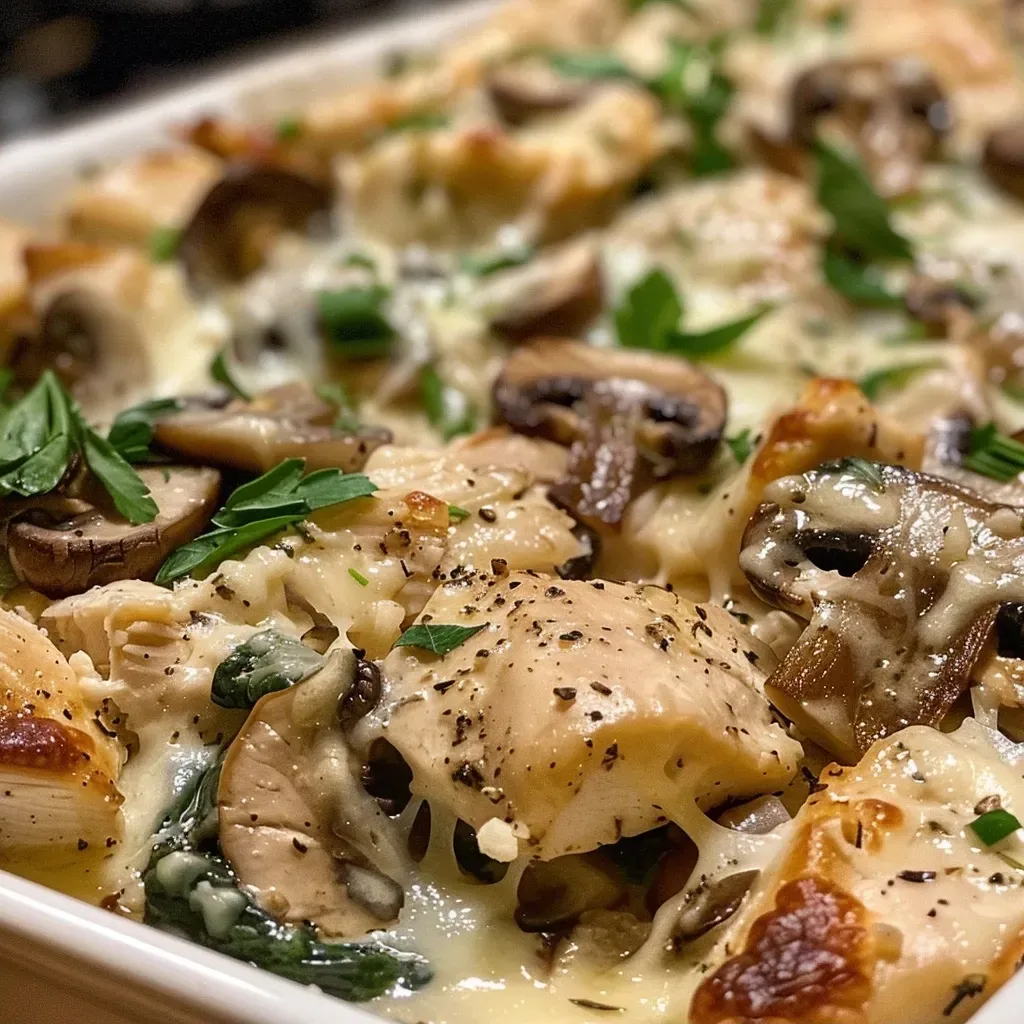
Close-up of a high protein keto garlic mushroom chicken casserole with melted cheese on top.

Here are some expert insights to elevate your casserole game:

  • Use Fresh Ingredients: Fresh mushrooms and spinach make a noticeable difference in flavor.
  • Don’t Rush the Searing: Properly browning the chicken adds depth to the overall flavor.
  • Experiment with Cheeses: While mozzarella and parmesan are classic, feel free to try gouda or cheddar for a twist.
  • Let It Rest: Allowing the casserole to rest enhances the flavors and makes serving easier.
  • Pair with a Salad: A fresh green salad balances the richness of the casserole.
  • Make-Ahead Option: Assemble the casserole a day ahead and bake it right before serving.
  • Check for Doneness: Ensure chicken reaches an internal temperature of 165°F (74°C).
  • Adjust Seasonings: Taste your sauce before pouring it over the chicken to adjust the flavor to your liking.

Common Mistakes and Troubleshooting

Even the best of us make mistakes in the kitchen. Here’s how to avoid common pitfalls:

  • Overcrowding the Pan: If your skillet is too crowded when searing chicken, it may steam instead of brown.
  • Not Enough Sauce: If your casserole seems dry, you may not have added enough liquid. Adjust as needed.
  • Burnt Cheese Topping: If the cheese browns too quickly, cover the dish with foil halfway through baking.
  • Undercooked Chicken: Always check the internal temperature to ensure food safety.
  • Too Much Spinach: While spinach wilts down significantly, adding too much can make the casserole watery.

Variations to Try

Feel free to experiment with these variations to add your unique twist:

  • Cheesy Spinach and Artichoke: Add chopped artichoke hearts and extra cream cheese for a rich variation.
  • Spicy Kick: Incorporate diced jalapeños or red pepper flakes into the sauce for a spicy version.
  • Mushroom Medley: Use a mix of different mushrooms like shiitake, portobello, and button for enhanced flavor.
  • Veggie-Loaded: Add zucchini or bell peppers along with the mushrooms for added nutrition.

Storage and Make-Ahead Instructions

Planning ahead? Here are some tips for storage and make-ahead:

  • Refrigeration: Store leftovers in an airtight container in the refrigerator for up to 3 days.
  • Freezing: This casserole freezes well. Allow it to cool completely before transferring to a freezer-safe container. It can last up to 2 months.
  • Reheating: To reheat, thaw in the refrigerator overnight and bake at 350°F (175°C) until heated through.
  • Make-Ahead: Assemble the casserole the night before and store it in the refrigerator. Bake it fresh when ready to serve.

Frequently Asked Questions

Here are some common questions about the keto garlic mushroom chicken casserole:

  • Can I use cooked chicken instead of raw? Yes, just reduce the baking time as you’re only warming it through.
  • Is this casserole gluten-free? Yes, all ingredients are naturally gluten-free.
  • How can I make this dish dairy-free? Substitute cream cheese with a dairy-free alternative and use coconut cream instead of heavy cream.
  • What side dishes pair well with this casserole? A simple green salad or roasted vegetables complement this dish perfectly.
  • Can I prepare this dish ahead of time? Yes, you can assemble it the night before and bake it fresh.
  • What if my sauce is too thin? Simmer it longer to thicken, or add a cornstarch slurry to help it set.
  • Is this recipe suitable for meal prep? Absolutely! It makes for great leftovers.
  • Can I add different vegetables? Yes, feel free to add any veggies you love!

Nutritional Tips and Dietary Adaptations

This casserole is not only delicious but also nutritious. Here are some tips to enhance its health benefits:

  • Protein Boost: Consider adding a scoop of protein powder to the cream sauce for an extra protein kick.
  • Vegan Option: Substitute chicken with chickpeas or tofu and use vegan cream cheese.
  • Low Sodium: Use low-sodium broth to control salt levels.
  • Increased Fiber: Add lentils or beans to the casserole for additional fiber content.

Equipment Recommendations

Make sure you have the right tools for the job:

  • Large Skillet: Ideal for searing chicken and sautéing vegetables.
  • Baking Dish: A 9×13 inch baking dish is perfect for this casserole.
  • Whisk: Essential for creating a smooth and creamy sauce.
  • Cutting Board and Knife: For prepping your ingredients efficiently.

Serving Suggestions

This garlic mushroom chicken casserole is delicious on its own but can be paired with:

  • Cauliflower Rice: A low-carb alternative to traditional rice.
  • Garlic Bread: For those who want to indulge a little more.
  • Steamed Vegetables: A side of green beans or broccoli adds freshness and color.

Conclusion

In conclusion, the High Protein Keto Garlic Mushroom Chicken Casserole is not just a meal; it’s a way to bring family and friends together. With its hearty flavors and nutritious ingredients, it’s a dish that feels good to eat and share. Whether you’re a seasoned cook or a beginner, this recipe is simple enough to follow and impressive enough to serve at gatherings. So, roll up your sleeves and enjoy the cooking process, knowing that a delightful meal awaits you. Happy cooking!

High Protein Keto Garlic Mushroom Chicken Casserole

Prep Time 15 minutes
Cook Time 25 minutes
Total Time 40 minutes
Servings 4 servings
Calories 650
A delicious low-carb, high-protein casserole combining tender chicken, savory mushrooms, and cheesy goodness, perfect for a keto-friendly meal.

Ingredients

Protein

  • 2 lbs boneless skinless chicken breasts (cut into 1-inch cubes)

Vegetables

  • 16 oz cremini mushrooms (sliced)
  • 4 cloves garlic (minced)

Dairy

  • 4 oz cream cheese (softened and cubed)
  • 1/2 cup heavy whipping cream
  • 1/2 cup chicken bone broth

Cheese

  • 1 1/2 cups shredded mozzarella cheese
  • 1/2 cup grated parmesan cheese

Oils & Seasonings

  • 2 tbsp olive oil
  • 1 tsp dried thyme
  • 1/2 tsp onion powder
  • 1/2 tsp sea salt
  • 1/2 tsp cracked black pepper

Instructions 

  • Preheat oven to 375°F (190°C). Season chicken with salt, pepper, and onion powder.
  • Sear chicken in 1 tbsp olive oil until browned, then transfer to baking dish.
  • Sauté mushrooms in remaining olive oil until golden, add garlic and thyme, cook 1 min.
  • Stir in broth, cream, and cream cheese; cook until thickened. Add spinach and wilt.
  • Pour sauce over chicken, top with cheeses, and bake 20-25 mins until bubbly and golden.

Notes

For extra flavor, sprinkle with fresh herbs before serving.
Calories: 650kcal
Cost: $15
Course: Main Course
Cuisine: keto
Keyword: Cheese, Chicken, Mushrooms

Indulge in a Creamy Keto Shrimp & Cheese Casserole

Welcome to the delicious world of keto cooking, where indulgence meets health! Today, I’m excited to share my take on a Keto Shrimp & Cheese Casserole that’s not just low-carb but also bursting with flavor. This dish perfectly marries the sweetness of succulent shrimp with the creaminess of rich cheeses, all while keeping your dietary goals in check. Whether you’re a seasoned chef or a beginner in the kitchen, this recipe is designed to inspire confidence and creativity.

In the following sections, I’ll guide you through this wonderful recipe, sharing tips, variations, and everything you need to know to make this comforting casserole a staple in your home. Let’s dive in!

Why You’ll Love This Recipe

  • Quick and Easy Preparation: This casserole comes together in just 30 minutes, making it perfect for busy weeknights.
  • One-Dish Wonder: Enjoy the convenience of minimal cleanup with everything baked in one dish.
  • Rich and Creamy: The blend of cheeses creates a deeply satisfying sauce that pairs perfectly with shrimp.
  • Customizable: You can easily switch out ingredients based on your preferences or what you have on hand.
  • Kid-Friendly: Even picky eaters will love this dish, making it a great choice for family dinners.

Ingredient Breakdown

Before we get cooking, let’s take a closer look at the ingredients that make this casserole so special:


Seafood Scissors

★ Recommended Kitchen Tool

Seafood Scissors

Make this recipe even easier with a quality Seafood Scissors — a must-have kitchen staple!


🛒 Check Price on Amazon →

As an Amazon Associate, we earn from qualifying purchases.
  • Shrimp (raw, peeled & deveined – 1½ lbs (680 g)): The star of the dish! Fresh shrimp gives the best flavor and texture.
  • Heavy cream – 1 cup (240 ml): Adds a luxurious creaminess to the sauce.
  • Cream cheese (softened – 4 oz (113 g)): This helps create a thick, rich sauce that clings to the shrimp.
  • Mozzarella (shredded – 1½ cups (170 g)): Melts beautifully and adds a stretchy, gooey texture.
  • Cheddar (shredded – ½ cup (55 g)): A sharp flavor that complements the creaminess.
  • Parmesan (grated – ¼ cup (25 g)): Adds a savory depth to the sauce.
  • Garlic (minced – 2 cloves): Essential for flavor; it brings everything together.
  • Salt – ½ teaspoon
  • Black pepper – ½ teaspoon
  • Garlic powder – ½ teaspoon
  • Smoked paprika – ¼ teaspoon: Smoky flavor that enhances the dish.
  • Optional chili flakes – ¼ teaspoon: For a little heat, if desired.

Substitutions & Adjustments

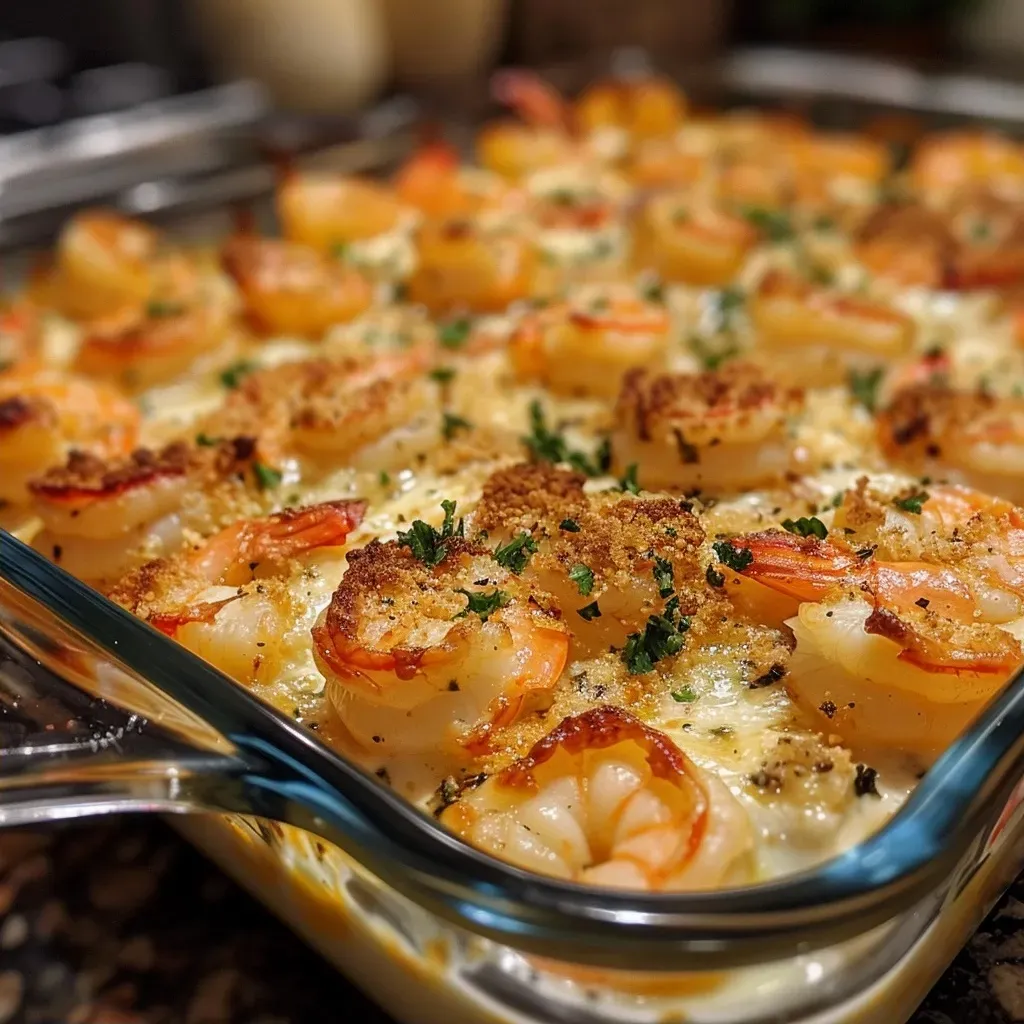
Close-up shot of a creamy Keto Shrimp & Cheese Casserole with melted cheese on top.

Don’t have all the ingredients? Here are some substitutions:

  • Seafood Variety: Substitute shrimp with scallops or crab for a different seafood experience.
  • Low-Fat Options: Use low-fat cream cheese or half-and-half if you want to reduce calories.
  • Vegetable Add-Ins: Spinach, mushrooms, or zucchini can be added for extra nutrients.
  • Cheese Variations: Experiment with different cheese blends, like Gouda or Gruyère, for unique flavors.

How to Make Keto Shrimp & Cheese Casserole

Ready to get started? Follow these simple steps to create your casserole:

  1. Pat the shrimp dry with paper towels, then season them with salt, black pepper, garlic powder, and smoked paprika. Heat a skillet over medium heat and add a bit of butter or oil. When hot, add the shrimp in a single layer and cook for 1-2 minutes per side until they turn pink. Remove them from the skillet and set aside.
  2. In a mixing bowl, combine the softened cream cheese and heavy cream. Whisk until smooth, then stir in the shredded mozzarella, cheddar, Parmesan, minced garlic, and remaining seasonings until fully combined into a creamy sauce.
  3. Lightly grease a baking dish and spread the partially cooked shrimp evenly across the bottom. Pour the cheese sauce over the shrimp, ensuring they are well coated.
  4. Bake in a preheated oven at 375°F (190°C) for 20-25 minutes, or until the casserole is bubbling and lightly golden on top. The shrimp should be fully cooked but still tender.
  5. Let the casserole rest for 5-10 minutes before serving to allow the sauce to thicken and cling to the shrimp.

Pro Tips for Success

  • Use Fresh Shrimp: Fresh shrimp provides better flavor and texture than frozen.
  • Don’t Overcook Shrimp: They will finish cooking in the oven; remove them while they’re still slightly underdone.
  • Rest Before Serving: Allow the casserole to rest; it enhances flavor and makes serving easier.
  • Experiment with Cheese: Different cheeses can change the flavor profile dramatically; don’t hesitate to try new combinations!
  • Garnish for Presentation: Adding fresh herbs like parsley or chives before serving can elevate the dish visually.
  • Adjust Spices to Taste: Feel free to increase or decrease the spices based on your preference for heat and flavor.
  • Meal Prep Friendly: This casserole can be made ahead and stored in the fridge before baking.
  • Perfect for Leftovers: Reheat in the oven or microwave for a quick meal the next day.

Common Mistakes to Avoid

Here are some common pitfalls to watch out for:

  • Not Drying Shrimp: Make sure the shrimp are dry before seasoning to help them sear properly.
  • Overbaking: Keep an eye on the casserole; overbaking can lead to tough shrimp.
  • Skipping the Resting Time: This step is crucial for the sauce to thicken and enhance flavors.

Variations to Try

Your creativity can shine through with these variations:

  • Spicy Version: Add diced jalapeños or more chili flakes for an extra kick.
  • Vegetarian Option: Replace shrimp with sautéed vegetables like bell peppers and broccoli.
  • Cheesy Spinach Casserole: Mix in fresh spinach for added nutrition and color.
  • Herb Infusion: Add fresh or dried herbs like thyme, oregano, or basil to the cheese sauce for additional aroma and flavor.

Storage and Make-Ahead Instructions

Planning ahead? Here’s how to store and prepare this dish:

  • Refrigeration: Store leftovers in an airtight container for up to 3 days.
  • Freezing: You can freeze the unbaked casserole for up to 2 months. Thaw overnight in the fridge before baking.
  • Reheating: Reheat in the oven at 350°F (175°C) until warmed through or in the microwave for a quicker option.

Comprehensive FAQ

Here are some common questions about this dish:

  • Can I make this casserole dairy-free? Yes, substitute the cream and cheeses with dairy-free alternatives.
  • What can I serve with this casserole? A simple side salad or steamed vegetables pairs well.
  • Is this recipe suitable for meal prep? Absolutely! It’s great for preparing ahead of time.
  • Can I use frozen shrimp? Yes, but make sure to thaw and dry them thoroughly before use.
  • What’s the best way to store leftovers? In an airtight container in the refrigerator for up to 3 days.
  • How can I adjust the spice level? Increase or decrease the amount of chili flakes or paprika as preferred.
  • Is this casserole keto-friendly? Yes, it’s low in carbs while being rich in healthy fats.
  • Can I add other proteins? Definitely! Chicken or fish can be great alternatives.

Nutrition Tips and Dietary Adaptations

This casserole is not only delicious but also packed with nutritional benefits:

  • Protein Power: With shrimp as the main ingredient, you’re getting a good dose of lean protein.
  • Healthy Fats: The cheeses and heavy cream provide healthy fats essential for a keto diet.
  • Low-Carb Delight: Each serving is low in carbs, making it suitable for a keto lifestyle.

Equipment Recommendations

Before you start cooking, here are some essential tools:

  • Skillet: For sautéing shrimp and mixing ingredients.
  • Baking Dish: Choose a medium-sized dish to hold all the ingredients.
  • Mixing Bowl: A large bowl for combining the cheese sauce ingredients.
  • Whisk: For achieving a smooth cheese sauce.

Serving Suggestions

This casserole is versatile, so here are some serving ideas:

  • Garnish: Add fresh herbs like parsley or chives for a pop of color.
  • Side Salad: Serve with a fresh green salad for a balanced meal.
  • Low-Carb Bread: Pair with keto-friendly bread or rolls to soak up the sauce.

In conclusion, my Keto Shrimp & Cheese Casserole is a delightful dish that you can enjoy without guilt. It’s rich in flavor, quick to prepare, and perfect for the whole family. I hope you find joy in making and sharing this recipe as much as I do. Happy cooking!

Keto Shrimp & Cheese Casserole Recipe

Prep Time 10 minutes
Cook Time 25 minutes
Total Time 35 minutes
Servings 4 servings
Calories 550
A delicious low-carb casserole combining tender shrimp with a rich, cheesy sauce, perfect for a satisfying keto meal.

Ingredients

Shrimp

  • 1.5 lbs Shrimp (raw, peeled & deveined)

Dairy

  • 1 cup Heavy cream
  • 4 oz Cream cheese (softened)
  • 1.5 cups Mozzarella (shredded)
  • 0.5 cup Cheddar (shredded)
  • 0.25 cup Parmesan (grated)

Seasonings

  • 2 cloves Garlic (minced)
  • 0.5 teaspoon Salt
  • 0.5 teaspoon Black pepper
  • 0.5 teaspoon Garlic powder
  • 0.25 teaspoon Smoked paprika
  • 0.25 teaspoon Optional chili flakes

Instructions 

  • Pat shrimp dry, season with salt, pepper, garlic powder, and paprika. Sauté in butter until pink, then set aside.
  • Mix cream cheese, heavy cream, shredded cheeses, garlic, and seasonings until smooth.
  • Spread partially cooked shrimp in a greased baking dish, pour cheese sauce over evenly.
  • Bake at 375°F (190°C) for 20–25 minutes until bubbling and golden.
  • Rest for 5–10 minutes before serving to allow sauce to thicken.

Notes

Ensure not to overcook the shrimp initially; they will finish cooking in the oven.
Calories: 550kcal
Cost: $15
Course: Main Course
Cuisine: American
Keyword: Cheese, Keto, shrimp

Transform Your Lunch: The Ultimate Vegetarian Sandwich Recipe

Are you ready to elevate your lunchtime game? This vegetarian sandwich is not just a meal; it’s a delicious embrace of flavors and textures that will leave you feeling satisfied and energized. With a base of whole grain bread, creamy mashed avocado, and a vibrant medley of fresh veggies, this sandwich is a perfect fit for anyone seeking a healthy, plant-based option. Let’s dive into how to create a sandwich that’s not only nutritious but also bursting with fresh flavors!

Why You’ll Love This Recipe

This vegetarian sandwich offers a variety of benefits that make it a standout choice for any meal. Here are just a few reasons to get excited:

  • Quick and Easy: This sandwich can be prepared in under 15 minutes, making it an ideal option for busy days.
  • Nutritious Ingredients: Packed with vitamins, minerals, and healthy fats from the avocado and veggies, this sandwich supports your overall health.
  • Customizable: Feel free to swap out ingredients based on your preferences or what you have on hand!
  • Flavorful Layers: Each bite is a delightful combination of creamy, crunchy, and savory, making it satisfying and fun to eat.
  • Perfect for Meal Prep: This sandwich holds up well, making it a great option for lunches throughout the week.

Ingredient Breakdown

Let’s take a closer look at the ingredients that come together to create this tasty sandwich:


Vegetable Spiralizer

★ Recommended Kitchen Tool

Vegetable Spiralizer

Make this recipe even easier with a quality Vegetable Spiralizer — a must-have kitchen staple!


🛒 Shop This Tool →

As an Amazon Associate, we earn from qualifying purchases.
  • Whole Grain Bread: Provides fiber and nutrients. Any grain bread can work, including whole wheat or multigrain.
  • Avocado: A creamy base that adds healthy fats. If you’re looking for a lower-calorie option, use less avocado or substitute with hummus.
  • Cucumber: Thinly sliced for crunch and hydration. Try pickled cucumbers for an extra zing!
  • Tomato: Adds sweetness and juiciness. Use heirloom varieties for a burst of flavor.
  • Spinach or Lettuce: Fresh greens for added nutrients. Kale or arugula can also be great substitutes.
  • Bell Pepper: Adds color and a sweet crunch. Feel free to mix colors for visual appeal.
  • Hummus: A flavorful spread that enhances the sandwich. Experiment with different flavors like roasted red pepper or garlic.
  • Salt and Pepper: Essential for seasoning. Don’t be shy—season to taste!
  • Optional Add-ins: Consider adding sliced red onion, sprouts, or even cheese for extra flavor and texture.

Step-by-Step Instructions

Close-up of a delicious vegetarian sandwich featuring whole grain bread with fresh vegetables.

Follow these simple steps to craft your perfect vegetarian sandwich:

  1. Prepare the Bread: Start by toasting the slices of whole grain bread until they reach your desired level of crispiness.
  2. Spread the Base: Generously spread mashed avocado on one slice of bread and hummus on the other.
  3. Layer the Veggies: On the avocado side, layer the sliced cucumber, tomato, spinach, and bell pepper. Don’t forget to season with salt and pepper!
  4. Top it Off: If desired, add optional ingredients like red onion or cheese for extra flavor.
  5. Close the Sandwich: Place the second slice of bread on top, hummus side down, and press gently.
  6. Slice and Serve: Cut the sandwich in half and serve immediately, or wrap it up for later enjoyment.

Pro Tips for the Perfect Vegetarian Sandwich

To ensure your sandwich is not only good but great, keep these expert tips in mind:

  • Use Fresh Ingredients: Fresh veggies will enhance flavor and texture significantly.
  • Toast the Bread: Toasting adds a delightful crunch and prevents sogginess.
  • Mix Your Spreads: Combine hummus with mustard or pesto for a unique flavor twist.
  • Layer Smartly: Alternate between wet and dry ingredients to maintain balance and prevent sogginess.
  • Experiment with Spices: Adding spices like paprika or cumin to your veggies can elevate the flavor profile.
  • Keep it Colorful: A variety of colors not only looks appealing but also indicates a range of nutrients.
  • Wrap It Right: If you’re taking it to go, wrap it tightly to keep it fresh.
  • Try Different Breads: Switch it up by using pita, a baguette, or even a tortilla.

Common Mistakes and Troubleshooting

Even the best recipes can hit a snag. Here’s how to troubleshoot common issues:

  • Soggy Sandwich: Toasting your bread and layering wet ingredients strategically can help avoid this.
  • Too Much Avocado: Balance is key. If the sandwich feels too heavy, reduce the amount of avocado or spread it thinner.
  • Not Enough Flavor: Always taste as you go. Adjust seasonings and spreads to your liking.
  • Ingredients Falling Out: Layer your ingredients thoughtfully and press down gently to keep everything in place.

Variations to Try

Feeling adventurous? Here are some delicious variations to try:

  • Italian Caprese: Substitute mozzarella for hummus and add fresh basil and balsamic glaze.
  • Spicy Southwest: Add sliced jalapeños, black beans, and corn to give it a kick.
  • Greek Delight: Use feta cheese, olives, and tzatziki sauce for a Mediterranean twist.
  • Breakfast Sandwich: Add scrambled eggs or tofu and top with salsa for a hearty breakfast option.

Storage and Make-Ahead Instructions

This vegetarian sandwich can be made ahead of time for convenience:

  • Refrigeration: Store in an airtight container for up to 2 days. Keep the ingredients separate if possible.
  • Freezing: While not recommended for the entire sandwich, you can freeze components like bread and hummus separately.
  • Make-Ahead: Pre-slice vegetables and store them in the fridge to speed up the assembly process.

Comprehensive FAQ

Here are some frequently asked questions to help you get the most out of this recipe:

  • Can I use gluten-free bread? Absolutely! Feel free to substitute with any gluten-free bread of your choice.
  • How do I keep my sandwich from getting soggy? Toast the bread and layer wet ingredients strategically to maintain texture.
  • What can I use instead of avocado? If you’re looking for a lower-calorie option, try hummus or a nut-based spread.
  • Can I add protein to this sandwich? Yes! Consider adding chickpeas, tofu, or tempeh for a protein boost.
  • How long does the sandwich last in the fridge? It’s best enjoyed within 2 days for optimal freshness.
  • What’s the best way to slice the sandwich? Cut diagonally for a more appealing presentation.
  • Can I use different veggies? Absolutely! Get creative with your favorite veggies.
  • Is this sandwich kid-friendly? Yes! Kids will love the colors and flavors, plus it’s a great way to sneak in some veggies.

Nutrition Tips and Dietary Adaptations

This vegetarian sandwich can easily fit into various dietary needs:

  • Vegan: Ensure all spreads and add-ins are plant-based.
  • Low-Carb: Use lettuce wraps instead of bread for a lighter option.
  • High-Protein: Incorporate protein-rich ingredients like beans or a protein-rich spread.
  • Low-Fat: Use less avocado and choose lighter spreads.

Equipment Recommendations

To make your sandwich preparation seamless, here are a few tools you might find helpful:

  • Sharp Knife: For clean slicing of veggies and bread.
  • Toaster or Pan: For toasting the bread to perfection.
  • Cutting Board: Essential for safe and easy preparation.
  • Storage Container: To keep your sandwich fresh if you’re on the go.

Serving Suggestions

Pair your vegetarian sandwich with these delightful options for a complete meal:

  • Side Salad: A light salad with a vinaigrette complements the sandwich beautifully.
  • Chips or Veggie Sticks: For a crunchy side, consider baked chips or fresh veggie sticks.
  • Soup: A warm bowl of soup can make for a comforting pairing.
  • Fruit Salad: Fresh fruits add a sweet contrast to the savory sandwich.

In conclusion, crafting the ultimate vegetarian sandwich is not only simple but also an opportunity to explore a world of flavors and textures. With this comprehensive guide, you have the tools and inspiration to create a delicious, satisfying meal that fits seamlessly into your lifestyle. Enjoy your journey into the delightful world of vegetarian cuisine!

Vegetarian Sandwich

Prep Time 10 minutes
Cook Time 5 minutes
Total Time 15 minutes
Servings 1 serving
Calories 350
A fresh and healthy vegetarian sandwich packed with colorful veggies and creamy spreads, perfect for a quick lunch.

Ingredients

Bread

  • 2 slices whole grain bread
  • 0.5 avocado avocado, mashed
  • 0.25 cucumber cucumber, thinly sliced
  • 1 tomato tomato, sliced
  • 1 handful spinach or lettuce
  • 0.25 bell pepper bell pepper, sliced
  • 2 tbsp hummus or your choice of spread
  • 1 to taste salt and pepper
  • 1 optional sliced red onion, sprouts, or cheese (for extra flavor)

Instructions 

  • Toast the bread slices to your desired crispiness.
  • Spread mashed avocado on one slice and hummus on the other.
  • Layer cucumber, tomato, spinach, and bell pepper on the avocado side; season with salt and pepper.
  • Add optional ingredients if desired, then place the second slice on top.
  • Cut in half and serve immediately or wrap for later.

Notes

Feel free to customize with your favorite veggies or spreads.
Calories: 350kcal
Cost: $8
Course: Lunch
Cuisine: Vegetarian
Keyword: Vegetables

Transform Your Leftovers with This Delicious Turkey Casserole

Are you looking for a comforting way to use up those turkey leftovers? This turkey casserole recipe is the answer! Packed with flavor and easy to make, it’s perfect for family dinners or cozy nights at home. In just under an hour, you can create a creamy, cheesy dish that will have everyone asking for seconds. Let’s dive into the details and discover why this recipe will become a staple in your kitchen.

Why You’ll Love This Recipe

This turkey casserole is not just another meal; it’s a culinary embrace that brings warmth and joy to the table. Here are five reasons to love it:

  • Quick and Easy: With simple ingredients and straightforward steps, you can whip this up in no time, making it ideal for weeknight dinners.
  • Comfort Food Classic: Combining turkey, pasta, and cheese creates a dish that feels like a warm hug, perfect for chilly evenings.
  • Versatile Ingredients: Use what you have in your fridge—whether it’s different veggies or types of cheese, this casserole adapts to your pantry.
  • Family-Friendly: Kids and adults alike will enjoy this dish, making it a hit for family gatherings or casual get-togethers.
  • Great for Leftovers: This recipe is specifically designed to make the most of your leftover turkey, reducing waste and maximizing flavor.

Ingredients You’ll Need

To create this scrumptious turkey casserole, gather the following ingredients:


Meal Prep Container Set

★ Recommended Kitchen Tool

Meal Prep Container Set

Make this recipe even easier with a quality Meal Prep Container Set — a must-have kitchen staple!


🛒 See Deals on Amazon →

As an Amazon Associate, we earn from qualifying purchases.
  • 3 cups | 9 ounce | 280 grams dry pasta (I used Fusilli, but you can also try penne or macaroni)
  • 1 teaspoon extra virgin olive oil
  • 1 cup | 2 small carrots (peeled and diced)
  • 1 small onion (peeled and diced)
  • 2 garlic cloves (peeled and minced)
  • 1 teaspoon dried oregano
  • 1 teaspoon dried thyme
  • 1 teaspoon dried parsley
  • 3 tablespoons tomato paste
  • 1 cup | 250 ml Half and Half
  • 2 ¼ cups | 400 g turkey leftovers or shredded turkey
  • Sea salt and black pepper (to taste)
  • 2 cups | 225 g mozzarella cheese

Smart Substitutions to Consider

Juicy turkey casserole with melted cheese and pasta, seen from the side.

If you don’t have all the ingredients on hand, here are some substitutions you can make:

  • **Pasta**: Use any short pasta, such as macaroni or rotini, for a different texture.
  • **Half and Half**: Substitute with heavy cream for a richer sauce or milk for a lighter version.
  • **Vegetables**: Feel free to add broccoli, spinach, or bell peppers to enhance the nutritional profile.
  • **Cheese**: Swap mozzarella for cheddar or a blend for varied flavors.

Step-by-Step Guide to Making Turkey Casserole

Follow these detailed steps for a flawless turkey casserole:

  1. Preheat the oven: Set your oven to 395°F (200°C) and grease a 9×13 baking dish.
  2. Cook the pasta: Boil a large pot of salted water and cook your pasta to al dente. Once cooked, reserve 2 tablespoons of pasta water, then drain and rinse the pasta with cold water.
  3. Sauté the vegetables: In a large non-stick skillet, heat olive oil over medium heat. Add the diced carrots and onion, cooking until tender. Stir in the minced garlic and dried herbs, cooking for an additional minute.
  4. Make the sauce: Incorporate the tomato paste into the vegetable mixture, stirring well. Add the Half and Half along with the reserved pasta water. Bring to a gentle simmer, then reduce the heat to low.
  5. Combine ingredients: Add the cooked pasta and shredded turkey to the skillet, mixing everything until well combined. Season with salt and pepper to taste.
  6. Layer in the baking dish: Transfer half of the pasta mixture into the greased baking dish. Top with 1 cup of mozzarella cheese. Layer the remaining pasta over this and sprinkle with the remaining cheese.
  7. Bake: Place the dish in the oven and bake for about 25 minutes, or until the cheese is melted and lightly browned. Allow it to cool for 5 minutes before serving.

Pro Tips for Perfecting Your Casserole

Here are some expert insights to elevate your turkey casserole:

  • Use a mix of cheeses: Combining different cheeses like cheddar and mozzarella can enhance flavor and creaminess.
  • Don’t overcook the pasta: Cooking the pasta slightly under al dente ensures it doesn’t become mushy during baking.
  • Broil for a crispy top: For a golden finish, turn on the broiler for the last few minutes of cooking.
  • Let it rest: Allowing the casserole to sit for a few minutes after baking helps it set, making for easier serving.
  • Experiment with spices: Add a pinch of cayenne pepper or smoked paprika for an extra kick.
  • Make it a complete meal: Serve with a side salad or garlic bread to round out the meal.
  • Freeze for later: This casserole freezes well, so make a double batch for easy meals later on.
  • Use fresh herbs: If available, fresh herbs can add a vibrant flavor compared to dried.

Troubleshooting Common Mistakes

Even seasoned cooks can run into hiccups! Here’s how to avoid common pitfalls:

  • Too dry? Add a splash of broth or more Half and Half if the casserole seems dry after baking.
  • Flavorless? Ensure you season adequately, tasting as you go. Fresh herbs can also boost flavor significantly.
  • Soggy texture? Avoid overcooking the pasta and ensure you let the casserole cool slightly before serving.

Variations to Try

Mix things up with these tasty variations:

  • Turkey and Rice Casserole: Replace pasta with cooked rice for a different base.
  • Mexican Turkey Casserole: Add black beans, corn, and taco seasoning for a fiesta twist.
  • Vegetable-Loaded Casserole: Incorporate more veggies like zucchini and bell peppers for a nutrient boost.
  • Buffalo Turkey Casserole: Stir in some buffalo sauce for a spicy kick and top with blue cheese.

Storage and Make-Ahead Instructions

This turkey casserole is perfect for meal prep:

  • Refrigeration: Store leftovers in an airtight container in the fridge for up to 3 days.
  • Freezing: Freeze unbaked casserole for up to 3 months. Thaw in the refrigerator overnight before baking.
  • Reheating: Warm in the oven at 350°F (175°C) until heated through, about 20-25 minutes.

Frequently Asked Questions

Here are some common questions about making turkey casserole:

  • Can I use other meats? Yes, chicken or ham can easily replace turkey in this recipe.
  • What if I don’t have leftover turkey? You can use store-bought rotisserie chicken as a convenient alternative.
  • Can I make this casserole ahead of time? Absolutely! Assemble the casserole and refrigerate it overnight before baking.
  • Is this casserole gluten-free? By using gluten-free pasta, you can easily adapt this recipe to be gluten-free.
  • Can I add more vegetables? Yes, feel free to incorporate any vegetables you enjoy.
  • How do I know when it’s done baking? When the cheese is melted and bubbly, and golden brown on top, it’s ready!
  • Can I double the recipe? Yes, just use a larger baking dish and adjust the cooking time as needed.
  • What sides pair well with this casserole? A fresh salad or garlic bread complements this dish beautifully.

Nutritional Tips and Dietary Adaptations

This casserole can fit various dietary needs:

  • Low-Calorie Option: Substitute whole grain pasta and use low-fat cheese.
  • Vegetarian Version: Replace turkey with a hearty mix of beans and vegetables.
  • Dairy-Free Adaptation: Use plant-based cheese and milk alternatives to make this dish dairy-free.

Equipment Recommendations

Here’s what you’ll need to make this recipe:

  • Large pot: For boiling pasta.
  • Non-stick skillet: Ideal for sautéing vegetables and making the sauce.
  • 9×13 baking dish: Perfect size for baking your casserole.
  • Measuring cups and spoons: Essential for accurate ingredient measurements.

Serving Suggestions

For a complete meal, consider pairing your turkey casserole with:

  • Fresh Garden Salad: A light salad with vinaigrette balances the richness of the casserole.
  • Garlic Bread: Crunchy garlic bread adds a delicious touch.
  • Steamed Vegetables: Simple steamed broccoli or green beans for extra nutrients.

Final Thoughts

This cozy turkey casserole is a fantastic way to transform your leftovers into something truly special. It’s easy to make, packed with flavor, and perfect for any occasion. So, gather your ingredients, follow these steps, and enjoy a dish that brings warmth and comfort to your table. Happy cooking!

Turkey Casserole

Prep Time 15 minutes
Cook Time 25 minutes
Total Time 40 minutes
Servings 6 servings
Calories 650
A hearty and cheesy turkey casserole perfect for using leftovers and satisfying the whole family.

Ingredients

Pasta

  • 3 cups dry pasta (Fusilli)
  • 1 teaspoon extra virgin olive oil
  • 1 cup diced carrots
  • 1 small onion (peeled and diced)
  • 2 cloves garlic (peeled and minced)
  • 1 teaspoon dried oregano
  • 1 teaspoon dried thyme
  • 1 teaspoon dried parsley
  • 3 tablespoons tomato paste
  • 1 cup Half and Half
  • 2.25 cups shredded turkey or leftovers
  • to taste sea salt sea salt
  • to taste black pepper black pepper
  • 2 cups mozzarella cheese

Instructions 

  • Cook pasta in salted boiling water until al dente, then drain and rinse with cold water.
  • Sauté carrots and onion in olive oil until tender, then add garlic and herbs. Stir in tomato paste.
  • Add Half and Half and reserved pasta water, simmer briefly.
  • Mix in pasta and turkey, season with salt and pepper.
  • Layer half of the mixture in a baking dish, sprinkle with cheese, then add remaining pasta and cheese. Bake at 395°F (200°C) for 25 minutes.

Notes

Use leftover turkey for best flavor. Adjust seasoning to taste.
Calories: 650kcal
Cost: $15
Course: Main Course
Cuisine: American
Keyword: Turkey