Author

Mike

Browsing

Welcome to the Ultimate Guide on Easy Hamburger Steak with Savory Brown Gravy

When it comes to comfort food, few dishes rival the hearty appeal of hamburger steak with brown gravy. This classic meal strikes the perfect balance between simplicity and flavor, making it an ideal choice for weeknight dinners or special gatherings. In this comprehensive guide, we’ll explore everything you need to know about making tender hamburger steaks, from ingredient selections to cooking techniques, ensuring your dish is not only delicious but also a family favorite.

Why You’ll Love This Recipe

  • Quick and Easy: This recipe takes about 30 minutes from start to finish, making it perfect for busy weeknights.
  • Comforting Flavor: The rich, savory gravy complements the juicy hamburger steaks, creating a dish that warms the soul.
  • Versatile Ingredients: You likely have many of the ingredients already in your pantry, making it a convenient choice.
  • Customizable: You can easily adapt the recipe with your favorite seasonings and sides!
  • Family-Friendly: It’s a hit with both kids and adults, ensuring everyone at the table is happy.

Ingredient Breakdown

Understanding your ingredients is key to culinary success. Let’s look at what you’ll need for this recipe and some helpful substitutions.

  • Ground Beef: Use 80/20 ground beef for the best flavor and juiciness. For a leaner option, 90/10 ground beef can be used, but it may lack some richness.
  • Breadcrumbs: These help bind the patties. If you’re gluten-free, substitute with crushed gluten-free crackers or oats.
  • Onion: Fresh onion adds a lot of flavor. You can substitute with onion powder if you’re in a pinch.
  • Beef Broth: For the gravy, homemade broth is ideal, but store-bought works just fine. For a richer flavor, you can use low-sodium beef broth.
  • Seasonings: Salt, pepper, and garlic powder are essentials. Feel free to add Worcestershire sauce for an extra depth of flavor.

Step-by-Step Instructions

Now, let’s get into the nitty-gritty of creating this delicious dish.

  • 1. Prepare the Beef Patties: In a large bowl, combine ground beef, breadcrumbs, finely chopped onion, garlic powder, salt, and pepper. Mix gently until just combined. Shape into patties, about 1/2 inch thick.
  • 2. Cook the Patties: Heat a skillet over medium-high heat with a little oil. Add the patties and cook for about 4-5 minutes on each side or until they reach your desired doneness.
  • 3. Make the Gravy: Once the patties are cooked, remove them from the skillet and set aside. In the same skillet, add flour to the drippings and whisk to create a roux. Gradually add beef broth, whisking continuously until the gravy thickens.
  • 4. Combine: Return the hamburger steaks to the skillet, spooning the gravy over them. Allow to simmer for a few minutes to absorb the flavors.

Pro Tips for Perfect Hamburger Steaks

  • Don’t Overmix: When forming the patties, mix just enough to combine the ingredients. Overmixing can lead to tough burgers.
  • Let Them Rest: After cooking the patties, let them rest for a few minutes to retain their juices.
  • Adjust Thickness: If your gravy is too thick, add a splash of water or broth to reach your desired consistency.
  • Add Depth of Flavor: Consider adding a splash of soy sauce or a teaspoon of mustard to the gravy for a flavor boost.
  • Sear for Flavor: Ensure the skillet is hot enough before adding the patties to get a nice sear.
  • Use Fresh Herbs: Fresh parsley or thyme can enhance the gravy’s flavor, adding freshness.
  • Experiment with Spices: Don’t hesitate to add your favorite spices to the beef mixture, such as paprika or cayenne for a kick.
  • Portion Control: Use a kitchen scale to ensure even-sized patties for consistent cooking.

Common Mistakes and Troubleshooting

Even seasoned cooks can encounter issues. Here’s how to avoid common pitfalls:

  • Dry Patties: If your patties turn out dry, consider adding an egg to the mixture or using higher-fat ground beef.
  • Lumpy Gravy: If your gravy has lumps, whisk vigorously or blend it for a smooth texture.
  • Gravy Too Thin: If your gravy isn’t thickening, make sure to cook the roux until it’s golden before adding broth.
  • Flavorless Dish: Always taste your gravy and adjust seasoning before serving.

Variations to Try

Want to mix things up? Here are some variations to consider:

  • Mushroom Gravy: Add sautéed mushrooms to your gravy for an earthy flavor.
  • Cheesy Hamburger Steaks: Top your patties with cheese during the last minute of cooking for a melty finish.
  • Spicy Kick: Incorporate diced jalapeños into the beef mixture for some heat.
  • Herb-Infused: Experiment with different herbs like rosemary or oregano in the beef mix for a unique flavor.

Storage and Make-Ahead Instructions

This dish is great for meal prep! Here’s how to store and reheat:

  • Refrigeration: Store leftover hamburger steaks and gravy in an airtight container for up to 4 days.
  • Freezing: You can freeze cooked patties and gravy in a freezer-safe container for up to 3 months.
  • Reheating: Reheat in a skillet over medium heat or in the microwave until warmed through.

Comprehensive FAQ

Here are some common questions you might have:

  • Can I use turkey or chicken instead of beef? Yes, but be mindful of cooking times as poultry may cook faster.
  • What sides go well with hamburger steak? Mashed potatoes, green beans, or a simple side salad complement the dish beautifully.
  • How do I know when my patties are done? Use a meat thermometer; ground beef should reach an internal temperature of 160°F.
  • Can I make the gravy in advance? Yes, you can prepare the gravy ahead of time and reheat it when ready to serve.
  • What’s the best way to reheat leftovers? Reheat gently on the stovetop for the best texture.
  • Is this recipe gluten-free? By substituting breadcrumbs with gluten-free options, you can easily make it gluten-free.
  • Can I add vegetables to the gravy? Absolutely! Carrots and peas can make a delicious addition.
  • How do I store leftovers? Place them in an airtight container in the fridge for up to four days.

Nutrition Tips and Dietary Adaptations

This recipe can easily be adapted to fit various dietary needs:

  • Low-Carb: Skip the breadcrumbs and serve the patties with a side salad.
  • Dairy-Free: Use dairy-free butter and milk alternatives in the gravy.
  • Low-Sodium: Opt for low-sodium beef broth and limit added salt.

Equipment Recommendations

To achieve the best results, here are some kitchen essentials you may need:

  • Skillet: A heavy-bottomed skillet is ideal for even cooking.
  • Meat Thermometer: Essential for checking the doneness of your patties.
  • Whisk: For creating a smooth gravy.

Serving Suggestions

Here’s how to serve your delicious hamburger steak:

  • Plate it Up: Serve the hamburger steaks smothered in gravy over a bed of fluffy mashed potatoes.
  • Garnish: Sprinkle with fresh parsley for a pop of color and flavor.
  • Pair with Sides: Consider pairing with steamed vegetables or a fresh garden salad to round out the meal.

Conclusion

Embrace the warmth of easy hamburger steak with savory brown gravy and create a dish that not only satisfies the palate but also brings comfort to your table. This recipe is perfect for those who appreciate the simple joys of home-cooked meals. Whether it’s a busy weeknight or a cozy family dinner, your homemade hamburger steaks will surely impress. So gather your ingredients, follow the steps, and enjoy a meal that’s bound to become a new family favorite!

Cozy Cooking, Made Simple

Prep Time 15 minutes
Cook Time 20 minutes
Total Time 35 minutes
Servings 8 pieces
Calories 250
Enjoy a collection of easy, cozy breakfast and spread recipes perfect for busy mornings and relaxed weekends.

Ingredients

Breakfast

  • 2 cups all-purpose flour
  • 1 cup fresh peaches, chopped
  • 1/2 cup sugar
  • 1 tbsp baking powder
  • 1/2 cup buttermilk
  • 1 egg large egg

Best Brown Sugar Banana Bread

  • 3 ripe bananas mashed
  • 1/2 cup brown sugar
  • 1 1/2 cups all-purpose flour
  • 1 tsp baking soda

Moist Pumpkin Bread

  • 1 1/2 cups canned pumpkin
  • 1/2 cup brown sugar
  • 2 cups all-purpose flour
  • 1 tsp cinnamon

3-Ingredient Peach Jam

  • 3 cups peaches, chopped
  • 1 cup granulated sugar
  • 2 tbsp lemon juice

Instructions 

  • Preheat oven to 375°F (190°C). Mix dry ingredients, add wet ingredients, and fold in peaches or bananas as specified. Shape into desired forms and bake for 20 minutes or until golden.


Notes

Use ripe fruits for best flavor and texture.
Calories: 250kcal
Cost: $15
Course: Breakfast, Spread
Cuisine: American
Keyword: Banana, Peach, Pumpkin

Discover the Delight of Creamy Crab Imperial

If you’re looking to impress your guests or simply enjoy a comforting meal at home, the creamy crab imperial recipe is an exceptional choice. This dish showcases the sweet, delicate flavor of jumbo lump crab meat enhanced with rich seasonings and a creamy base. Whether you are a seasoned chef or a cooking novice, this recipe promises a culinary experience that’s as rewarding as it is delicious. Let’s dive into the details of this Maryland-style classic!

Why You’ll Love This Creamy Crab Imperial

  • Rich Flavor: The combination of mayonnaise, Old Bay seasoning, and fresh crab meat creates a depth of flavor that is both comforting and luxurious.
  • Easy Preparation: With just a few simple steps, you can create a stunning dish that looks and tastes gourmet.
  • Versatile Serving Options: Whether you choose to serve it in ramekins or a larger baking dish, this dish is adaptable for any occasion.
  • Impressive Presentation: The golden, bubbling top and succulent crab meat make for an eye-catching centerpiece on your dinner table.
  • Make-Ahead Convenience: Prepare your creamy crab imperial in advance and bake it just before serving, perfect for entertaining!

Essential Ingredients for Creamy Crab Imperial

To create this mouthwatering crab imperial, you’ll need the following ingredients:

  • 1 lb jumbo lump crab meat
  • 1/2 cup mayonnaise
  • 1/2 tsp Old Bay seasoning
  • 1/2 tsp salt-free lemon pepper seasoning
  • 1 tsp Worcestershire sauce
  • 1 egg
  • 1 tbsp fresh parsley, chopped
  • 1 tsp lemon juice
  • 1 tsp hot sauce
  • 1 tsp Dijon mustard

Step-by-Step Guide to Make Creamy Crab Imperial

Follow these steps to create your creamy crab imperial:

  1. Preheat your oven: Set it to 400°F (200°C) to ensure it’s hot when your dish is ready to bake.
  2. Prepare the creamy mixture: In a large bowl, combine the mayonnaise, Old Bay seasoning, lemon pepper seasoning, Worcestershire sauce, egg, parsley, lemon juice, hot sauce, and Dijon mustard. Whisk until smooth.
  3. Fold in the crab: Gently add the jumbo lump crab meat to the mixture, ensuring you keep the lumps intact for the best texture.
  4. Transfer to a baking dish: Spoon the crab mixture into ramekins or a shallow baking dish for a beautiful presentation.
  5. Bake: Place in the oven and bake for 20 minutes or until the top is golden brown and bubbling.
  6. Garnish and serve: Remove from the oven, let cool slightly, and garnish with fresh parsley before serving.

Expert Tips for Perfecting Your Creamy Crab Imperial

  • Use fresh crab: Whenever possible, opt for fresh jumbo lump crab meat for the best flavor.
  • Don’t overmix: Be gentle when folding in the crab to maintain its delicate texture.
  • Experiment with spices: Feel free to adjust the Old Bay seasoning to match your taste preferences.
  • Personalize with toppings: Consider adding a sprinkle of breadcrumbs or cheese on top before baking for an extra layer of flavor.
  • Temperature check: Use a food thermometer to ensure your dish reaches an internal temperature of 165°F for food safety.
  • Let it rest: Allowing the dish to sit for a few minutes after baking helps the flavors meld together and makes it easier to serve.
  • Pair with wine: A crisp white wine like Sauvignon Blanc pairs beautifully with this rich dish.
  • Make it a meal: Serve with a fresh salad or steamed vegetables to balance the richness of the crab imperial.

Common Mistakes to Avoid

  • Using canned crab: While convenient, canned crab lacks the freshness and flavor of high-quality lump crab meat.
  • Overbaking: Keep an eye on your dish while it’s in the oven; overbaking can lead to a dry texture.
  • Ignoring seasonings: Don’t skip the spices! They are essential to enhancing the natural sweetness of the crab.
  • Not using enough butter: A bit of melted butter brushed on top before baking can add a delightful richness.

Delicious Variations to Try

  • Spicy Crab Imperial: Add diced jalapeños or a few dashes of cayenne pepper to the mixture for a kick.
  • Cheesy Crab Imperial: Mix in 1/2 cup of shredded cheddar or Gruyère for a creamy, cheesy twist.
  • Vegetable Crab Imperial: Add sautéed bell peppers, onions, or spinach for extra flavor and nutrition.
  • Herb-Infused Crab Imperial: Incorporate fresh herbs like dill or chives for a fragrant touch.

Storage and Make-Ahead Instructions

This creamy crab imperial can be prepared in advance:

  • Refrigerate: Store any leftovers in an airtight container for up to 3 days.
  • Freezing: You can freeze the uncooked mixture for up to 2 months. Thaw in the fridge before baking.
  • Reheating: Warm leftovers in the oven at 350°F until heated through, about 15-20 minutes.

Frequently Asked Questions

  • What is crab imperial? Crab imperial is a classic seafood dish made with crab meat, a creamy sauce, and seasonings, usually baked until golden.
  • Can I freeze crab imperial? Yes, you can freeze the uncooked mixture for later use. Just thaw it in the refrigerator before baking.
  • What can I serve with crab imperial? Pair it with a light salad, crusty bread, or seasonal vegetables for a complete meal.
  • How do I know when it’s done? The top should be golden brown, and the dish should be bubbling slightly when it’s finished baking.
  • Can I make it gluten-free? Yes, ensure all ingredients, including seasonings, are certified gluten-free.
  • What’s the best type of crab to use? Jumbo lump crab meat is preferred for its size and flavor, but you can also use lump or backfin crab meat.
  • How spicy can I make it? Adjust the hot sauce and spices to your liking; start with a small amount and increase as desired.
  • Is this recipe suitable for meal prep? Absolutely! You can prepare it ahead of time and store it in the fridge or freezer until you’re ready to bake.

Nutritional Tips and Dietary Adaptations

This dish is rich in protein and can be made healthier by making a few substitutions:

  • Light mayonnaise: Swap regular mayonnaise for a light version to reduce calories.
  • Low-fat cheese: If adding cheese, choose a low-fat option for a healthier twist.
  • Increased vegetables: Add more vegetables to boost fiber and nutrients without significantly increasing calories.

Essential Equipment for Making Creamy Crab Imperial

  • Baking dish: A shallow baking dish or individual ramekins works best for even cooking.
  • Mixing bowl: A large bowl for combining ingredients smoothly.
  • Whisk: Perfect for blending the creamy mixture thoroughly.
  • Measuring cups and spoons: Ensure precise ingredient measurements for consistent results.

Serving Suggestions

To elevate your serving experience:

  • Garnish: Top with fresh herbs or a squeeze of lemon juice for added brightness.
  • Presentation: Use elegant dishes to serve individual portions, enhancing the dining experience.
  • Accompaniments: Serve with a light salad, crusty bread, or a glass of chilled white wine.

In conclusion, the creamy crab imperial recipe is a delightful dish that combines rich flavors and elegant presentation, making it perfect for any occasion. With its easy preparation and versatile serving options, this recipe is sure to become a favorite in your culinary repertoire. So gather your ingredients and get ready to impress your family and friends with this delicious seafood delight!

Creamy Crab Imperial Recipe

Prep Time 10 minutes
Cook Time 20 minutes
Total Time 30 minutes
Servings 4 servings
Calories 350
A rich and creamy crab dish perfect for elegant appetizers or main courses, combining fresh crab meat with flavorful seasonings and a golden baked topping.

Ingredients

Main

  • 1 lb crab meat, jumbo lump crab
  • 1/2 cup mayo
  • 1/2 tsp old bay seasoning
  • 1/2 tsp salt-free lemon pepper seasoning
  • 1 tsp Worcestershire sauce
  • 1 egg egg
  • 1 tbsp parsley, fresh
  • 1 tsp lemon juice
  • 1 tsp hot sauce
  • 1 tsp dijon mustard

Instructions 

  • Preheat oven to 400°F (200°C).
  • Mix mayo, seasonings, Worcestershire, egg, parsley, lemon juice, hot sauce, and mustard until smooth.
  • Gently fold in crab meat, keeping lumps intact.
  • Spoon mixture into ramekins or baking dish.
  • Bake for 20 minutes until golden and bubbling. Garnish with parsley before serving.

Notes

Use fresh crab for best flavor and avoid overmixing to keep lumps intact.
Calories: 350kcal
Cost: $15
Course: Appetizer
Cuisine: American
Keyword: Crab

Discover the secrets to baking the perfect No Knead Bread with our step-by-step guide. Experience the joy of creating artisan-style loaves in your own kitchen without the hassle of kneading. Join us as we explore tips, tricks, and delicious variations that will elevate your bread-baking game!

Why You’ll Love This Recipe

Making bread can often feel intimidating, but with this no knead bread recipe, you’ll find that it’s not only simple but also rewarding. Here are five reasons why you’ll love making this bread:

  • Effortless Preparation: With just a few ingredients and minimal effort, you can create bakery-quality bread at home.
  • Artisan Texture: This method gives you a crusty exterior and a soft, airy interior, reminiscent of your favorite artisan loaves.
  • Versatile Base: The basic dough can be customized with herbs, spices, or even cheese, allowing you to create various flavor profiles.
  • Overnight Rise: With this recipe, you can prepare your dough the night before and bake fresh bread in the morning.
  • Perfect for Beginners: If you’re new to baking, this recipe is forgiving and easy to follow, making it a great starting point.

Ingredients Breakdown

This no knead bread recipe requires just a handful of ingredients, each playing a crucial role in achieving that perfect loaf:

  • All-Purpose Flour: The foundation of your bread. You can substitute with whole wheat flour for a heartier texture.
  • Water: Use lukewarm water to help activate the yeast. If using cold water, it may slow down the rising process.
  • Active Dry Yeast: Essential for the fermentation process. You can also use instant yeast if that’s what you have on hand.
  • Salt: Not just for flavor, it strengthens the gluten structure. Don’t skip this ingredient!
  • Optional Add-Ins: Consider adding herbs like rosemary or spices like garlic for a flavor boost.

Pro Tips for Perfect Bread

Here are some expert insights to help you master the art of no knead bread:

  • Use a Dutch Oven: Baking your bread in a Dutch oven traps steam, creating that perfect crust.
  • Don’t Rush the Rise: Allow your dough ample time to rise; a longer rise develops flavor.
  • Check Your Temperature: Ideal dough temperature should be around 75-80°F for optimal yeast activity.
  • Practice Patience: Wait for the crust to turn golden brown and sound hollow when tapped before removing from the oven.
  • Experiment with Flour Types: Try mixing in whole wheat or specialty flours for different flavors and textures.
  • Storage Matters: Store leftover bread in a paper bag to keep it fresh; avoid plastic, which can make it soggy.
  • Use a Kitchen Scale: Weighing your ingredients ensures accuracy and consistency in your baking.
  • Let it Cool: Allow your bread to cool completely before slicing to maintain its structure.

Common Mistakes and Troubleshooting

Even the best bakers encounter issues, but don’t worry! Here’s how to troubleshoot common problems:

  • Dense Bread: This could indicate not enough rise time or insufficient yeast. Ensure your yeast is active and give the dough enough time to rise.
  • Hard Crust: If your crust is too hard, try lowering the oven temperature or covering it with foil during the last 10 minutes of baking.
  • Flat Loaf: This can happen if the dough is over-proofed. Keep an eye on the rising time and adjust as needed.
  • Sticky Dough: If your dough is too sticky, you may need to adjust the hydration level by adding a bit more flour.

Variations to Try

Once you master the basic no knead bread recipe, try these fun variations:

  • Herbed Bread: Add dried herbs like oregano or thyme to the dough for a flavorful twist.
  • Cheesy Loaf: Incorporate shredded cheese into the dough for a rich, savory bread.
  • Sweet Bread: Mix in chocolate chips or dried fruit for a delightful breakfast treat.
  • Seeded Bread: Top your loaf with sesame or poppy seeds before baking for added texture and flavor.

Storage and Make-Ahead Instructions

Your no knead bread can be made ahead of time and stored with ease:

  • Storing: To keep your bread fresh, wrap it in a kitchen towel and store it at room temperature. For longer storage, freeze it in a resealable bag.
  • Make-Ahead: You can prepare the dough a day in advance. Simply refrigerate it after the first rise and bake it the next day.

Frequently Asked Questions

Curious about no knead bread? Here are some common questions answered:

  • Can I use whole wheat flour? Yes, but you may need to adjust the water content since whole wheat flour absorbs more moisture.
  • How long does the dough need to rise? Generally, 12-18 hours is ideal for the best flavor and texture.
  • What if I don’t have a Dutch oven? You can use any oven-safe pot with a lid or a baking stone if you prefer.
  • Can I add nuts or seeds? Absolutely! Just fold them into the dough during the mixing stage.
  • How can I tell when the bread is done? The loaf should be golden brown and sound hollow when tapped on the bottom.
  • Is it possible to make this bread gluten-free? You can use a gluten-free flour blend, but results may vary.
  • How do I reheat leftover bread? To refresh it, wrap in foil and warm in a 350°F oven for about 10 minutes.
  • Can I use fresh herbs? Yes, but be mindful of the moisture they add to the dough.

Nutrition Tips and Dietary Adaptations

If you’re looking to make this no knead bread more nutritious:

  • Whole Grains: Substitute half of the all-purpose flour with whole wheat flour for added fiber.
  • Low-Sodium Variation: Reduce the salt to lower sodium content; just be aware it may affect flavor.
  • Gluten-Free Options: Use a gluten-free flour blend and add xanthan gum for better texture.

Equipment Recommendations

Here’s what you’ll need to make your no knead bread:

  • Mixing Bowl: A large bowl for mixing your ingredients.
  • Dutch Oven: Ideal for baking; it helps create steam for a beautiful crust.
  • Kitchen Scale: For accurate measurements of your ingredients.
  • Rubber Spatula: Great for folding and mixing your dough without overworking it.

Serving Suggestions

No knead bread is incredibly versatile! Here are some ways to enjoy your freshly baked loaf:

  • With Olive Oil and Balsamic Vinegar: Perfect for dipping.
  • As Sandwich Bread: Use it for your favorite sandwiches or toasts.
  • With Soup or Stew: A side of warm bread complements hearty dishes beautifully.
  • For Breakfast: Toast it and spread with butter or jam for a delightful start to your day.

Final Thoughts

Baking no knead bread is not just about making food; it’s about creating joy and connection. With minimal effort and basic ingredients, you can produce something extraordinary. So, roll up your sleeves, gather your ingredients, and start your journey to becoming a bread-baking pro. Happy baking!

Bread

Prep Time 15 minutes
Cook Time 30 minutes
Total Time 45 minutes
Servings 8 slices
Calories 150
A classic homemade bread recipe that is easy to prepare and perfect for any occasion.

Ingredients

Dough

  • 3 cups all-purpose flour
  • 1 teaspoon salt
  • 1 packet dry yeast
  • 1.5 cups warm water

Instructions 

  • Mix warm water and yeast, let sit until frothy.
  • Add flour and salt, knead into a smooth dough.
  • Let dough rise in a warm place for 1 hour.
  • Shape dough into a loaf and place in a Dutch oven.
  • Bake at 450°F (230°C) for 30 minutes.

Notes

For a crusty exterior, preheat the Dutch oven before baking.
Calories: 150kcal
Cost: $15
Course: bread
Cuisine: American
Keyword: Bakery, Yeast

Welcome to the World of Easy Air Fryer Bakes!

If you’re looking to elevate your baking game while keeping it simple, you’ve come to the right place! This article is dedicated to showcasing the joy of preparing delicious treats using the air fryer. With recipes like Chocolate Chip Cookies and Cinnamon Apple Muffins, you can transform your favorite baked goods into delightful air-fried wonders. Let’s dive into the delightful world of easy air fryer baking!

Why You’ll Love These Air Fryer Recipes

These air fryer bakes are not just easy to make; they also come with a host of benefits that will make you want to whip them up again and again:

  • Time-Saving: Air fryers cook food faster than traditional ovens, allowing you to enjoy your baked goods in a fraction of the time.
  • Healthier Options: Baking in an air fryer requires less oil, making your treats lighter and healthier without sacrificing flavor.
  • Versatility: From cookies to cakes, the air fryer can handle a wide variety of baked goods, making it a multi-use kitchen appliance.
  • Easy Cleanup: Most air fryer baskets are non-stick, making cleanup a breeze compared to conventional baking trays.
  • Consistent Results: The air fryer circulates heat evenly, ensuring that your baked goods are perfectly cooked every time.

Ingredients You’ll Need

Here’s a breakdown of the ingredients typically required for easy air fryer bakes, along with some substitutions if you’re missing a few items:

  • Chocolate Chip Cookies: Flour, sugar, butter, eggs, chocolate chips. Substitution: Use coconut oil for a dairy-free version.
  • Cinnamon Apple Muffins: Flour, sugar, cinnamon, apples, baking powder. Substitution: Substitute apples with mashed bananas for a different flavor.
  • Chocolate Berry Gateaux: Flour, cocoa powder, sugar, eggs, mixed berries. Substitution: Use almond flour for gluten-free baking.
  • Macarons: Almond flour, powdered sugar, egg whites, food coloring. Substitution: You can use a different nut flour to suit your taste.
  • Hot Cross Bun Loaf: Flour, sugar, yeast, spices, mixed fruit. Substitution: Use dried cranberries instead of mixed fruit for a twist.
  • Victoria Sponge: Flour, sugar, eggs, butter, jam. Substitution: Replace jam with fresh fruit for a lighter option.
  • Sticky Toffee Pudding: Dates, sugar, flour, eggs, toffee sauce. Substitution: Use maple syrup instead of sugar for a healthier sweetener.

Pro Tips for Air Fryer Baking

To ensure you have the best experience baking in your air fryer, follow these expert tips:

  • Preheat Your Air Fryer: Just like an oven, preheating your air fryer helps achieve the best texture and cooking times.
  • Don’t Overcrowd: Leave space between your baked goods to allow for proper air circulation.
  • Use Parchment Paper: This prevents sticking and makes cleanup easier, especially for sticky recipes.
  • Check for Doneness: Use a toothpick to test if cakes and muffins are cooked through; it should come out clean.
  • Adjust Cooking Times: Every air fryer is different, so monitor your food closely, especially the first time you try a recipe.
  • Experiment with Temperature: Lower temperatures can yield softer baked goods, while higher temperatures create a crispier texture.
  • Rotate the Basket: For even cooking, shake or rotate the basket halfway through the cooking time.
  • Let Them Cool: Allow baked goods to cool slightly before removing them from the basket to maintain their shape.

Common Mistakes and Troubleshooting

Even the best bakers make mistakes! Here are some common pitfalls and how to avoid them:

  • Burnt Baked Goods: This can happen if the temperature is too high or if you’ve left them in the fryer for too long. Always adjust cooking times based on your specific model.
  • Raw Centers: If your cake or muffins are cooked on the outside but raw inside, reduce the temperature and extend the cooking time.
  • Sticking: Always use parchment paper or a non-stick spray, especially for recipes with higher sugar content.
  • Uneven Cooking: If some parts are done while others are not, ensure you’re not overcrowding the basket and rotate during cooking.

Variations to Try

Here are some fun variations to mix things up:

  • Nutty Chocolate Chip Cookies: Add walnuts or pecans for crunch.
  • Apple-Cinnamon Muffins: Incorporate chopped nuts or raisins for added texture.
  • Chocolate Orange Gateaux: Add orange zest to the batter for a citrus twist.
  • Spiced Pumpkin Muffins: Use pumpkin puree and add nutmeg for a seasonal flavor.

Storage and Make-Ahead Instructions

Want to enjoy your baked goods later? Here’s how to store and prepare them ahead of time:

  • Room Temperature: Most cookies and muffins can be stored at room temperature in an airtight container for up to 3 days.
  • Refrigeration: Cakes and more delicate baked goods should be kept in the fridge for up to a week.
  • Freezing: Most baked goods freeze well. Wrap them tightly and store in a freezer-safe container for up to 3 months.
  • Make-Ahead: Prepare your batter ahead of time and refrigerate it for up to 24 hours before cooking.

Frequently Asked Questions

Here are some common questions I receive about air fryer baking:

  • Can I bake in an air fryer? Absolutely! Air fryers are great for baking cookies, cakes, and more.
  • Do I need to preheat my air fryer? Yes, preheating helps achieve the best results.
  • What types of baked goods can I make? You can make anything from cookies to cakes, muffins, and even pastries!
  • How do I prevent my baked goods from burning? Monitor the temperature and adjust cooking times based on your specific air fryer.
  • Can I use regular baking recipes in an air fryer? Most recipes can be adapted, but you may need to adjust the cooking time and temperature.
  • Is it necessary to use oil in air fryer baking? While you can use a little oil for richness, many recipes do not require it.
  • How do I clean my air fryer after baking? Most air fryer baskets are dishwasher safe; otherwise, wipe them down with a damp cloth.
  • Can I bake multiple items at once? Yes, but ensure they don’t overcrowd the basket for even cooking.

Nutrition Tips and Dietary Adaptations

Don’t forget to consider your dietary needs when baking. Here are some tips:

  • Gluten-Free: Substitute all-purpose flour with almond or coconut flour.
  • Dairy-Free: Use plant-based butter or oil in place of regular butter.
  • Low Sugar: Substitute sugar with natural sweeteners like honey or agave syrup.

Equipment Recommendations

Here’s what you’ll need for successful air frying:

  • Quality Air Fryer: Choose a model with adjustable temperature and a large capacity for versatility.
  • Parchment Paper: Essential for preventing sticking and easy cleanup.
  • Mixing Bowls: Use sturdy bowls for mixing ingredients efficiently.
  • Measuring Cups and Spoons: Accurate measurements are key to successful baking.

Serving Suggestions

Now that you’ve baked up a storm, here are some serving ideas:

  • Pair with Coffee: Enjoy your baked goods with a hot cup of coffee or tea.
  • Garnish: Top muffins with a sprinkle of powdered sugar or drizzle icing for a special touch.
  • Serve Warm: Many baked treats taste even better when served warm.

Conclusion

Embrace the joy of air fryer baking! With these easy recipes and tips, you can create delightful treats that are sure to impress. Remember, baking is about experimenting and having fun, so don’t hesitate to make these recipes your own. Happy baking!

Easy Air Fryer Bakes

Prep Time 10 minutes
Cook Time 15 minutes
Total Time 25 minutes
Servings 8 pieces
Calories 250
Enjoy a variety of delicious baked treats made effortlessly in your air fryer with this versatile recipe collection.

Ingredients

Baking Mixes

  • 1 cup Chocolate Chip Cookies (Pre-made or homemade dough)
  • 1 cup Cinnamon Apple Muffin (Muffin batter)
  • 1 cup Chocolate Berry Gateaux (Cake batter)
  • 1 cup Macarons (Meringue mixture)
  • 1 cup Hot Cross Bun Loaf (Dough for bread)
  • 1 cup Victoria Sponge (Sponge cake batter)
  • 1 cup Sticky Toffee Pudding (Date pudding mixture)

Instructions 

  • Preheat the air fryer to 350°F (180°C).
  • Prepare each batter or dough as per your recipe and portion into the air fryer basket.
  • Cook each type for 12-15 minutes until golden and cooked through.
  • Remove from the air fryer and let cool slightly before serving.
  • Repeat with remaining batter or dough as needed.

Notes

Use parchment paper to prevent sticking and ensure even cooking.
Calories: 250kcal
Cost: $15
Course: Dessert
Cuisine: fusion
Keyword: baking

Unleash Your Inner Chef: The Ultimate Guide to Chicken Fillet in Spicy, Creamy Garlic-Parmesan Sauce

Welcome to a culinary adventure that combines flavor, comfort, and creativity! In this guide, we’ll explore how to make a delectable dish of Chicken Fillet in Spicy, Creamy Garlic-Parmesan Sauce that’s sure to impress your family and friends. This recipe not only tantalizes your taste buds but also brings the joy of cooking right into your home kitchen. Let’s dive into the heart of this recipe, which is rich in savory goodness and perfect for any occasion.

Why You’ll Love This Recipe

Here are five compelling reasons to embrace this Chicken Fillet in Spicy, Creamy Garlic-Parmesan Sauce:

  • Flavor Explosion: The combination of garlic, Parmesan, and a spicy kick creates a flavor profile that’s both comforting and exciting.
  • Quick and Easy: With simple ingredients and straightforward steps, this dish comes together in under 30 minutes, perfect for busy weeknights.
  • Versatile Pairings: Serve it with crispy fries, a fresh salad, or over pasta for a satisfying meal tailored to your palate.
  • Impressive Presentation: The creamy sauce and perfectly cooked chicken make for a stunning dish that looks as good as it tastes.
  • Customizable: Easily adjust spice levels or incorporate seasonal vegetables for a personalized touch.

Ingredients for Chicken Fillet in Spicy, Creamy Garlic-Parmesan Sauce

Gather the following ingredients to get started:

  • Chicken fillets: 4 pieces (about 1.5 lbs or 680 g)
  • Garlic: 4 cloves, minced (fresh garlic enhances the flavor)
  • Heavy cream: 1 cup (240 ml) for creaminess
  • Parmesan cheese: 1 cup, grated (for a rich, cheesy texture)
  • Olive oil: 2 tablespoons (for cooking the chicken)
  • Spices: 1 teaspoon red pepper flakes, salt, and pepper to taste
  • Fresh parsley: Chopped, for garnish

Tools You’ll Need

Before you begin, make sure you have the following tools:

  • Skillet or frying pan: A large skillet works best for even cooking.
  • Meat thermometer: To ensure your chicken is perfectly cooked.
  • Spatula: For flipping and serving.
  • Measuring cups and spoons: For precise ingredient measurements.

Preparation Steps for Chicken Fillet in Spicy, Creamy Garlic-Parmesan Sauce

Let’s break down the cooking process into simple, easy-to-follow steps:

Step 1: Preparing the Chicken Fillets

Start by seasoning the chicken fillets with salt, pepper, and red pepper flakes for that spicy kick. This is crucial for developing flavor right from the start.

Step 2: Cooking the Chicken

Heat olive oil in a skillet over medium-high heat. Add the chicken fillets and cook for 6-7 minutes on each side or until they reach an internal temperature of 165°F (74°C). This ensures they’re juicy and tender.

Step 3: Making the Creamy Garlic-Parmesan Sauce

In the same skillet, add minced garlic and sauté for about 30 seconds until fragrant. Pour in the heavy cream, stirring constantly to avoid curdling. Gradually add the grated Parmesan cheese and continue stirring until melted and the sauce thickens.

Step 4: Combining Chicken with Sauce

Return the cooked chicken to the skillet, coating each piece generously with the creamy garlic-Parmesan sauce. Allow it to simmer for a few minutes to absorb the flavors.

Step 5: Serving the Dish

Plate the chicken fillets, drizzling extra sauce over the top. Garnish with freshly chopped parsley for a pop of color and freshness.

Serving Suggestions

This Chicken Fillet in Spicy, Creamy Garlic-Parmesan Sauce pairs beautifully with:

  • Crispy fries: Complement the creamy sauce with perfectly seasoned, crunchy fries.
  • Steamed vegetables: Broccoli or asparagus add a nutritious touch.
  • Garlic bread: Perfect for soaking up any remaining sauce.
  • Pasta: Serve it over fettuccine or penne for a hearty meal.

Pro Tips for Perfecting Your Dish

To elevate your cooking game, consider these expert insights:

  • Use a meat thermometer: Ensure your chicken is cooked to perfection at 165°F (74°C).
  • Let the chicken rest: Give the fillets a few minutes to rest after cooking for juicier results.
  • Adjust the spice level: Use more or less red pepper flakes according to your heat preference.
  • Quality ingredients matter: Opt for fresh garlic and high-quality Parmesan for the best flavor.
  • Experiment with herbs: Fresh thyme or basil can add an aromatic twist to the sauce.
  • Save the leftovers: This dish keeps well in the fridge, making for great next-day meals.
  • Make it a meal prep: Cook the chicken and sauce ahead of time, then reheat when ready to serve.

Common Mistakes and Troubleshooting

Here are some common pitfalls to avoid while making this dish:

  • Overcooking the chicken: Keep an eye on the temperature to maintain juiciness.
  • Too thick sauce: If the sauce becomes too thick, add a splash of chicken broth or water to loosen it.
  • Burnt garlic: Sauté garlic just until fragrant; burning it can impart a bitter taste.

Variations to Try

Here are some delightful spins on this classic recipe:

  • Garlic Parmesan Chicken Bake: Transfer the chicken and sauce to a baking dish, top with cheese, and bake until bubbly.
  • Spicy Garlic Chicken Tacos: Shred the chicken and serve in taco shells with fresh toppings.
  • Vegetarian Version: Substitute chicken with grilled eggplant or mushrooms for a vegetarian-friendly option.
  • Add Vegetables: Mix in spinach or sun-dried tomatoes to the sauce for added flavor and nutrition.

Storage and Make-Ahead Instructions

For optimal freshness, store leftovers in an airtight container in the refrigerator for up to 3 days. To make ahead, prepare the chicken and sauce, then refrigerate separately. Reheat gently on the stove, adding a splash of cream or broth to restore creaminess.

Frequently Asked Questions

Here are some common inquiries about this dish:

  • Can I use chicken thighs instead of fillets? Absolutely! Thighs will add more flavor and moisture.
  • Is there a dairy-free substitute for the cream? Yes, you can use coconut cream or a plant-based heavy cream alternative.
  • How spicy is this dish? The spice level can be adjusted based on your preference. Start with less and add more if needed.
  • Can I freeze the leftovers? Yes, this dish can be frozen. Thaw in the fridge overnight before reheating.
  • What can I serve instead of fries? Mashed potatoes or rice are excellent alternatives.
  • How do I reheat the sauce? Reheat gently on low heat, adding a little cream or broth to help it maintain its consistency.
  • Can I add other cheeses? Yes, you can mix in mozzarella or feta for a different flavor profile.
  • What wine pairs well with this dish? A crisp white wine like Chardonnay complements the creamy sauce beautifully.

Nutritional Tips and Dietary Adaptations

For those mindful of nutrition:

  • Low-calorie option: Use skinless chicken breasts and reduce the amount of cream.
  • Gluten-free: This dish is naturally gluten-free; just ensure any sides are also gluten-free.
  • Paleo-friendly: Substitute the cream with coconut milk for a Paleo-friendly option.

Equipment Recommendations

For best results, consider investing in the following:

  • Non-stick skillet: For easy cooking and cleanup.
  • Quality chef’s knife: For precise ingredient preparation.
  • Meat thermometer: Essential for ensuring perfectly cooked chicken.

Conclusion

Now that you’ve mastered the art of Chicken Fillet in Spicy, Creamy Garlic-Parmesan Sauce, you’re equipped to impress anyone around your dinner table. Remember, cooking is not just about the ingredients but the love and creativity you put into each dish. So, roll up your sleeves and enjoy the delightful process of creating something special. Happy cooking!

Browse By

Prep Time 10 minutes
Cook Time 20 minutes
Total Time 30 minutes
Servings 4 servings
Calories 350
Explore a variety of recipes categorized by meal type and occasion, perfect for any culinary adventure.

Ingredients

Home

  • 1 cup RECIPESBreakfastLunchDinnerDessertsSeafood

Breakfast

  • 1 cup RECIPESBreakfastLunchDinnerDessertsSeafood

Lunch

  • 1 cup RECIPESBreakfastLunchDinnerDessertsSeafood

Dinner

  • 1 cup RECIPESBreakfastLunchDinnerDessertsSeafood

Desserts

  • 1 cup RECIPESBreakfastLunchDinnerDessertsSeafood

Seafood

  • 1 cup RECIPESBreakfastLunchDinnerDessertsSeafood

Ingredients

  • 2 pcs Chicken (boneless, skinless)
  • 200 g Beef (ground)
  • 1 head Salads
  • 2 cups Soup (prepared)

Instructions 

  • Prepare ingredients as needed.
  • Combine ingredients in a bowl.
  • Cook or assemble according to preference.
  • Serve and enjoy!

Notes

Use fresh ingredients for best flavor.
Calories: 350kcal
Cost: $15
Course: Breakfast, Desserts, Dinner, Lunch, Seafood
Keyword: Beef, Chicken, Salads, Soup

A Culinary Journey: Mastering Homemade Beijing Beef

Welcome to the culinary world of home-cooked Beijing Beef! This beloved dish, reminiscent of takeout favorites from Panda Express, is a delightful fusion of tender marinated beef, vibrant vegetables, and a savory sauce that will transport your taste buds straight to the heart of Chinese cuisine. Whether you’re a seasoned chef or a novice in the kitchen, this guide will equip you with everything you need to create a restaurant-quality dish in the comfort of your home.

In this comprehensive article, we’ll explore the ingredients, share expert tips, provide common troubleshooting advice, and even suggest variations to cater to different dietary preferences. By the end, you’ll be ready to impress your family and friends with your culinary prowess!

Why You’ll Love This Recipe

  • Quick and Easy: With preparation and cooking time under 30 minutes, you can whip up this tasty meal even on a busy weekday.
  • Customizable Ingredients: Use your favorite vegetables and adjust the spice levels to suit your taste.
  • Healthy Homemade Alternative: Control the ingredients to make a healthier version than typical takeout.
  • Perfect for Meal Prep: This dish stores well and can be made ahead, making it ideal for lunches or dinners throughout the week.
  • Brings People Together: Cooking and sharing meals is a wonderful way to create connections with family and friends.

Ingredient Breakdown

Let’s dive into the essential ingredients that make up this mouthwatering dish. Understanding each component allows you to make the best choices, whether you’re shopping at your local grocery store or substituting items you already have at home.

Beef

The star of this dish is, of course, the beef. Opt for flank steak or sirloin for the best texture and flavor. These cuts are lean and tender, making them perfect for stir-frying.

Vegetables

Traditional Beijing Beef often includes bell peppers and onions, but feel free to incorporate your favorites such as broccoli, snap peas, or carrots. Remember to cut them into uniform pieces for even cooking.

Sauce

The sauce is what ties everything together. A combination of soy sauce, hoisin sauce, and a hint of sesame oil creates a rich flavor profile. You can adjust the quantities to suit your taste preferences.

Cornstarch Slurry

A cornstarch slurry is essential for thickening the sauce and giving the beef a glossy finish. It’s a simple mix of cornstarch and water that you can easily whip up as you cook.

Pro Tips for Perfect Beijing Beef

  • Marinate for Flavor: Allow the beef to marinate for at least 30 minutes to enhance its flavor and tenderness.
  • High Heat Cooking: Use a wok or a heavy skillet over high heat for quick cooking, which helps maintain the beef’s juiciness.
  • Don’t Overcrowd the Pan: Cook the beef in batches if necessary to avoid steaming, which can lead to tough meat.
  • Use Neutral Oil: Opt for oils like canola or vegetable oil that can withstand high temperatures without burning.
  • Prepare Everything Before Cooking: Have all your ingredients and equipment ready to go to streamline the cooking process.
  • Adjust to Taste: Feel free to tweak the sauce ingredients based on your flavor preferences.
  • Rest the Beef: Let the cooked beef rest for a few minutes before serving to allow the juices to redistribute.
  • Garnish for Presentation: A sprinkle of sesame seeds or sliced green onions can elevate the dish visually.

Common Mistakes and Troubleshooting

Cooking can sometimes be tricky, but I’m here to help you avoid common pitfalls:

  • Overcooking the Beef: Aim for medium-rare to medium; overcooked beef can become tough and chewy.
  • Incorrect Sauce Consistency: If your sauce is too thin, add more cornstarch slurry; if it’s too thick, thin it out with a splash of water or broth.
  • Burning Vegetables: Always add vegetables based on their cooking times; softer vegetables like bell peppers cook faster than harder ones like carrots.
  • Flavor Imbalance: If the dish tastes bland, add a splash of soy sauce or a pinch of salt to enhance the flavors.

Delicious Variations

Beijing Beef is incredibly versatile! Here are some variations to inspire your cooking:

  • Beijing Chicken: Substitute beef with chicken breast for a lighter version.
  • Vegetarian Beijing: Use tofu or seitan, along with a variety of vegetables for a meat-free alternative.
  • Spicy Beijing Beef: Add sliced fresh chilies or a dash of chili paste for a spicy kick.
  • Beijing Beef with Broccoli: Incorporate steamed broccoli for added nutrition and color.

Storage and Make-Ahead Instructions

This recipe is perfect for meal prep! Here’s how to store and prepare:

  • Refrigeration: Store leftovers in an airtight container in the fridge for up to 3 days.
  • Freezing: Freeze the cooked dish in a freezer-safe container for up to 2 months. Thaw overnight in the fridge before reheating.
  • Make-Ahead: You can marinate the beef and chop the vegetables a day in advance to save time on cooking day.

Comprehensive FAQ

1. Can I use a different type of meat?

Yes! You can use chicken, pork, or even shrimp depending on your preference.

2. Is it possible to make this dish gluten-free?

Absolutely! Use gluten-free soy sauce and ensure all other ingredients are gluten-free.

3. How do I get my beef tender?

Marinating the beef and cutting against the grain are key to achieving tender meat.

4. What side dishes pair well with Beijing Beef?

Serve it with steamed rice, fried rice, or stir-fried noodles for a complete meal.

5. Can I meal prep this dish?

Yes, Beijing Beef is great for meal prep and holds up well in the refrigerator.

6. How spicy is this recipe?

The spice level can be adjusted based on your personal taste. Feel free to add or omit chili elements.

7. What type of oil should I use?

Choose a neutral oil like canola or vegetable oil for frying.

8. How do I know when the beef is cooked?

The beef should be browned on the outside and slightly pink inside for medium doneness.

Nutrition Tips and Dietary Adaptations

This recipe can easily be made healthier:

  • Lean Proteins: Use lean cuts of beef to reduce fat content.
  • Load Up on Vegetables: Increase the vegetable content for more fiber and nutrients.
  • Whole Grains: Serve with brown rice instead of white for added health benefits.
  • Low Sodium Options: Choose low-sodium soy sauce to reduce salt intake.

Equipment Recommendations

To achieve the best results, here’s a list of essential equipment:

  • Wok or Large Skillet: For high-heat cooking and stir-frying.
  • Sharp Knife: For precision cutting of beef and vegetables.
  • Cutting Board: A sturdy surface for all your chopping needs.
  • Measuring Cups and Spoons: To ensure accurate ingredient quantities.

Serving Suggestions

Present your Beijing Beef in style:

  • Garnish: Top with sesame seeds or sliced green onions for a fresh touch.
  • Side Dishes: Serve with fried rice, steamed jasmine rice, or noodles.
  • Presentation: Use a colorful plate to enhance visual appeal.

Conclusion

Now that you have all the tools, tips, and tricks to make an outstanding Beijing Beef dish, it’s time to roll up your sleeves and get cooking! This recipe is more than just a meal—it’s an opportunity to create lasting memories around the dining table, connecting with loved ones through the joy of cooking and sharing. Enjoy the process, savor every bite, and remember, great cooking is all about having fun and experimenting in the kitchen. Happy cooking!

Subscribe

Prep Time 10 minutes
Cook Time 15 minutes
Total Time 25 minutes
Servings 4 people
Calories 150
A simple and engaging recipe to help you stay connected and informed. Perfect for beginners and seasoned cooks alike.

Ingredients

Main Ingredients

  • 1 unit Subscribe (Main ingredient for the recipe)

Instructions 

  • Gather all ingredients and prepare your workspace.
  • Mix the ingredients thoroughly in a bowl.
  • Follow the steps to complete the process.
  • Serve immediately or store for later.

Notes

Enjoy your subscription and stay updated!
Calories: 150kcal
Cost: $10
Course: Main
Cuisine: Universal
Keyword: Subscription

Mastering the Art of Meatballs: A Comprehensive Guide

Welcome to your ultimate guide on how to create delicious homemade meatballs that are sure to impress your family and friends! Whether you’re planning a cozy dinner or a festive gathering, mastering the art of meatballs can transform any meal into a hearty feast. This article will delve into the nuances of crafting meatballs, exploring the best ingredients, techniques, and variations to elevate your culinary skills.

Why You’ll Love This Recipe

Here are five reasons why making homemade meatballs will become your new favorite kitchen activity:

  • Versatility: Meatballs can be served in various styles, from classic spaghetti and meatballs to hearty meatball subs and even as appetizers.
  • Customizable: You can easily adjust ingredients to suit dietary needs, from gluten-free breadcrumbs to leaner meats.
  • Flavorful: Homemade meatballs allow you to control the seasoning and flavor profile, ensuring they’re packed with taste.
  • Make Ahead: Meatballs can be prepared in advance and stored, making weeknight meals a breeze.
  • Fun to Make: Involving family or friends in the meatball-making process can create memorable cooking moments!

Ingredient Breakdown

Let’s take a closer look at the essential ingredients used for making scrumptious meatballs:

  • Ground Meat: Use ground beef for a classic taste, or try ground turkey or chicken for a lighter option.
  • Breadcrumbs: Traditional white or whole wheat breadcrumbs help bind the meatballs. For a gluten-free option, consider using almond flour or gluten-free breadcrumbs.
  • Eggs: Eggs act as a binder, ensuring your meatballs hold their shape during cooking.
  • Herbs and Spices: Fresh parsley, garlic powder, and onion powder elevate the flavor profile. Feel free to experiment with other herbs like basil or oregano.
  • Cheese: Adding grated Parmesan or mozzarella can enhance flavor and texture.

Pro Tips for Perfect Meatballs

Here are some expert insights to help you achieve the best meatballs:

  • Don’t Overmix: When combining ingredients, mix just until combined to avoid tough meatballs.
  • Chill the Mixture: Refrigerate your meatball mixture for 30 minutes before shaping to help them hold their form.
  • Use a Cookie Scoop: This ensures uniformity in size, leading to even cooking.
  • Space Them Apart: When placing meatballs on the baking sheet, leave some space between them for even cooking.
  • Use a Meat Thermometer: Ensure your meatballs reach an internal temperature of 160°F (71°C) for safety.
  • Experiment with Cooking Methods: Try baking, frying, or slow cooking to find your preferred method!
  • Flavor With Sauces: Consider coating meatballs in marinara, BBQ, or teriyaki sauce for added flavor.
  • Let Rest After Cooking: Allow meatballs to rest for a few minutes before serving to lock in juices.

Common Mistakes and Troubleshooting

Even the best chefs encounter challenges. Here are common mistakes and how to avoid them:

  • Too Dry: If meatballs turn out dry, consider adding more moisture with ingredients like finely chopped onions, or using a fattier meat.
  • Too Crumbly: This can happen if you skip the egg or breadcrumbs; ensure you include both for better binding.
  • Overcooking: Keep an eye on cooking times to avoid tough meatballs; use a timer and a thermometer.
  • Uneven Cooking: If they cook unevenly, check your oven temperature or consider rotating the baking sheet halfway through.

Variations to Try

Once you master the classic meatball, here are exciting variations to explore:

  • Italian Meatballs: Mix in Italian herbs and serve with marinara sauce.
  • Swedish Meatballs: Incorporate nutmeg and serve in a creamy sauce with lingonberries.
  • Asian-Inspired Meatballs: Use ground pork or turkey, add ginger and green onions, and serve with soy sauce or sesame glaze.
  • Vegetarian Meatballs: Combine lentils, quinoa, and veggies for a nutritious alternative.

Storage and Make-Ahead Instructions

Making meatballs in advance can save time and hassle. Here are some guidelines:

  • Refrigerate: Store uncooked meatballs in an airtight container for up to 24 hours before cooking.
  • Freeze: Freeze uncooked meatballs on a baking sheet, then transfer to a freezer bag for up to three months.
  • Cooked Meatballs: Store cooked meatballs in the refrigerator for up to four days or freeze for up to three months.
  • Reheat: When reheating, ensure they reach an internal temperature of 165°F (74°C).

Comprehensive FAQ

Here are some frequently asked questions to enhance your meatball-making experience:

  • Can I use different types of meat? Absolutely! Ground turkey, chicken, beef, or even plant-based meats work wonderfully.
  • What can I substitute for breadcrumbs? Crushed crackers, oats, or even cooked rice make great substitutes.
  • How do I know when they’re done? Use a meat thermometer; they should reach 160°F (71°C).
  • Can I cook them in sauce? Yes, you can simmer them in sauce after browning for added flavor.
  • What’s the best way to freeze meatballs? Flash freeze them on a baking sheet before transferring to a freezer bag.
  • Can I bake them instead of frying? Yes! Baking is a healthier option and can still yield delicious results.
  • How do I avoid soggy meatballs? Make sure to drain excess liquid from ingredients like veggies and avoid overmixing.
  • What’s the best way to serve meatballs? They can be served in various ways, such as in pasta, on skewers, or as a party appetizer.

Nutrition Tips and Dietary Adaptations

For health-conscious cooks, consider these tips:

  • Lean Meats: Opt for lean ground meats to reduce fat content.
  • Whole-Grain Options: Use whole wheat breadcrumbs or oats for added fiber.
  • Vegetarian Choices: Experiment with lentils or chickpeas to create nutritious meatballs.

Equipment Recommendations

Here are some essential tools to make your meatball preparation easier:

  • Mixing Bowls: A set of various sizes for mixing ingredients.
  • Measuring Cups and Spoons: Accurate measurements are key for consistent results.
  • Cookie Scoop: For uniform meatballs that cook evenly.
  • Baking Sheet: A sturdy, non-stick baking sheet is ideal for oven cooking.
  • Meat Thermometer: Ensure food safety with this essential kitchen tool.

Serving Suggestions

Your beautifully crafted meatballs deserve a great presentation. Here are some serving ideas:

  • Classic Spaghetti: Serve over pasta with marinara sauce and a sprinkle of Parmesan.
  • Meatball Subs: Place meatballs in a toasted sub roll with marinara and melted cheese.
  • Appetizer Style: Serve with toothpicks and a dipping sauce for parties.
  • On a Salad: Top a fresh salad with sliced meatballs for a hearty meal.

Conclusion

Now that you’ve explored the ins and outs of making homemade meatballs, it’s time to gather your ingredients and get cooking! With a little practice and creativity, you’ll master this delicious dish that brings people together around the table. Remember, the joy of cooking lies in experimenting and sharing your creations—so don’t hesitate to put your personal spin on these recipes. Happy cooking!

Home

Prep Time 20 minutes
Cook Time 10 minutes
Total Time 30 minutes
Servings 8 people
Calories 350
A delightful collection of festive and sweet recipes perfect for holiday celebrations and cozy gatherings.

Ingredients

Beverages

  • 1 cup Pomegranate Holiday Punch
  • 1 cup Orange Cranberry Holiday Punch

Fudge

  • 2 tablespoons 2 Ingredient Peanut Butter Fudge

Pies

  • 1 piece Sweet Potato Pie Recipe

Sauces

  • 1 cup Cooked Cranberry Sauce Recipe

Treats

  • 2 cups Sugar Cookie Rice Krispie Treats
  • 12 pieces Reeses Turkey Treats

Toppings

  • 1 cup Cool Whip Hot Cocoa Toppers
  • 1 package Nilla Wafer Acorn Cookies

Instructions 

  • Mix the beverages and chill before serving.
  • Prepare the peanut butter fudge by melting and mixing ingredients, then refrigerate until firm.
  • Bake or prepare the sweet potato pie as directed and let it cool.
  • Cook the cranberry sauce and serve alongside the main dishes.
  • Assemble rice krispie treats and decorate with Reeses and wafers. Top with whipped topping before serving.

Notes

Enjoy these festive treats and drinks with family and friends!
Calories: 350kcal
Cost: $15
Course: Beverage, Dessert
Cuisine: American
Keyword: festive, holiday, sweet

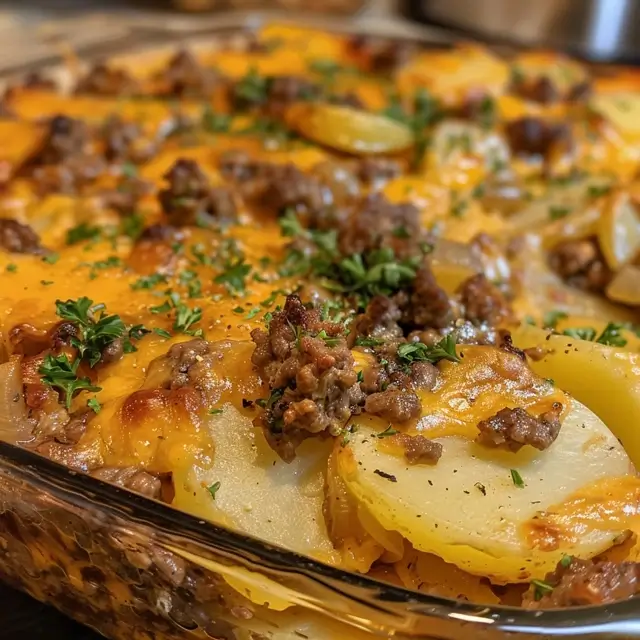
Discover the Comfort of Hobo Casserole

Welcome to the world of Hobo Casserole, a dish that embodies warmth, convenience, and heartiness! This classic recipe, featuring layers of ground beef and tender potatoes, is a perfect meal for any occasion—whether you’re feeding a family or hosting friends. With its simple preparation and rich flavors, it’s no wonder that this dish has stood the test of time. Let’s dive into why this casserole is a must-try and how you can make it your own!

Why You’ll Love This Recipe

This Hobo Casserole is more than just a meal; it’s a comforting experience. Here are five compelling reasons why you’ll love it:

  • Easy Preparation: With minimal prep time and straightforward steps, you can have this dish in the oven in no time. Perfect for busy weeknights!
  • Budget-Friendly: Utilizing affordable ingredients like ground beef and potatoes makes this casserole easy on the wallet. Feeding a crowd has never been more economical!
  • Versatile Ingredients: You can customize the recipe with your favorite vegetables or substitute proteins to suit your dietary needs. The options are endless!
  • Kid-Approved: This dish is a surefire hit with the little ones, combining familiar flavors in a fun and appealing way.
  • Comfort Food Classic: There’s something inherently cozy about a bubbling casserole. It’s the kind of dish that brings people together around the dinner table.

Ingredients Breakdown

Let’s take a closer look at the ingredients you’ll need to create this comforting Hobo Casserole, along with some helpful substitutions.

  • 1 lb ground beef: This is the star of the show! Opt for 80/20 for a balance of flavor and juiciness. You can also use ground turkey or chicken if you prefer a leaner option.
  • 1 tablespoon olive oil: For browning the beef. You can replace this with any cooking oil you prefer.
  • 1 medium onion, chopped: Adds flavor and sweetness. Yellow or white onions work best, but red onions can add a nice twist.
  • 2 cloves garlic, minced: A must for flavor enhancement! Feel free to add more if you love garlic.
  • 4-5 medium potatoes, thinly sliced: Russets are ideal, but red or Yukon Gold potatoes also work well. Ensure they are thinly sliced for even cooking.
  • 1 1/2 cups shredded cheddar cheese: For that gooey, melty goodness. You can mix in other cheeses like Monterey Jack or mozzarella for variety.
  • 1/2 cup grated Parmesan cheese: Adds a salty, nutty flavor. You can omit it if you prefer.
  • 1 teaspoon dried Italian seasoning: This herb blend adds depth. If you don’t have it, use oregano or basil.
  • 1/2 teaspoon paprika: For a hint of smokiness. You can use smoked paprika for an extra kick.
  • Salt and pepper to taste: Essential for enhancing flavors.
  • 1/2 cup beef broth or water: Keeps the potatoes moist while baking. Vegetable broth is a great alternative.
  • 1/4 cup milk (optional): For extra creaminess. You can use any milk or even cream for a richer texture.
  • Fresh parsley for garnish (optional): Adds color and freshness to the finished dish.

How to Make Hobo Casserole

Now that you have your ingredients ready, let’s walk through the steps to create this delicious casserole.

  • Step 1: Preheat your oven to 375°F (190°C) and grease a 9×13-inch baking dish with cooking spray or olive oil.
  • Step 2: In a large skillet, heat the olive oil over medium heat. Add the ground beef and cook, breaking it apart with a spoon, until browned and cooked through (about 5-7 minutes). Drain any excess fat if needed.
  • Step 3: Add the chopped onion and minced garlic to the skillet with the beef. Cook for another 3-4 minutes until the onion becomes soft and translucent.
  • Step 4: Layer the thinly sliced potatoes on top of the ground beef in the prepared baking dish. First, spread the cooked ground beef mixture evenly in the bottom of the dish. Then, arrange the potatoes on top, seasoning them with salt, pepper, Italian seasoning, and paprika.
  • Step 5: Sprinkle the shredded cheddar and grated Parmesan cheese over the beef. Pour the beef broth (or water) around the edges of the casserole to keep the potatoes moist while baking. Optionally, drizzle with milk for extra creaminess.
  • Step 6: Cover the casserole with aluminum foil and bake for 30 minutes. After 30 minutes, remove the foil and bake for an additional 15-20 minutes, or until the potatoes are tender and the cheese is bubbly and golden.
  • Step 7: Garnish with fresh parsley if desired and serve hot!

Pro Tips for the Best Hobo Casserole

To elevate your Hobo Casserole to the next level, consider these expert tips:

  • Don’t rush the browning: Ensure the ground beef is well-browned to enhance the flavor. This step is crucial for depth.
  • Slice potatoes evenly: Thin, even slices ensure that the potatoes cook uniformly—nobody likes undercooked potatoes!
  • Layer thoughtfully: When layering, think about moisture distribution. Place the beef mixture at the bottom to absorb juices from the potatoes.
  • Experiment with spices: Feel free to add your favorite spices or herbs. A dash of cayenne pepper can add heat!
  • Cheese variations: Mix and match different cheeses to create your unique flavor profile. Try gouda or feta for something different.
  • Let it rest: Allow the casserole to rest for 10 minutes after baking for better slicing and serving.
  • Make it gluten-free: Use gluten-free broth and ensure your cheese is gluten-free.
  • Consider adding veggies: Incorporate vegetables like bell peppers, carrots, or green beans for added nutrition and flavor.

Common Mistakes and Troubleshooting

Even seasoned cooks can run into hiccups. Here are some common mistakes and how to avoid them:

  • Overcrowding the pan: If cooking in a skillet, don’t overcrowd the beef; this can cause steaming rather than browning.
  • Undercooked potatoes: Ensure your potato slices are thin enough. If they’re too thick, they may not cook through.
  • Too dry casserole: If the casserole seems dry, consider adding more broth or covering it with foil during baking.
  • Flavorless dish: Don’t skimp on seasoning! Make sure every layer is seasoned well to avoid blandness.

Variations of Hobo Casserole

This recipe is a blank canvas! Here are some creative variations you might want to try:

  • Vegetarian Hobo Casserole: Replace ground beef with lentils or a mix of your favorite beans for a hearty vegetarian version.
  • Cheesy Broccoli Hobo Casserole: Add steamed broccoli florets in the layers for a veggie boost.
  • Southwestern Style: Incorporate corn, black beans, and spices like cumin and chili powder for a southwestern twist.
  • Breakfast Casserole: Use sausage instead of ground beef, and add scrambled eggs and cheese for a tasty breakfast option.

Storage and Make-Ahead Instructions

This casserole is perfect for meal prep! Here’s how to store and reheat it:

  • Refrigeration: Store leftovers in an airtight container in the refrigerator for up to 3-4 days.
  • Freezing: You can freeze the unbaked casserole for up to 2 months. Just assemble, cover tightly, and label.
  • Reheating: To reheat, thaw overnight in the fridge and bake at 350°F (175°C) until heated through, about 25-30 minutes.

Comprehensive FAQ

Here are some frequently asked questions about Hobo Casserole:

  • What is a Hobo Casserole made of? This dish typically consists of ground beef, potatoes, cheese, and seasonings, all baked together for a comforting meal.
  • Do you cook the ground beef before baking in casserole? Yes, browning the beef first enhances the flavor and texture.
  • Can I freeze Hobo Casserole with potatoes? Absolutely! It freezes well, especially if assembled but not yet baked.
  • What sides go well with beef and potato casserole? A simple green salad or steamed vegetables make excellent sides.
  • How can I make this recipe gluten-free? Use gluten-free broth and check your cheese labels to ensure they’re gluten-free.
  • What can I substitute for cheese? You can use nutritional yeast or a dairy-free cheese substitute if you’re avoiding dairy.
  • How long does it take to bake? Typically, it takes about 45-50 minutes to bake, ensuring the potatoes are tender and cheese is bubbly.
  • Can I add other meats? Certainly! Ground turkey, chicken, or even sausage can be delicious alternatives.

Nutrition Tips and Dietary Adaptations

To make this dish healthier or cater to dietary needs, consider these tips:

  • Lean meats: Use lean ground beef or turkey to reduce fat content.
  • Incorporate veggies: Add diced carrots, peas, or spinach for extra nutrients.
  • Low-fat cheese options: Choose low-fat or reduced-fat cheese to cut calories.
  • Portion control: Serve smaller portions alongside a large salad for a balanced meal.

Equipment Recommendations

Here’s what you’ll need to prepare this Hobo Casserole:

  • 9×13-inch baking dish: Essential for layering and baking.
  • Large skillet: For browning the beef and sautéing onions and garlic.
  • Cutting board and knife: For chopping your vegetables and slicing potatoes.
  • Measuring cups and spoons: To ensure accuracy in your ingredients.

Serving Suggestions

To make your meal even more delightful, consider these serving ideas:

  • Fresh Green Salad: A simple green salad with a vinaigrette pairs beautifully with the richness of the casserole.
  • Crusty Bread: Serve with warm, crusty bread to soak up the delicious flavors.
  • Pickles or Relish: Adding a tangy element can balance the rich flavors of the casserole.
  • Fruit Salad: A refreshing fruit salad on the side is a great complement to the savory dish.

In conclusion, this Hobo Casserole is not just a meal but a celebration of comfort and creativity in your kitchen. With its straightforward preparation and endless variations, it’s bound to become a family favorite. So gather your ingredients, roll up your sleeves, and enjoy the process of creating a dish that brings everyone together. Happy cooking!

Hobo Casserole Ground Beef

Prep Time 15 minutes
Cook Time 45 minutes
Total Time 1 hour
Servings 4 servings
Calories 650
A hearty and cheesy baked casserole combining ground beef, potatoes, and flavorful cheeses, perfect for a comforting family meal.

Ingredients

Meat

  • 1 lb ground beef
  • 1 tablespoon olive oil
  • 1 medium onion, chopped
  • 2 cloves garlic, minced
  • 4-5 medium potatoes, thinly sliced
  • 1 1/2 cups shredded cheddar cheese
  • 1/2 cup grated Parmesan cheese
  • 1 teaspoon dried Italian seasoning
  • 1/2 teaspoon paprika
  • to taste Salt and pepper
  • 1/2 cup beef broth or water
  • 1/4 cup milk (optional)

Garnish

  • Fresh parsley for garnish (optional)

Instructions 

  • Preheat oven to 375°F (190°C) and grease a 9×13-inch dish.
  • Cook ground beef in a skillet with olive oil until browned, then add onion and garlic; cook until soft.
  • Layer cooked beef mixture and sliced potatoes in the dish, seasoning potatoes with salt, pepper, Italian seasoning, and paprika.
  • Sprinkle cheeses over the beef, pour broth around edges, and drizzle with milk if desired.
  • Cover with foil and bake for 30 minutes, then remove foil and bake 15-20 minutes until golden and tender.
  • Garnish with parsley and serve hot.

Notes

For extra flavor, add a dash of hot sauce or herbs.
Calories: 650kcal
Cost: $15
Course: Main Course
Cuisine: American
Keyword: ground beef

Mastering Cottage Cheese Flatbreads: Your New Favorite Recipe

Welcome to a culinary journey that will transform your kitchen into a haven of deliciousness! If you’re looking for a healthy, simple, and versatile addition to your meals, look no further than cottage cheese flatbreads. This recipe is not only quick to prepare but also packed with protein and flavor, making it a perfect choice for breakfast, lunch, or dinner. Let’s dive into the details of this delightful dish that can easily become a staple in your cooking repertoire.

Why You’ll Love This Recipe

There are countless reasons to fall in love with cottage cheese flatbreads. Here are just a few:

  • Quick Preparation: With just a few simple ingredients and minimal prep time, you can whip these up in under 30 minutes.
  • Healthy and Nutritious: Cottage cheese is rich in protein and low in carbs, making these flatbreads an excellent choice for a healthy diet.
  • Versatile Base: These flatbreads can be topped with a variety of ingredients—from fresh veggies to meats or spreads—making them suitable for any meal.
  • Family-Friendly: Kids and adults alike will enjoy these flavorful flatbreads, making them a great option for family meals.
  • Easy to Customize: Feel free to experiment with different herbs, spices, and toppings to suit your taste.

Ingredient Breakdown and Substitutions

To make your cottage cheese flatbreads, you’ll need the following ingredients:

  • 2 Eggs: Large eggs work best for binding the mixture. If you need a vegan option, consider using flaxseed meal mixed with water as an egg substitute.
  • 1 Cup Cottage Cheese: Opt for low-fat or full-fat based on your dietary preferences. If you’re lactose intolerant, try using a lactose-free cottage cheese or Greek yogurt.
  • A Pinch of Salt: Enhances flavor; adjust to taste.
  • Pepper (to taste): Freshly ground black pepper adds a nice bite.
  • Garlic Powder (to taste): Provides a savory depth; you could also use fresh minced garlic for a stronger flavor.

Pro Tips for Perfect Flatbreads

To ensure your cottage cheese flatbreads turn out perfectly every time, here are some expert insights:

  • Blend Smoothly: Make sure to blend the ingredients until smooth for a uniform texture.
  • Even Spread: Ensure the mixture is spread evenly on the baking sheet to cook uniformly.
  • Monitor Baking Time: Keep an eye on the flatbreads as they bake; they should be lightly golden but not overdone.
  • Cool Before Filling: Allow the flatbreads to cool slightly before adding toppings to prevent sogginess.
  • Experiment with Toppings: Don’t hesitate to get creative with toppings—think hummus, smoked salmon, or even a simple avocado spread.
  • Use Parchment Paper: This helps prevent sticking and makes cleanup a breeze.
  • Store Properly: Keep leftovers in an airtight container in the fridge for up to three days.
  • Make Ahead: You can prepare the mixture in advance and bake it fresh when you’re ready to serve.

Common Mistakes and Troubleshooting

Even the best chefs encounter a few bumps in the road. Here are some common pitfalls and how to avoid them:

  • Too Thick: If your flatbreads are too thick, they may not cook through properly. Aim for a thin layer when spreading the mixture.
  • Dry Flatbreads: Overbaking can lead to dryness. Keep a close watch during the last few minutes of baking.
  • Sticking Issues: If your flatbreads stick to the pan, ensure you’ve lined it well with parchment paper or use a non-stick spray.

Delicious Variations to Try

Feel free to get adventurous with your cottage cheese flatbreads! Here are some fun variations to consider:

  • Herbed Flatbreads: Add fresh or dried herbs like basil, oregano, or dill to the mixture for an aromatic twist.
  • Spicy Version: Mix in some red pepper flakes or your favorite hot sauce for an extra kick.
  • Cheesy Flatbreads: Incorporate shredded cheese into the mixture for added flavor and texture.
  • Sweet Flatbreads: For a sweet treat, add a bit of cinnamon and sugar, then top with fruits and honey.

Storage and Make-Ahead Instructions

Your cottage cheese flatbreads can be made ahead and stored for convenience:

  • Refrigerate: Store flatbreads in an airtight container in the fridge for up to three days.
  • Freeze: For longer storage, freeze the flatbreads separated by parchment paper to prevent sticking. Thaw and reheat in the oven when ready to eat.
  • Make Ahead Batter: Prepare the batter a day in advance and bake it fresh the next day for optimal flavor and texture.

Frequently Asked Questions

Here are some common questions and answers about cottage cheese flatbreads:

  • Can I use other types of cheese? Yes! Feel free to experiment with ricotta or cream cheese for a different flavor profile.
  • What can I serve with flatbreads? They pair well with salads, soups, or as a base for pizzas.
  • Are these flatbreads gluten-free? Absolutely! As long as the ingredients are gluten-free, these flatbreads are a great option.
  • Can I make these vegan? Yes! Use a vegan egg substitute and non-dairy cottage cheese.
  • How do I know when they are done? They should be set and lightly golden on the edges.
  • Can I add vegetables to the batter? Definitely! Finely chopped spinach, bell peppers, or zucchini can be delicious additions.
  • What’s the best way to reheat leftovers? Reheat in the oven or a skillet to maintain their texture.
  • How do I know if my cottage cheese is fresh? Always check the expiration date and look for any signs of spoilage.

Nutrition Tips and Dietary Adaptations

When it comes to nutrition, cottage cheese flatbreads are already a healthy choice, but here are a few tips to make them even better:

  • High Protein: Cottage cheese is an excellent source of protein, which is essential for muscle repair and growth.
  • Low Carb Option: Perfect for those following a low-carb diet or keto lifestyle.
  • Boost Fiber: Add some ground flaxseed or chia seeds to the mixture for added fiber and omega-3 fatty acids.
  • Calorie Conscious: Keep track of your toppings to maintain a balanced meal without excessive calories.

Essential Equipment for Success

To make your cottage cheese flatbreads, you’ll need some basic kitchen tools:

  • Food Processor: For blending the ingredients smoothly.
  • Baking Sheet: A sturdy sheet to hold your flatbreads while they bake.
  • Parchment Paper: Helps prevent sticking and makes cleanup easier.
  • Spatula: For spreading the batter evenly on the baking sheet.

Serving Suggestions

Once your flatbreads are baked to perfection, consider these serving ideas:

  • Wraps: Use them as a wrap for lunch fillings like turkey, hummus, and fresh veggies.
  • Pizzas: Top with marinara, cheese, and your favorite toppings for a quick flatbread pizza.
  • Snacks: Enjoy them on their own or with dips like tzatziki or guacamole.

In conclusion, cottage cheese flatbreads are a fantastic addition to your cooking arsenal. With their simplicity, versatility, and nutritional benefits, you’ll find yourself making these again and again. So gather your ingredients, get creative, and enjoy every delicious bite!

Cottage Cheese Flatbreads

Prep Time 10 minutes
Cook Time 15 minutes
Total Time 25 minutes
Servings 4 pieces
Calories 180
Delicious and easy-to-make flatbreads using cottage cheese and eggs, perfect for a quick snack or meal.

Ingredients

Dairy

  • 2 pieces eggs
  • 1 cup cottage cheese
  • A pinch salt
  • Pepper (to taste) pepper
  • Garlic powder (to taste) garlic powder

Instructions 

  • Preheat oven to 350°F (175°C). Line a baking sheet with parchment paper.
  • Blend eggs, cottage cheese, salt, pepper, and garlic powder until smooth.
  • Spread mixture evenly on the baking sheet as a thin layer.
  • Bake for 10-15 minutes until set and lightly golden.
  • Let cool, then fill with toppings and roll up. Slice and serve.

Notes

You can customize toppings for added flavor.
Calories: 180kcal
Cost: $8
Course: Snack
Cuisine: American
Keyword: cottage cheese

Unleashing the Flavors of Dungeness Crab: The Ultimate Guide

When it comes to seafood, few delights match the sweet, tender meat of Dungeness crab. This guide will walk you through every step of preparing, cooking, and enjoying this culinary treasure, ensuring you create memorable meals every time. From cleaning and cooking techniques to delicious variations, you’ll discover why Dungeness crab recipes are a favorite in kitchens across the globe. Whether you’re a seasoned chef or a novice home cook, this comprehensive article will inspire confidence in your cooking skills.

Why You’ll Love This Recipe

The allure of Dungeness crab goes beyond its flavor. Here are five compelling reasons to dive into this recipe:

  • Deliciously Sweet Meat: The tender meat of Dungeness crab is naturally sweet, making it a favorite for seafood lovers.
  • Versatile Cooking Methods: Whether you prefer boiling, grilling, or roasting, Dungeness crab adapts beautifully to various cooking styles.
  • Elegant Presentation: Dungeness crab makes for an impressive dish, perfect for special occasions or family gatherings.
  • Nutrient-Rich: Packed with protein, omega-3 fatty acids, and essential nutrients, crab is a healthy addition to your diet.
  • Quick to Prepare: Once you master the cleaning and cooking process, you’ll find that preparing Dungeness crab can be done in under an hour.

Detailed Ingredient Breakdown

To create the best oven-roasted Dungeness crab, you need the right ingredients. Here’s a breakdown:

  • Dungeness Crab: Fresh or frozen, ensure you choose crabs that are alive or have been properly frozen to maintain quality.
  • Garlic: Fresh garlic enhances the natural sweetness of the crab and adds depth to the flavor.
  • Butter: Use unsalted butter for making a simple garlic butter sauce that complements the crab beautifully.
  • Lemon: Fresh lemon juice brightens the dish and balances the richness of the butter.
  • Herbs: Fresh parsley or thyme can be added for an aromatic touch.

Pro Tips for Perfect Dungeness Crab

To ensure your Dungeness crab turns out perfect every time, consider these expert insights:

  • Cleaning the Crab: Always clean your crab under cold running water. This removes any sand or debris and ensures freshness.
  • Boiling Time: For best results, boil the crab for about 10-12 minutes for 1.5-2 lbs of crab. This ensures the meat is cooked through without becoming tough.
  • Use Sea Salt: When boiling, adding sea salt to the water enhances the flavor of the crab meat.
  • Butter Temperature: Ensure your butter is at room temperature before mixing in garlic to prevent burning.
  • Resting Time: Allow the crab to rest for a few minutes after cooking; this helps the meat firm up and makes it easier to handle.
  • Serve with Lemon Wedges: Fresh lemon wedges are a must for squeezing over the crab just before eating.
  • Leftover Storage: Store any leftover crab in an airtight container in the refrigerator for up to two days.
  • Pair with Wine: A crisp white wine like Sauvignon Blanc pairs beautifully with Dungeness crab.

Common Mistakes and Troubleshooting

A few common pitfalls can affect your crab cooking experience. Here are some troubleshooting tips:

  • Overcooking: Watch the cooking time closely. Overcooked crab meat becomes rubbery and loses its delicate flavor.
  • Underseasoning: Don’t skimp on salt and seasonings. A well-seasoned crab enhances the overall taste.
  • Improper Cleaning: Ensure you remove the top shell and gills thoroughly before cooking.
  • Not Using Fresh Ingredients: Always opt for fresh garlic and herbs to maximize flavor.

Delicious Variations of Dungeness Crab

Feeling adventurous? Here are some enticing variations to try:

  • Grilled Dungeness Crab: Brush the crab with garlic butter and grill for a smoky flavor.
  • Crab Cakes: Combine crab meat with breadcrumbs, herbs, and spices for delicious crab cakes that are pan-fried to golden perfection.
  • Crab Pasta: Toss crab meat with your favorite pasta and a light cream sauce for a luxurious meal.
  • Crab Tacos: Use crab meat as a filling for tacos, topped with avocado and fresh salsa for a fresh twist.

Storage and Make-Ahead Instructions

Planning ahead? Here’s how to store and make your Dungeness crab meal in advance:

  • Cooked Crab Storage: Store cooked crab in an airtight container in the refrigerator for up to two days.
  • Make-Ahead Garlic Butter: Prepare garlic butter sauce in advance and store it in the fridge. Simply reheat before serving.
  • Freezing Crab: If you have leftover crab, it can be frozen for up to three months. Ensure it’s in an airtight freezer bag to prevent freezer burn.

Comprehensive FAQ

Got questions? Here are answers to some of the most common queries about Dungeness crab:

  • How do I know when Dungeness crab is cooked? The meat should be opaque and the shell should have a bright red color.
  • Can I use frozen Dungeness crab? Yes, frozen crab is a great option; just ensure it’s thawed properly before cooking.
  • What is the best way to clean a Dungeness crab? Remove the top shell, gills, and any internal organs, then rinse under cold water.
  • How long can I store cooked crab? Cooked crab can be stored in the refrigerator for up to two days.
  • What’s the best way to serve Dungeness crab? Serve warm with melted garlic butter and lemon wedges on the side.
  • Can I eat the crab shell? No, the shell is not edible. Focus on the sweet meat inside!
  • What sides pair well with Dungeness crab? Consider serving with coleslaw, corn on the cob, or a fresh garden salad.
  • Is Dungeness crab sustainable? Yes, when sourced from responsible fisheries, Dungeness crab is considered a sustainable seafood choice.

Nutrition Tips and Dietary Adaptations

Here’s how to enjoy Dungeness crab while keeping health in mind:

  • Low-Calorie Protein: Crab meat is high in protein yet low in calories, making it a great choice for weight management.
  • Omega-3 Fatty Acids: Incorporate crab into your diet to benefit from heart-healthy omega-3s.
  • Gluten-Free Option: This recipe is naturally gluten-free; just be cautious with any sauces or sides.
  • Allergy Considerations: Always be mindful of shellfish allergies when preparing dishes for others.

Equipment Recommendations

To make your crab cooking experience seamless, having the right tools is essential:

  • Crab Pot: A large pot for boiling or steaming is crucial for cooking multiple crabs at once.
  • Seafood Cracker: A good seafood cracker helps extract meat from the shell effortlessly.
  • Kitchen Shears: These are perfect for cutting through shells and other tough parts of the crab.
  • Serving Platter: An attractive platter makes for an appealing presentation.

Serving Suggestions

How you serve Dungeness crab can enhance the dining experience:

  • Family Style: Serve the crab on a large platter with melted garlic butter and lemon wedges for a communal dining experience.
  • Individual Plates: For a more formal setting, serve in individual portions with all sides neatly arranged.
  • Pair with Sides: Consider pairing with roasted vegetables, baked potatoes, or a refreshing salad.

In conclusion, preparing Dungeness crab can be a delightful culinary adventure that brings people together. With this comprehensive guide, you’re well-equipped to handle every aspect of cooking and serving this delicious seafood. Remember, the key to a successful crab dish is not just in the ingredients, but in the love and care you put into it. So gather your friends and family, and create memorable moments around the table with your perfectly cooked Dungeness crab!

Munchkin Time

Prep Time 15 minutes
Cook Time 30 minutes
Total Time 45 minutes
Servings 4 people
Calories 850
A delicious collection of quick and flavorful chicken and meat recipes perfect for any meal.

Ingredients

Main Ingredients

  • 4 pieces Best Oven Baked Chicken Thighs
  • 4 pieces Grilled Chicken Thighs with Garlic Lemon Marinade
  • 20 pieces Best Swedish Meatballs and Gravy
  • 2 pieces Honey Soy Chicken Thighs (Video)
  • 2 fillets Baked Salmon with Lemon
  • 1 lb Grilled Ribeye Steak with Chimichurri Sauce
  • 1 cup Greek Chicken Quinoa Bowl
  • 1 piece How to Cook Ribeye Steak in the Oven (Video)
  • 2 pieces Easy 30-Minute Chicken Chimichanga Recipe
  • 4 pieces 30-min Oven Baked Boneless Skinless Chicken Thighs (Video)
  • 4 pieces Creamy Oven Baked Chicken Thighs
  • 4 pieces Grilled Greek Chicken Gyros
  • 4 pieces Baked Honey Garlic Chicken Thighs
  • 2 pieces Smash Chicken Burger (Video)
  • 1 cup Best Hawaiian BBQ Chicken Recipe (VIDEO)
  • 1 quart Super Easy Turkey Brine Recipe

Instructions 

  • Prepare the chicken or meat as per the specific recipe instructions.
  • Cook or bake the ingredients until fully done, following the recommended times.
  • Combine or serve with desired sides or sauces.

Notes

Use fresh ingredients for best flavor and adjust seasoning to taste.
Calories: 850kcal
Cost: $15
Course: Main Course
Cuisine: Various
Keyword: baked, Chicken, meat