Author

Mike

Browsing

Unlock the Sweetness of Valentine’s Day with Heartfelt Cookies

Valentine’s Day is a time to express love and affection, and what better way to do so than with a batch of heart-shaped cookies? This Valentine’s Day Heart Cookies recipe is not just an ordinary cookie recipe—it’s a celebration of love, creativity, and the joy of baking. In this guide, I’ll walk you through every step of the process, ensuring that your cookies turn out beautifully, taste delightful, and become cherished gifts for your loved ones.

Join me, Mike Anderson, as we embark on this sweet journey together. Whether you’re a seasoned baker or just getting started, you’ll find this recipe approachable and fun. Let’s make this Valentine’s Day unforgettable!

Why You’ll Love This Recipe

  • Easy to Follow: The straightforward steps make it accessible for bakers of all skill levels.
  • Customizable: Add your favorite flavors and decorations to personalize your cookies.
  • Perfect for Gifting: These cookies not only taste amazing but also look beautiful, making them ideal gifts for friends and family.
  • Kid-Friendly Activity: Involve your children in the baking process for a fun family activity.
  • Memorable Moments: Baking and sharing these cookies can create lasting memories with your loved ones.

Ingredients You’ll Need

Gather these simple ingredients to create your heart-shaped cookies:

  • 2 1/4 cups all-purpose flour: This forms the base of your cookies.
  • 1/2 teaspoon baking powder: Helps the cookies rise for a fluffy texture.
  • 1/4 teaspoon salt: Enhances the flavor of the cookies.
  • 3/4 cup unsalted butter, softened: Provides richness and moisture.
  • 3/4 cup granulated sugar: Sweetens the dough beautifully.
  • 1 large egg: Binds the ingredients together.
  • 1 teaspoon vanilla extract: Adds a lovely flavor.
  • 1/2 cup red food coloring: Gives your cookies a festive touch.

Ingredient Substitutions

Delicious heart-shaped cookies with vibrant red color captured with an iPhone.

If you’re missing an ingredient or prefer alternatives, here are some substitutions you can consider:

  • Gluten-Free Flour: Use a 1:1 gluten-free baking flour in place of all-purpose flour for gluten-sensitive friends.
  • Vegan Butter: Substitute with a plant-based butter alternative and use flaxseed meal mixed with water instead of an egg.
  • Maple Syrup: Replace granulated sugar with maple syrup for a different flavor and sweetness.
  • Cocoa Powder: For chocolate cookies, replace 1/4 cup of flour with cocoa powder.

How to Make Valentine’s Day Heart Cookies

Let’s dive into the baking process!

  1. Preheat your oven: Set your oven to 350°F (175°C).
  2. Mix dry ingredients: In a medium bowl, whisk together flour, baking powder, and salt.
  3. Cream butter and sugar: In a large bowl, beat the softened butter and sugar together until light and fluffy.
  4. Add egg and vanilla: Incorporate the egg and vanilla extract into the butter mixture and mix well.
  5. Combine mixtures: Gradually add the dry ingredients to the wet mixture and mix until just combined.
  6. Add color: If desired, mix in the red food coloring until evenly distributed.
  7. Roll out the dough: On a floured surface, roll the dough to about 1/4 inch thickness.
  8. Cut out shapes: Use a heart-shaped cookie cutter to cut out cookies and place them on a baking sheet lined with parchment paper.
  9. Bake: Bake for 12-15 minutes or until the edges are slightly golden.
  10. Cool: Allow cookies to cool on the baking sheet for 5 minutes before transferring to a wire rack to cool completely.

Pro Tips for Perfect Valentine’s Cookies

  • Chill the dough: If the dough feels too soft, refrigerate it for 30 minutes before rolling to prevent spreading.
  • Use parchment paper: Lining your baking sheet helps prevent cookies from sticking.
  • Don’t overbake: Keep an eye on your cookies; they should be soft when you take them out.
  • Experiment with flavors: Try adding almond extract for a unique twist!
  • Decorate with icing: Once cooled, decorate with royal icing or sprinkles for an eye-catching finish.
  • Room temperature ingredients: Ensure butter and eggs are at room temperature for the best mixing.
  • Use a timer: Set a timer for baking to avoid overbaking.
  • Store properly: Keep cookies in an airtight container to maintain freshness.

Common Mistakes and Troubleshooting

  • Cookies spread too much: This could be due to warm dough or not enough flour. Chill your dough before baking.
  • Cookies are too hard: Overbaking can cause this. Ensure you take them out while they’re still soft.
  • Flavors are too bland: Don’t be shy with the vanilla extract; it enhances the overall taste.
  • Dough is too sticky: Add a bit more flour if the dough feels too wet.

Variations to Try

Mix things up with these fun variations:

  • Chocolate Heart Cookies: Incorporate cocoa powder into the dough for a chocolatey delight.
  • Sprinkle Cookies: Add colored sprinkles directly into the dough for a festive touch.
  • Nutty Cookies: Mix in chopped nuts like almonds or hazelnuts for added crunch.
  • Frosted Hearts: Top your cookies with different colored frostings to create a vibrant cookie platter.

Storage and Make-Ahead Instructions

Want to prepare in advance? Here’s how to store your cookies:

  • Room Temperature: Store cookies in an airtight container at room temperature for up to a week.
  • In the Fridge: For longer freshness, you can keep them in the fridge for up to two weeks.
  • Freezing: Freeze baked cookies for up to three months. Wrap them individually for best results.
  • Dough Storage: You can also freeze the cookie dough for up to three months. Just thaw it in the fridge before baking.

Frequently Asked Questions (FAQs)

  • Can I use whole wheat flour? Yes, but it may alter the texture. Use half whole wheat and half all-purpose for a healthier version.
  • How can I prevent my cookies from spreading too much during baking? Ensure your dough is chilled and your oven is preheated.
  • Can I make these cookies ahead of time? Absolutely! You can prepare the dough or baked cookies in advance.
  • What’s the best way to decorate my cookies? Royal icing or a simple glaze works beautifully for decoration.
  • How long do these cookies last? They can last up to a week at room temperature or longer if refrigerated.
  • Can I use different colors of food coloring? Yes! Feel free to experiment with different shades.
  • Are these cookies suitable for kids? Definitely! They’re a fun baking project and can be decorated in many ways.
  • What if I don’t have a heart-shaped cutter? Any shape will do! Get creative with what you have.

Nutritional Tips and Dietary Adaptations

Making healthy choices? Here are some tips:

  • Reduce Sugar: Cut back on sugar by using natural sweeteners like honey or maple syrup.
  • Use Whole Ingredients: Opt for organic butter and free-range eggs for a healthier cookie.
  • Portion Control: Consider making smaller cookies to enjoy the flavor without overindulging.

Essential Equipment for Baking

Here’s what you’ll need to make your heart-shaped cookies:

  • Mixing Bowls: A set of various sizes for mixing ingredients.
  • Electric Mixer: A stand or hand mixer makes creaming butter and sugar easy.
  • Baking Sheets: Use heavy-duty baking sheets for even baking.
  • Parchment Paper: Perfect for lining your baking sheets and preventing sticking.
  • Cookie Cutters: Invest in a good set of various shapes for versatile baking.

Serving Suggestions

These cookies can be served in a variety of delightful ways:

  • Gift Boxes: Present in a beautifully decorated box for a thoughtful gift.
  • Cookie Platters: Arrange them with other treats for a festive dessert table.
  • Pair with Beverages: Serve with hot cocoa, coffee, or tea for a cozy treat.

Conclusion: Bake Your Way to a Heartfelt Valentine’s Day

Now that you have the ultimate guide to baking Valentine’s Day Heart Cookies, it’s time to get started! Remember, the key to great baking is patience, care, and love. Each cookie you create is a testament to your affection and creativity. Happy baking, and may your Valentine’s Day be filled with sweet moments and delicious treats!

Valentine's Day Heart Cookies

Prep Time 20 minutes
Cook Time 15 minutes
Total Time 35 minutes
Servings 24 cookies
Calories 150
Celebrate love with these adorable heart-shaped cookies perfect for Valentine's Day.

Ingredients

Dough

  • 2 1/4 cups all-purpose flour
  • 1/2 teaspoon baking powder
  • 1/4 teaspoon salt
  • 3/4 cup unsalted butter, softened
  • 3/4 cup granulated sugar
  • 1 large egg
  • 1 teaspoon vanilla extract
  • 1/2 cup red food coloring

Instructions 

  • Preheat oven to 350°F (175°C).
  • Mix dry ingredients; beat butter and sugar until fluffy.
  • Add egg and vanilla; combine well.
  • Add food coloring; mix until evenly colored. Roll out dough and cut into hearts.
  • Bake 12-15 minutes; cool before serving.
Notes

Chill dough for easier handling if needed.
Calories: 150kcal
Cost: $15
Course: Dessert
Cuisine: American
Keyword: cookies

Discover the Joy of Crafting Fresh Vietnamese Spring Rolls

Welcome to your culinary journey into the world of fresh Vietnamese spring rolls! This delightful recipe combines the vibrant flavors of shrimp or tofu, crisp vegetables, and aromatic herbs, all wrapped in delicate rice paper. Whether you’re hosting a gathering or simply looking for a healthy snack, these rolls are sure to impress. In this guide, we’ll take you through every step of the process, share pro tips, and explore variations to suit every palate. Let’s dive in!

Why You’ll Love This Recipe

  • Fresh Ingredients: Using seasonal vegetables and herbs ensures your spring rolls burst with flavor.
  • Customizable: Easily adapt the filling to suit dietary preferences—make it vegan with tofu or keep it classic with shrimp.
  • Health Benefits: Packed with fresh produce, these rolls are low in calories and high in nutrients, making them a guilt-free treat.
  • Fun to Make: Rolling spring rolls is a hands-on activity that’s perfect for family cooking nights or gatherings with friends.
  • Perfect for Any Occasion: Serve them as appetizers, snacks, or even as a light meal; they’re versatile enough for any setting.

Ingredients Breakdown

Here’s what you’ll need to create these delicious spring rolls:

  • Spring Roll Wrappers: 10-12 rice paper wrappers, approximately 8 1/2 inches in diameter.
  • Protein Option: 12 oz cooked shrimp (peeled) or baked tofu, cut into 1/2 inch strips.
  • Noodles: 4 ounces vermicelli noodles, cooked according to package instructions.
  • Vegetables: 1-2 Turkish cucumbers, daikon radish, bell pepper, and purple cabbage or matchstick carrots.
  • Herbs: 1/4 cup mint leaves and 1/4 cup Thai basil leaves.
  • Other Crunchy Options: Feel free to add jicama, grated beets, or kohlrabi for extra texture.

For the dipping sauce, you will need:

  • Nuoc Cham Ingredients: 3 tbsp water, 1 tbsp sugar, 1 tbsp fresh lime or lemon juice, and 1 tbsp fish sauce (or vegan fish sauce). Optionally, add slices of bird’s eye or Thai chilies for a kick!

Step-by-Step Instructions

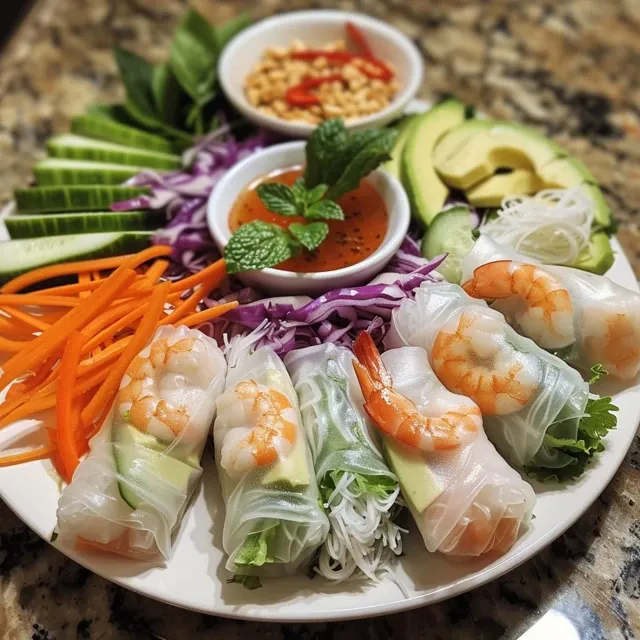
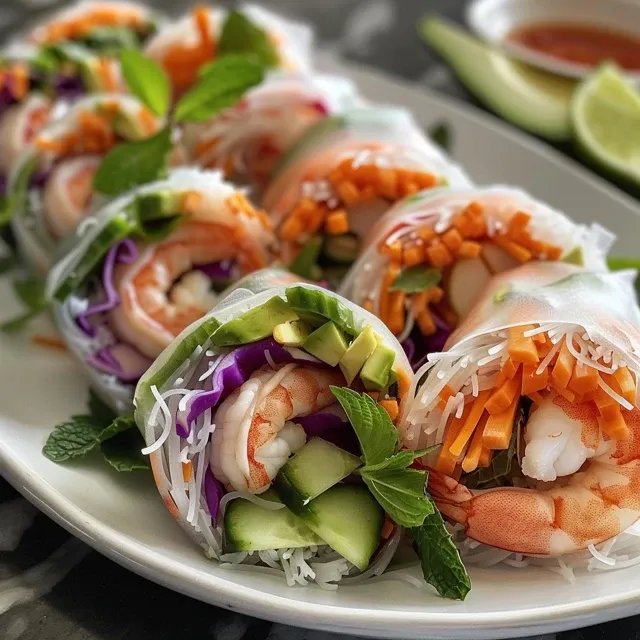
Detailed image of vibrant Vietnamese spring rolls filled with shrimp and fresh vegetables on a plate.

Ready to roll? Follow these simple steps to create your fresh Vietnamese spring rolls:

  • Prep Your Ingredients: Gather and prepare all filling ingredients, ensuring they’re ready to roll.
  • Soften the Rice Paper: Fill a large bowl with lukewarm water. Submerge one rice paper in the water until it becomes tender and flexible, about 10 seconds.
  • Assemble the Rolls: Place the softened rice paper on a damp kitchen towel. Lay out your chosen filling—noodles, veggies, protein, and herbs—then roll it up tightly like a burrito. Set it seam-side down. Repeat with all wrappers.
  • Prepare the Dipping Sauce: In a small bowl, combine the Nuoc Cham ingredients and stir until sugar dissolves.
  • Serve and Enjoy: Pair your fresh rolls with the dipping sauce and enjoy your creation!

Pro Tips for Perfect Spring Rolls

  • Keep It Moist: Use a damp paper towel to keep the rice paper from drying out while you roll.
  • Don’t Overstuff: Too much filling can make rolling difficult, so aim for a balanced amount.
  • Experiment with Textures: Incorporate crunchy veggies and fresh herbs for added depth of flavor and texture.
  • Rolling Technique: Tuck in the sides before rolling to secure the filling and maintain a neat appearance.
  • Make Ahead: You can prepare the rolls a few hours in advance. Just cover them with a damp cloth to keep them fresh.
  • Chill for Refreshing Taste: Serve your spring rolls cold for a refreshing bite, especially on hot days!
  • Vegan Considerations: Substitute shrimp with marinated tofu and use vegan fish sauce for a plant-based option.
  • Storage Tips: If you have leftovers, store them in the fridge with a damp paper towel between layers to prevent sticking.

Variations to Try

Feel free to mix things up! Here are four tasty variations:

  • Spicy Shrimp Rolls: Add a slice of jalapeño or a few drops of sriracha to your shrimp for a spicy kick.
  • Crunchy Veggie Rolls: Load up on colorful veggies like bell peppers, carrots, and celery for a crunchy vegetarian option.
  • Fruit and Nut Rolls: Incorporate slices of mango or avocado for a sweet twist and sprinkle in some crushed peanuts for texture.
  • Herbed Tofu Rolls: Marinate tofu in sesame oil and add fresh herbs like cilantro for a fragrant experience.

Storage and Make-Ahead Instructions

Fresh Vietnamese spring rolls can be stored in the fridge for a few hours. Here are some tips:

  • Short-term Storage: Place the rolls in an airtight container, separated by damp paper towels to prevent sticking.
  • Long-term Storage: Unassembled ingredients can be stored in the fridge for up to three days, keeping everything fresh and ready to roll.

FAQs About Vietnamese Spring Rolls

  • Can I use frozen shrimp?: Yes, just ensure they are thawed and cooked before using.
  • What are the best vegetables to use?: Fresh and crunchy vegetables like cucumbers, bell peppers, and carrots work best.
  • How do I make the rice paper easier to handle?: Soak in warm water until pliable, but not too soft to tear.
  • Can I make these rolls vegan?: Absolutely! Substitute shrimp with tofu and use vegan sauces.
  • How long do spring rolls last in the fridge?: They are best consumed within a day but can last up to two days if stored properly.
  • What dipping sauce goes best with spring rolls?: Nuoc Cham or a peanut dipping sauce pairs perfectly.
  • Can I fry spring rolls?: Yes, you can fry them for a crispy texture, but they are traditionally served fresh.
  • What else can I serve with spring rolls?: Pair with a light salad or soup for a full meal.

Nutrition Tips and Dietary Adaptations

Spring rolls are naturally low in calories and can be a healthy addition to your diet. Here are a few tips:

  • Low-Carb Option: Replace vermicelli noodles with spiralized zucchini or cucumber.
  • Gluten-Free: Use rice paper and ensure all sauces are gluten-free.
  • Protein Boost: Add edamame or chickpeas for a plant-based protein punch.

Essential Equipment

To make your spring rolls successfully, you’ll need:

  • A Large Bowl: For soaking the rice paper.
  • Damp Kitchen Towels: To keep the rice paper moist while rolling.
  • Sharp Knife: For slicing vegetables and proteins evenly.

Serving Suggestions

Present your fresh Vietnamese spring rolls with flair! Here are some ideas:

  • Colorful Platter: Arrange the rolls on a platter with vibrant garnishes like lime wedges and fresh herbs.
  • Dipping Stations: Offer a variety of dipping sauces, such as sweet chili sauce, peanut sauce, and Nuoc Cham.
  • Garnish with Sesame Seeds: Sprinkle toasted sesame seeds for an added crunch and visual appeal.

Conclusion

Crafting fresh Vietnamese spring rolls is not just about cooking; it’s about creating moments of connection and joy around the table. With this comprehensive guide, you’re equipped to master this delightful dish and share it with family and friends. Remember, the beauty of spring rolls lies in their versatility—so get creative and make them your own! Enjoy your culinary adventure, and happy rolling!

Fresh Vietnamese Spring Roll Recipe

Prep Time 20 minutes
Cook Time 10 minutes
Total Time 30 minutes
Servings 4 servings
Calories 150
Enjoy these fresh and healthy Vietnamese spring rolls filled with vibrant vegetables, shrimp or tofu, and herbs, served with a tangy dipping sauce.

Ingredients

Wrapper

  • 10-12 pieces spring roll wrappers (8 1/2 inch in diameter)

Protein

  • 12 oz shrimp (cooked, peeled) or baked tofu (cut into 1/2 inch strips)

Noodles

  • 4 ounces vermicelli noodles (cooked according to directions)

Vegetables

  • 1-2 pieces Turkish cucumber (cut into strips)
  • 1 piece daikon radish (cut into strips (or use red radishes))
  • 1 piece bell pepper (cut into strips)
  • 1 cup purple cabbage or matchstick carrots

Fruits & Herbs

  • 1 piece avocado (sliced)
  • 1/4 cup mint leaves
  • 1/4 cup thai basil leaves

Dipping Sauce

  • 3 tbsp water
  • 1 tbsp sugar
  • 1 tbsp fresh lime or lemon juice
  • 1 tbsp fish sauce or vegan fish sauce (slices of bird’s eye / Thai chilies)

Instructions 

  • Prepare all filling ingredients and have them ready to roll.
  • Fill a large bowl with lukewarm water. Submerge one rice paper until tender, about 10 seconds.
  • Place softened rice paper on a damp towel, add veggies, noodles, shrimp or tofu, and herbs. Roll tightly and set seam side down. Repeat with remaining rice papers.
  • Serve with Sweet chili Sauce or Vietnamese Nuoc Cham.
  • To make Nuoc Cham, stir all sauce ingredients in a small bowl.

Notes

Keep ingredients ready for quick assembly and enjoy!
Calories: 150kcal
Cost: $15
Course: Appetizer
Cuisine: Vietnamese
Keyword: Spring Rolls

Indulge in the Joy of Baking with One-Bowl Chocolate Fudge Cake

Welcome to the world of baking bliss! Today, we’re diving into the delightful and straightforward process of making a One-Bowl Chocolate Fudge Cake. This recipe is not just about creating a cake; it’s about enjoying the simplicity and satisfaction that comes from baking at home. Perfect for any occasion, this cake is rich, moist, and incredibly easy to whip up. Let’s explore why this recipe is a favorite among home bakers and how you can make it your own!

Why You’ll Love This Recipe

This One-Bowl Chocolate Fudge Cake is more than just a dessert; it’s an experience. Here are some reasons why you’ll adore making this cake:

  • Minimal Cleanup: With everything prepared in just one bowl, you can enjoy baking without the hassle of washing multiple dishes.
  • Rich Chocolate Flavor: The combination of cocoa powder and hot coffee elevates the chocolate intensity, making every bite a delight.
  • Moist and Fudgy Texture: Thanks to the buttermilk and careful mixing, this cake remains moist and fudgy for days.
  • Versatile Serving Options: Whether you prefer it plain, dusted with powdered sugar, or topped with a luscious frosting, this cake adapts beautifully to your taste.
  • Quick to Prepare: In just about an hour, you can have a decadent cake ready for your guests or a cozy family gathering.

Detailed Ingredient Breakdown

Before we dive into the recipe, let’s take a closer look at the ingredients and some possible substitutions to cater to your needs:

  • 1 cup all-purpose flour: A staple for structure. You can substitute with gluten-free flour for a gluten-free version.
  • 1 cup granulated sugar: Provides sweetness and moisture. Coconut sugar can be used for a lower glycemic option.
  • 1/2 cup unsweetened cocoa powder: The star for chocolate flavor. Dutch-processed cocoa gives a richer taste.
  • 1 tsp baking soda: A leavening agent that helps the cake rise. Make sure it’s fresh for best results.
  • 1/2 tsp salt: Enhances flavor and balances the sweetness.
  • 1 cup buttermilk: Contributes to moisture and tenderness. Substitute with a mix of milk and vinegar if you don’t have buttermilk.
  • 1/2 cup vegetable oil: Keeps the cake moist. Melted coconut oil is a delicious alternative.
  • 2 large eggs: Binds the ingredients together. For a vegan option, use flax eggs or a commercial egg replacer.
  • 1 tsp vanilla extract: Adds depth to the flavor. Use pure vanilla for the best taste.
  • 1/2 cup hot coffee (or hot water): Enhances the chocolate flavor. If you prefer not to use coffee, hot water works just fine.

Step-by-Step Instructions for One-Bowl Chocolate Fudge Cake

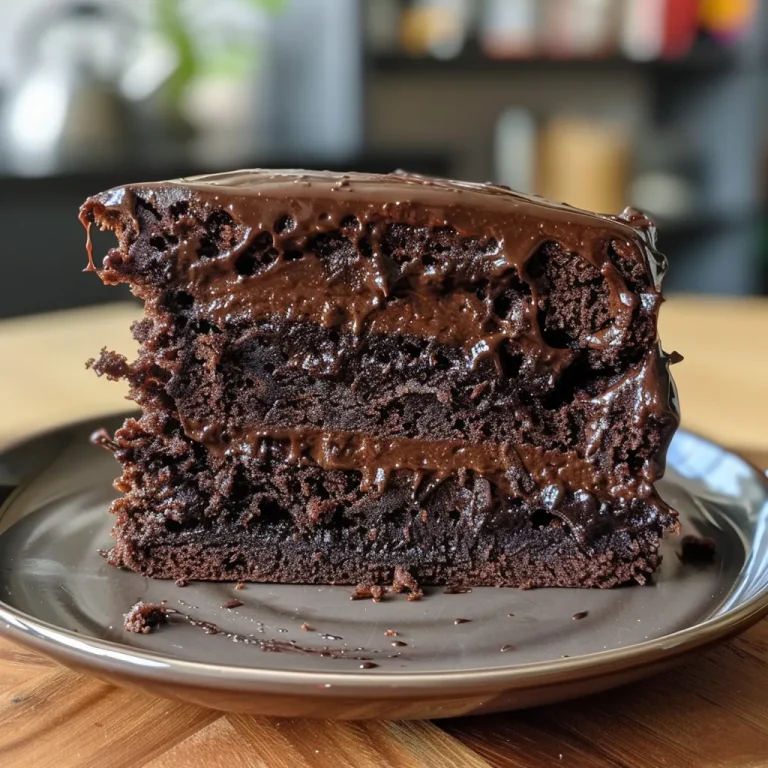
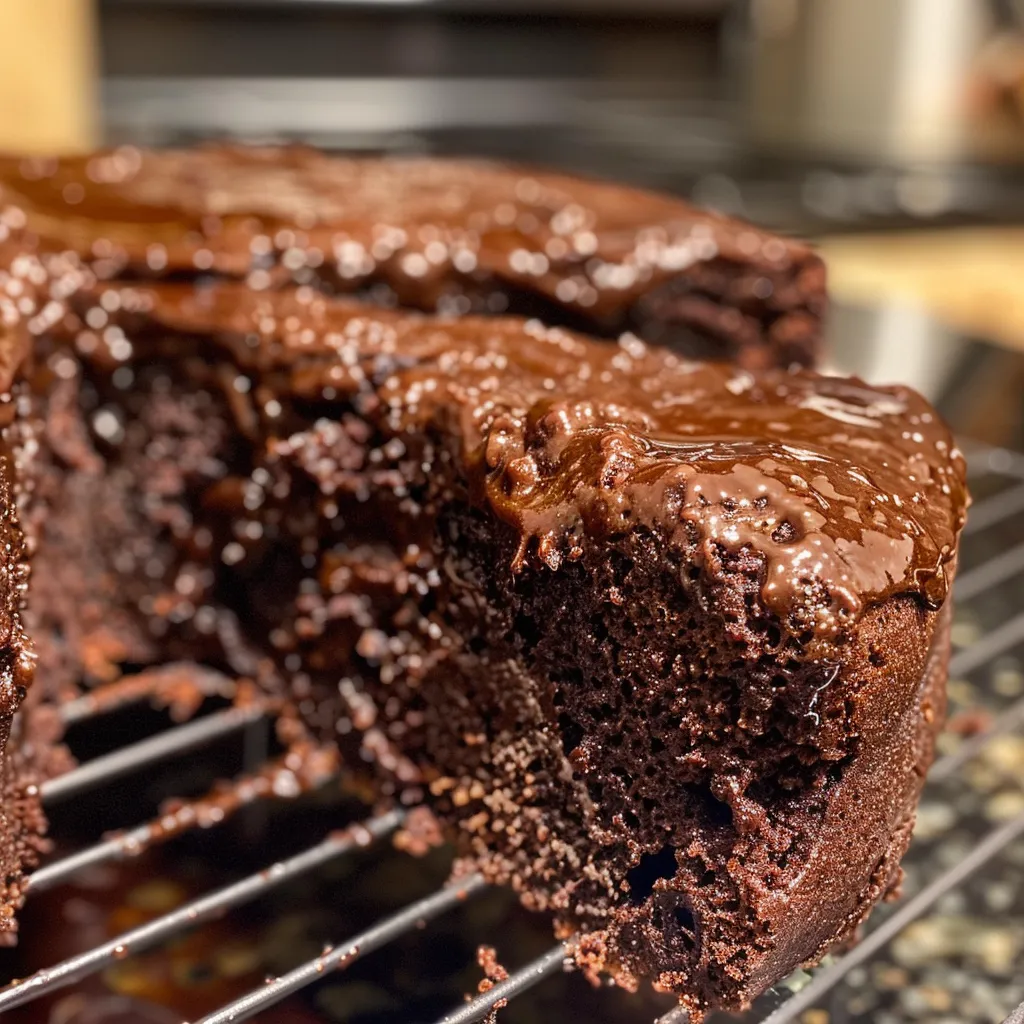
Indulgent chocolate fudge cake with a soft, rich appearance, ready to enjoy.

Now that we have our ingredients ready, let’s get baking! Follow these simple steps:

  1. Preheat your oven to 350°F (175°C) and grease a 9-inch round cake pan. Line the bottom with parchment paper for easy removal.
  2. In a large mixing bowl, whisk together the flour, sugar, cocoa powder, baking soda, and salt until evenly combined.
  3. Pour in the buttermilk, vegetable oil, eggs, vanilla, and hot coffee directly into the dry ingredients.
  4. Using a whisk, mix until just combined. Be careful not to overmix—the key to a fudgy texture is to keep it light.
  5. Pour the batter into the prepared cake pan and bake for 30-35 minutes. A toothpick inserted in the center should come out with moist crumbs, not wet batter.
  6. Let the cake cool in the pan for about 10 minutes, then transfer it to a wire rack to cool completely. Frost or dust with powdered sugar as desired.

Expert Baking Tips for the Best Results

To ensure your One-Bowl Chocolate Fudge Cake turns out perfectly every time, consider these expert tips:

  • Use Room Temperature Ingredients: Ingredients mix more easily and create a smoother batter when they’re at room temperature.
  • Don’t Overmix: Mixing too much can lead to a tough cake. Stop as soon as the ingredients are combined.
  • Test for Doneness: Ovens can vary; check your cake a few minutes before the recommended baking time to avoid overbaking.
  • Cool Completely Before Frosting: This prevents the frosting from melting and helps maintain a beautiful presentation.
  • Experiment with Add-ins: Chopped nuts, chocolate chips, or even a swirl of peanut butter can add delightful variations to the cake.

Common Mistakes and Troubleshooting

Even the best bakers encounter hiccups. Here are some common pitfalls and how to avoid them:

  • Dry Cake: This can happen if you overbake. Always check for doneness with a toothpick and avoid leaving it in the oven too long.
  • Dense Texture: This may result from overmixing. Remember, the batter should be mixed just until combined.
  • Falling Cake: If your cake sinks in the middle, it may have been underbaked or the oven temperature was too low. Use an oven thermometer to ensure accuracy.

Delicious Variations to Try

Once you’ve mastered the basic recipe, here are some fun variations to switch things up:

  • Chocolate Mint Fudge Cake: Add 1 teaspoon peppermint extract to the batter for a refreshing twist.
  • Mocha Chocolate Fudge Cake: Instead of hot water, use brewed coffee to enhance the coffee flavor.
  • Nutty Chocolate Fudge Cake: Fold in 1 cup of chopped walnuts or pecans for added crunch and flavor.
  • Red Velvet Fudge Cake: Replace half of the cocoa powder with red food coloring for a vibrant take on the classic.

Storage and Make-Ahead Instructions

This One-Bowl Chocolate Fudge Cake can be stored and enjoyed over several days:

  • Room Temperature: The cake can be kept at room temperature for up to 2 days, covered with a cake dome or plastic wrap.
  • Refrigerator: Store covered in the fridge for up to a week. To prevent drying, wrap well.
  • Freezing: Freeze the cake (unfrosted) for up to 3 months. Thaw in the refrigerator overnight before serving.

Frequently Asked Questions

Here are some common questions about the One-Bowl Chocolate Fudge Cake:

  • Can I use whole wheat flour? Yes, whole wheat flour can be used, although it may result in a denser cake.
  • What if I don’t have buttermilk? You can make a simple substitute by mixing milk with vinegar or lemon juice.
  • How can I make this cake gluten-free? Substitute all-purpose flour with a gluten-free blend.
  • Can I add chocolate chips? Absolutely! Fold in about 1 cup of chocolate chips for extra chocolatey goodness.
  • What’s the best way to frost this cake? Keep it simple with powdered sugar, or try a chocolate ganache for a rich finish.
  • Is this cake good for layer cakes? Yes! You can easily double the recipe for layer cakes.
  • Can I use a different type of sugar? Brown sugar or coconut sugar can be substituted for a different flavor profile.
  • What’s the best way to serve this cake? It’s delightful on its own, but a scoop of vanilla ice cream takes it to the next level!

Nutritional Tips and Dietary Adaptations

This One-Bowl Chocolate Fudge Cake can be adapted to fit various dietary needs:

  • Low Sugar Option: Use a sugar substitute like erythritol to reduce sugar content.
  • Dairy-Free Version: Use almond milk and a dairy-free yogurt in place of buttermilk.
  • Vegan Version: Replace eggs with flax eggs and use plant-based milk.

Essential Equipment for Perfect Baking

To make this One-Bowl Chocolate Fudge Cake, you’ll need:

  • 9-inch round cake pan: A must-have for even baking and easy release.
  • Mixing bowl: A large bowl for all your ingredients.
  • Whisk or spatula: For mixing the batter gently.
  • Parchment paper: For lining the bottom of your cake pan, ensuring a clean release.

Serving Suggestions

This cake pairs wonderfully with a variety of accompaniments:

  • Fresh Berries: Serve with strawberries or raspberries for a refreshing contrast.
  • Ice Cream: A scoop of vanilla or chocolate ice cream elevates each slice.
  • Whipped Cream: Top with freshly whipped cream for added creaminess.
  • Chocolate Ganache: Drizzle over the top for an extra indulgent treat.

In conclusion, baking this One-Bowl Chocolate Fudge Cake is not only a delightful culinary adventure but also a great way to create memories around the kitchen table. With its rich flavor and moist texture, it’s sure to be a hit with family and friends. Happy baking, and may your kitchen be filled with the sweet aroma of chocolate!

One-Bowl Chocolate Fudge Cake

Prep Time 10 minutes
Cook Time 35 minutes
Total Time 45 minutes
Servings 8 pieces
Calories 350
A rich and moist chocolate cake made effortlessly in one bowl, perfect for satisfying your sweet tooth.

Ingredients

Dry ingredients

  • 1 cup all-purpose flour
  • 1 cup granulated sugar
  • 1/2 cup unsweetened cocoa powder
  • 1 tsp baking soda
  • 1/2 tsp salt

Wet ingredients

  • 1 cup buttermilk
  • 1/2 cup vegetable oil
  • 2 large eggs
  • 1 tsp vanilla extract
  • 1/2 cup hot coffee (or hot water)

Instructions 

  • Preheat oven to 350°F (175°C). Grease a 9-inch round pan.
  • Mix dry ingredients in a bowl. Add wet ingredients and whisk until just combined.
  • Pour batter into the pan and bake for 30–35 minutes.
  • Cool for 10 minutes, then transfer to a wire rack. Serve as desired.

Notes

Use good quality cocoa for best flavor.
Calories: 350kcal
Cost: $15
Course: Dessert
Cuisine: American
Keyword: chocolate

Discover the Joy of Sourdough Discard Focaccia

Welcome to a delightful journey into the world of baking with sourdough! If you’re looking to elevate your bread game, you’ve come to the right place. This sourdough discard focaccia recipe with rosemary and olive oil is not just easy; it’s also incredibly rewarding. With its crispy exterior and soft, airy interior, this focaccia is perfect for any meal or occasion. Let’s dive into the details of creating this culinary masterpiece!

Why You’ll Love This Recipe

This focaccia recipe isn’t just another bread; it’s a game-changer. Here’s why:

  • Versatile Ingredients: Made with simple pantry staples, this recipe uses sourdough discard, allowing you to reduce waste while creating something delicious.
  • Beginner-Friendly: Whether you’re a novice or an experienced baker, the straightforward steps make it easy to achieve perfect results.
  • Flavor Explosion: The addition of fresh rosemary and a drizzle of olive oil elevates the flavor profile, making it a favorite at dinner parties and family meals.
  • Customizable: You can easily modify the toppings and mix-ins to suit your taste preferences or dietary needs.
  • Perfect for Sharing: This focaccia is not just a loaf of bread; it’s a centerpiece for gatherings, perfect for tearing and sharing!

Ingredients Breakdown

Let’s take a closer look at the essential ingredients needed for this focaccia, along with possible substitutions:

  • Sourdough Starter Discard: 1 cup (240g) of unfed sourdough discard is the base of this recipe. If you don’t have discard, you can substitute it with 1 cup of active sourdough starter.
  • All-Purpose Flour: 2 cups (260g) for a light texture. For a heartier bread, consider using bread flour instead.
  • Warm Water: 3/4 cup (180ml) at about 80°F (27°C) helps activate the yeast. If you’re using cold water, remember to let it sit out to warm up.
  • Olive Oil: 2 tablespoons, plus extra for drizzling. Use high-quality extra virgin olive oil for the best flavor.
  • Salt: 1 teaspoon enhances flavor and strengthens gluten structure.
  • Sugar or Honey: 1 teaspoon (optional) for a touch of sweetness, enhancing the browning process.
  • Instant Yeast: 1 teaspoon (optional) can speed up the fermentation process, but it’s not necessary if you’re using active sourdough.
  • Fresh Rosemary: 2 tablespoons, roughly chopped, adds a fragrant touch. You can also use other herbs like thyme or oregano.
  • Coarse Sea Salt: For sprinkling on top, adding a delightful crunch.

Step-by-Step Instructions

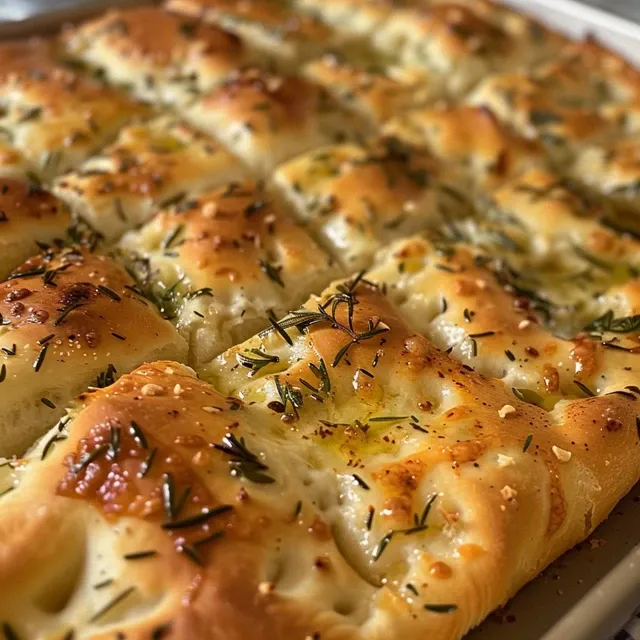
Delicious slice of focaccia bread with an inviting shine from olive oil and herbs.

Ready to create your focaccia? Follow these detailed steps for a successful bake:

  1. In a large bowl, combine the sourdough discard, warm water, and 2 tablespoons olive oil. Mix well.
  2. Add flour, salt, sugar (if using), and instant yeast (if using). Stir until you achieve a loose, sticky dough.
  3. Cover the bowl with a damp towel or plastic wrap and let the dough rest for 30 minutes (this is called the autolyse).
  4. For the next 2 hours, every 30 minutes, wet your hands and gently grab one edge of the dough. Stretch it upwards and fold it over the rest of the dough. Repeat this process 3 to 4 times around the bowl each time.
  5. After your final stretch and fold, cover the bowl again and let the dough sit until it doubles in size, about 2 to 3 hours.
  6. Generously oil a 9×13 inch baking pan. Carefully tip the dough into the pan and use your fingertips to press it out evenly, creating dimples all over by pressing your fingers deep into the dough.
  7. Cover the dough again and let it rise for an additional 45 minutes to 1 hour until puffed up.
  8. Preheat your oven to 450°F (230°C). Drizzle olive oil generously over the dough, sprinkle with fresh rosemary, and finish with coarse sea salt.
  9. Bake the focaccia for 20 to 25 minutes until golden brown and crisp on top.
  10. Remove from the oven and let it cool slightly on a wire rack. Slice into squares and enjoy warm!

Pro Tips for Perfect Focaccia

Here are some expert insights to ensure your focaccia turns out perfectly every time:

  • Hydration is Key: This focaccia benefits from a wetter dough. Don’t be afraid if it seems sticky; it will create that lovely airy texture.
  • Use Warm Water: Ensure your water is warm, around 80°F (27°C), to activate the yeast without killing it.
  • Experiment with Flavors: Feel free to add garlic, olives, or sun-dried tomatoes into the dough for added flavor.
  • Don’t Rush the Rise: Allowing the dough to rise fully is crucial for developing flavor and texture.
  • Check Oven Temperature: An oven thermometer can help ensure your oven is at the right temperature for perfect baking.
  • Cool Before Slicing: Letting the focaccia cool slightly before slicing helps maintain its structure.
  • Storage: Store any leftover focaccia in an airtight container at room temperature for up to 2 days or freeze for longer storage.
  • Reheat for Best Results: Warm leftovers in the oven or toaster oven for a few minutes to bring back that fresh, crispy texture.

Common Mistakes and Troubleshooting

Even the best bakers can encounter challenges. Here are some common mistakes and how to avoid them:

  • Dense Texture: If your focaccia is too dense, it could be due to insufficient rising time or not enough hydration in the dough.
  • Flat Dough: If the dough doesn’t rise well, check the freshness of your sourdough discard and yeast.
  • Burnt Bottom: If the bottom burns before the top is golden, try placing a baking sheet on the rack below the focaccia to diffuse the heat.
  • Dry Focaccia: Ensure you use enough olive oil, both in the dough and on top before baking, to keep it moist.

Delicious Variations

Get creative with your focaccia! Here are some variations to try:

  • Garlic and Herb Focaccia: Add minced garlic and a mix of herbs like thyme and oregano into the dough for a fragrant twist.
  • Olive and Cheese Focaccia: Top with pitted black olives and sprinkle with crumbled feta cheese before baking.
  • Tomato Basil Focaccia: Incorporate sun-dried tomatoes and fresh basil into the dough for a Mediterranean flair.
  • Cheesy Focaccia: Mix in grated Parmesan or mozzarella cheese into the dough for a cheesy delight.

Storage and Make-Ahead Instructions

Planning ahead? Here’s how to store and prepare your focaccia:

  • Room Temperature: Store cooled focaccia in an airtight container for up to 2 days.
  • Refrigerate: For longer storage, refrigerate for up to a week.
  • Freeze: Wrap slices tightly in plastic wrap and freeze for up to 3 months. Thaw at room temperature before reheating.
  • Make-Ahead Option: Prepare the dough up to the first rise, then refrigerate it overnight. Bring back to room temperature before shaping and baking.

Frequently Asked Questions

Here are some common questions about sourdough discard focaccia:

  • Can I use cold sourdough discard? Yes, but it’s best to let it come to room temperature for better results.
  • What if I don’t have a sourdough starter? You can use store-bought bread dough or make a simple yeasted focaccia instead.
  • How can I tell when the focaccia is done? It should be golden brown on top and sound hollow when tapped on the bottom.
  • Can I add toppings before baking? Absolutely! Just make sure they’re not too heavy, or the focaccia may not rise properly.
  • Why is my focaccia too flat? Insufficient rising time or not enough yeast can cause this. Ensure the dough doubles in size before baking.
  • Can I make this gluten-free? Yes! Substitute all-purpose flour with a gluten-free flour blend, ensuring it contains a binding agent like xanthan gum.
  • What’s the best way to serve focaccia? It’s delicious on its own but pairs wonderfully with dips, cheese, or as a sandwich bread.
  • Can I use dried rosemary instead of fresh? Yes, but use less, as dried herbs are more concentrated in flavor.

Nutritional Tips and Dietary Adaptations

If you’re conscious about health and nutrition, here are some tips:

  • Whole Grain Option: Substitute half of the all-purpose flour with whole wheat flour for added fiber and nutrients.
  • Less Oil: Reduce the amount of olive oil in the dough for a lower-fat version, but it may affect texture.
  • Lower Sodium: Decrease the salt to suit dietary restrictions; just be aware that it may affect flavor.
  • Vegan Adaptation: This recipe is naturally vegan, but ensure any additional toppings are plant-based.

Equipment Recommendations

To successfully bake your focaccia, here’s what you’ll need:

  • Mixing Bowl: A large bowl for mixing and rising the dough.
  • Measuring Cups and Spoons: Essential for accurate ingredient measurements.
  • Baking Pan: A 9×13 inch pan is ideal for this recipe, though a cast-iron skillet works beautifully too.
  • Kitchen Towel: For covering the dough during its resting periods.
  • Oven Thermometer: To ensure your oven is at the correct temperature for baking.

Serving Suggestions

Once your focaccia is baked and cooled, it’s time to enjoy! Here are some serving ideas:

  • As an Appetizer: Serve warm with balsamic vinegar and olive oil for dipping.
  • In Sandwiches: Use slices for sandwiches filled with your favorite ingredients.
  • With Soups and Salads: Focaccia pairs beautifully with soups and salads, adding texture and flavor to your meal.
  • For Breakfast: Enjoy it toasted with a spread of butter or jam.

Now that you’re equipped with all the knowledge you need, get ready to bake an incredible sourdough discard focaccia that will impress family and friends alike. Remember, the beauty of baking lies not just in the finished product but in the joy of creating. Happy baking!

Sourdough Discard Focaccia with Rosemary & Olive Oil

Prep Time 15 minutes
Cook Time 25 minutes
Total Time 40 minutes
Servings 8 slices
Calories 220
A flavorful and easy focaccia made with sourdough discard, topped with rosemary and olive oil for a delicious snack or side.

Ingredients

Dough

  • 1 cup sourdough starter discard (unfed)
  • 2 cups all-purpose flour
  • 3/4 cup warm water (about 80°F/27°C)
  • 2 tbsp olive oil, plus extra for drizzling
  • 1 tsp salt
  • 1 tsp sugar or honey (optional)
  • 1 tsp instant yeast (optional)
  • 2 tbsp fresh rosemary leaves, roughly chopped

Coarse sea salt for sprinkling

Instructions 

  • Mix sourdough discard, warm water, and olive oil. Add flour, salt, sugar, and yeast; stir into a sticky dough.
  • Let dough rest covered for 30 minutes, then perform 3-4 stretch and fold cycles every 30 minutes over 2 hours.
  • Transfer dough to oiled pan, press out evenly, and create dimples with fingertips.
  • Cover and let rise for 45 minutes to 1 hour until puffed.
  • Preheat oven to 450°F (230°C). Drizzle olive oil, sprinkle rosemary, and coarse sea salt on top.
  • Bake for 20-25 minutes until golden brown. Cool slightly, then slice and serve warm.

Notes

Use fresh rosemary for the best flavor and ensure the dough is well stretched for a light, airy focaccia.
Calories: 220kcal
Cost: $10
Course: Side Dish
Cuisine: Italian
Keyword: Focaccia

Unleashing the Joy of Homemade Pita Bread

There’s something truly magical about making your own pita bread from scratch. Not only is it a simple process that yields delicious results, but it also connects you to the rich traditions of Mediterranean cooking. In this definitive guide, you’ll discover how to create soft, fluffy pita bread at home, perfect for stuffing or dipping. With just a few ingredients and a little bit of time, you can impress family and friends with your culinary skills.

Why You’ll Love This Recipe

  • Quick and Easy: This recipe requires minimal ingredients and time, making it accessible for beginner cooks and busy schedules alike.
  • Healthier Option: Homemade pita bread allows you to control the ingredients, making it a healthier alternative to store-bought varieties.
  • Versatile Uses: Use your fresh pita bread for wraps, sandwiches, or as a side to your favorite dips like hummus or tzatziki.
  • Customizable: Feel free to experiment with flavors by adding herbs or spices to the dough.
  • Fun to Make: Engage your family or friends in the cooking process, making it a fun and interactive experience.

Ingredient Breakdown

To make the perfect pita bread, you’ll need the following ingredients:

  • 1 cup warm water (100–110°F): This temperature is essential for activating the yeast without killing it.
  • 2 1/4 tsp active dry yeast: This is your leavening agent that makes the dough rise.
  • 1 tsp sugar: Helps to activate the yeast and adds a hint of sweetness.
  • 2 1/2 cups all-purpose flour: The base of your dough; feel free to use whole wheat for a healthier option.
  • 1 tsp salt: Enhances flavor in the bread.
  • 1 tbsp olive oil: Adds moisture and flavor to the dough.

Step-by-Step Instructions

A delicious homemade pita bread with a warm, inviting texture.

Follow these easy steps to create your homemade pita bread:

  • Activate the Yeast: In a small bowl, mix the warm water, sugar, and yeast. Let it sit for 5-10 minutes until it becomes frothy.
  • Mix the Dough: In a large bowl, combine flour and salt. Add the yeast mixture and olive oil, stirring until a shaggy dough forms.
  • Knead the Dough: On a floured surface, knead the dough for 8-10 minutes until it is smooth and elastic.
  • Let It Rise: Place the dough in an oiled bowl, cover it with a clean cloth, and let it rise for 1-1.5 hours until it doubles in size.
  • Shape the Dough: Punch down the dough, divide it into 6-8 equal balls, and roll each into a 1/4-inch-thick disc. Allow them to rest for 5 minutes.
  • Cook the Pitas: Heat a skillet over medium-high heat. Cook each pita for 1-2 minutes on each side until puffed and golden.
  • Serve Warm: Wrap cooked pitas in a towel to keep them warm and soft. Serve immediately or store when cooled.

Pro Tips for Perfect Pita Bread

  • Temperature Matters: Ensure your water is warm, not hot, to activate the yeast properly.
  • Don’t Rush the Rise: Allow the dough to rise fully for the best puffing effect.
  • Experiment with Flour: Try using whole wheat flour for a nutritious twist.
  • Keep It Covered: Cover the dough with a damp cloth while it rests to prevent it from drying out.
  • Use a Heavy Skillet: A cast-iron skillet retains heat well, ensuring even cooking.
  • Store Properly: Place cooled pitas in an airtight container to maintain softness.
  • Freeze Extras: Pitas can be frozen for up to a month—just reheat in a skillet or the oven.
  • Use Fresh Ingredients: Quality flour and fresh yeast will yield better results.

Common Mistakes and Troubleshooting

Even experienced bakers can make mistakes. Here are some common pitfalls and how to avoid them:

  • Flat Pitas: If your pitas don’t puff, your oven might not be hot enough, or the dough may not have risen sufficiently.
  • Hard Texture: Overcooking the pitas can lead to a hard texture; watch them closely as they cook.
  • Dry Dough: If your dough is too dry, add a little more water, one tablespoon at a time, until it reaches the right consistency.
  • Yeast Issues: If your yeast doesn’t froth, it may be expired—always check the date before use.

Variations of Pita Bread

Looking to spice things up? Here are some delicious variations of your homemade pita bread:

  • Herbed Pita: Add dried oregano or thyme to the dough for a fragrant twist.
  • Whole Wheat Pita: Substitute half or all of the all-purpose flour with whole wheat flour for added nutrition.
  • Spiced Pita: Incorporate spices like cumin or coriander into the dough for an aromatic flavor.
  • Stuffed Pita: Before rolling out, add a mixture of feta and spinach inside the dough for a delightful surprise!

Storage and Make-Ahead Instructions

To enjoy your homemade pita bread later, follow these storage tips:

  • Cooling: Allow the pitas to cool completely before storing.
  • Refrigeration: Store in an airtight container in the fridge for up to 5 days.
  • Freezing: Freeze pitas layered with parchment paper in between for up to a month. Thaw in the fridge or reheat directly from the freezer.
  • Reheating: Warm in a skillet or wrap in foil and heat in the oven at 350°F for about 10 minutes.

Comprehensive FAQs

Here are some frequently asked questions about making pita bread:

  • Can I use instant yeast instead of active dry yeast? Yes, use the same amount and skip the activation step.
  • What if my dough is too sticky? Add a little more flour until it reaches a manageable consistency.
  • Can I make pita bread gluten-free? Absolutely! Substitute with a gluten-free flour blend.
  • How do I know when the pitas are cooked? They should puff up and turn golden brown on both sides.
  • Can I grill the pitas? Yes, grilling adds a wonderful smoky flavor to the bread.
  • What’s the best way to serve pita bread? Serve warm with dips, or fill them with your favorite ingredients for sandwiches.
  • How can I tell if the yeast is still good? If it doesn’t foam after mixing with water and sugar, it’s likely expired.
  • Can I double the recipe? Yes, simply double all ingredients and follow the same instructions.

Nutrition Tips and Dietary Adaptations

Making your pita bread healthier is simple with these tips:

  • Whole Grains: Opt for whole wheat or spelt flour for added fiber and nutrients.
  • Reduce Sugar: Cut down on sugar without sacrificing flavor; it’s mainly used for yeast activation.
  • Add Seeds: Mix in flaxseed or sesame seeds for extra crunch and health benefits.
  • Control Portions: Make smaller pitas to manage portion sizes better.

Equipment Recommendations

To make your pita bread-making experience easier, here are some recommended tools:

  • Mixing Bowls: A set of varying sizes will help with ingredient preparation.
  • Rolling Pin: Essential for rolling out the dough evenly.
  • Cast Iron Skillet: Ideal for even heat distribution, making it perfect for cooking pitas.
  • Kitchen Towel: Use for covering the dough during rising to keep it moist.

Serving Suggestions

Enjoy your homemade pita bread in a variety of ways:

  • With Dips: Serve alongside hummus, baba ganoush, or tzatziki for a delightful appetizer.
  • For Sandwiches: Fill with grilled vegetables, meats, or falafel for a delicious meal.
  • As a Side: Pair with Mediterranean dishes like grilled chicken or salads.
  • For Breakfast: Spread with cream cheese and fruit preserves for a tasty morning treat.

In conclusion, making homemade pita bread is a rewarding experience that brings the joy of cooking into your kitchen. With just a few simple ingredients and these easy-to-follow steps, you can create your own fluffy pitas that will elevate any meal. So gather your ingredients, roll up your sleeves, and let’s get baking! You’ll be amazed at how satisfying it is to serve warm, homemade pita bread to your loved ones.

Easy Pita Bread Recipe: Homemade Greek Flatbread Step-by-Step

Prep Time 15 minutes
Cook Time 10 minutes
Total Time 25 minutes
Servings 6 pitas
Calories 150
Learn how to make soft, fluffy pita bread at home with this simple step-by-step recipe. Perfect for wraps, dips, and sandwiches.

Ingredients

Dough

  • 1 cup warm water (100–110°F)
  • 2 1/4 tsp active dry yeast
  • 1 tsp sugar

Dry ingredients

  • 2 1/2 cups all-purpose flour
  • 1 tsp salt

Wet ingredients

  • 1 tbsp olive oil

Instructions 

  • Mix warm water, sugar, and yeast; let sit 5–10 minutes until frothy.
  • Combine flour and salt; add yeast mixture and olive oil, stirring to form a shaggy dough.
  • Knead on a floured surface for 8–10 minutes until smooth.
  • Let dough rise in an oiled bowl, covered, for 1–1.5 hours until doubled.
  • Punch down, divide into 6–8 balls, roll into 1/4-inch discs, and rest 5 minutes.
  • Cook each pita in a hot skillet 1–2 minutes per side until puffed and golden.

Notes

Ensure the dough is not too sticky for easy rolling.
Calories: 150kcal
Cost: $10
Course: bread
Cuisine: Greek
Keyword: Pita

Welcome to a culinary adventure that will elevate your dessert game and warm your heart! Baked Cinnamon Apples are a simple yet delightful treat, perfect for family gatherings, cozy nights in, or any occasion that calls for a touch of sweetness. In this comprehensive guide, I’ll walk you through everything you need to know to make perfect baked apples, from choosing the right variety to serving suggestions that will impress your guests and satisfy your sweet tooth.

Why You’ll Love This Recipe

This recipe isn’t just about baked apples; it’s about creating a wonderful experience in your kitchen. Here are five reasons why you will adore making these baked cinnamon apples:

  • Quick and Easy: With just a few simple ingredients and minimal prep time, you can whip up a delicious dessert that looks and tastes gourmet.
  • Healthy Treat: Baked apples are a healthier alternative to many desserts, offering natural sweetness without the need for excessive sugar.
  • Versatile Dish: Serve them as a warm dessert, a breakfast topping, or a side dish for savory meals. The options are endless!
  • Customizable: Adjust the sweetness and spice levels to your preference and experiment with various toppings and additions.
  • Family-Friendly: This recipe is a fantastic way to involve kids in the kitchen; they’ll love helping with the peeling and mixing!

Ingredients Breakdown

To create the best Baked Cinnamon Apples, start with high-quality ingredients. Here’s what you’ll need:

  • 6 large apples: Choose varieties like Granny Smith for tartness or Honeycrisp for sweetness. You can even mix different types for added depth of flavor.
  • 1/2 cup brown sugar: This adds rich sweetness. Feel free to substitute with coconut sugar or maple syrup for a healthier option.
  • 1 1/2 tablespoons cinnamon: Ground cinnamon is traditional, but you can also use apple pie spice for a twist.
  • 1/8 teaspoon sea salt: Balances the sweetness and enhances flavors.
  • 1 teaspoon vanilla extract: For a fragrant and warm flavor profile.
  • 1 tablespoon water: Helps create the perfect syrupy consistency.
  • 2 teaspoons cornstarch: Ensures the juices thicken beautifully.
  • 2 tablespoons unsalted butter: Adds richness; you can use coconut oil for a dairy-free version.

Steps to Make Baked Cinnamon Apples

  1. Preheat the oven: Start by preheating your oven to 350°F (175°C).
  2. Prepare the apples: Peel, core, and slice the apples into uniform 1/2-inch slices to ensure even cooking.
  3. Create a slurry: In a small bowl, combine the water and cornstarch to form a slurry—this will help thicken the juices.
  4. Mix ingredients: Place the apples in a 9×13-inch baking dish. Sprinkle the brown sugar, cinnamon, vanilla extract, and salt over the apples. Drizzle the cornstarch mixture on top and mix everything well. Spread the apples evenly and top with small chunks of butter.
  5. Bake covered: Cover the dish loosely with foil and bake for 45 minutes. After this time, carefully remove the foil and stir the apples.
  6. Bake uncovered: Continue baking without foil for an additional 10-15 minutes until the apples are fork-tender and the juices have thickened.
  7. Serve warm: Enjoy your baked cinnamon apples warm, topped with whipped cream or a scoop of ice cream if desired.

Pro Tips for Perfect Baked Apples

Freshly baked cinnamon apples with melted butter chunks.

Here are some expert insights to ensure your baked apples turn out perfectly every time:

  • Choose the right apples: Firm apples hold their shape better during baking, preventing them from becoming mushy.
  • Adjust sweetness: If you prefer a less sweet dessert, reduce the amount of brown sugar to suit your taste.
  • Experiment with spices: Add nutmeg or allspice for a more complex flavor profile.
  • For a nutty crunch: Sprinkle chopped nuts like pecans or walnuts on top before baking for added texture.
  • Stir midway: Stirring the apples halfway through baking helps them cook evenly and absorb the flavors.
  • Don’t skip the butter: It adds a richness that elevates the dish; omit it only if you need a dairy-free option.
  • Serve with toppings: Pair with yogurt, granola, or a drizzle of caramel for a gourmet touch.
  • Make ahead: Prepare the apples in advance and bake just before serving for a fresh, warm dessert.

Common Mistakes and Troubleshooting

Even the best recipes can have hiccups. Here’s how to avoid common mistakes:

  • Mushy apples: If your apples turn out mushy, they might not have been the right variety. Stick to firmer apples like Granny Smith.
  • Not enough flavor: Ensure you’re using fresh spices and check the balance of sugar and salt. Taste the mixture before baking if unsure.
  • Too dry: If the apples are dry, try adding a bit more butter or a splash of apple juice before baking.
  • Burnt edges: If the edges start to brown too quickly, cover loosely with foil until the apples are tender.

Variations to Try

Feel free to get creative with your baked apples! Here are some delicious variations:

  • Caramel Baked Apples: Drizzle with caramel sauce before baking for a sweet twist.
  • Nutty Cinnamon Apples: Add chopped pecans or walnuts for a crunchy texture.
  • Dried Fruit Addition: Mix in raisins or cranberries for added sweetness and a chewy texture.
  • Spiced Up Apples: Experiment with flavors by adding a dash of ginger or cloves for a spicier version.

Storage and Make-Ahead Instructions

Need to prepare your baked apples ahead of time? Here’s how to store and reheat them:

  • Storage: Store leftover baked apples in an airtight container in the refrigerator for up to 5 days.
  • Reheating: Reheat in the oven at 350°F until warmed through, or in the microwave for a quick option.
  • Make-ahead: Prepare the apples the day before and bake them just before serving for the best texture and flavor.

Frequently Asked Questions

Here are some common questions about baked cinnamon apples:

  • Do I need to peel the apples? Peeling is optional, but it gives a smoother texture. Leaving the skin on adds extra fiber.
  • Can I use frozen apples? Yes, but they may become mushy. Thaw and drain excess liquid before baking.
  • What apple varieties are best? Firm apples like Granny Smith, Honeycrisp, or Fuji are ideal for baking.
  • Can I add other fruits? Absolutely! Pears or berries can complement the apples beautifully.
  • How long do baked apples last? They can be stored in the fridge for up to 5 days.
  • Can I freeze baked apples? Yes, freeze in an airtight container for up to 3 months. Thaw before reheating.
  • What can I serve with baked apples? They pair well with vanilla ice cream, yogurt, or even as a topping for pancakes.
  • Is this recipe gluten-free? Yes, this recipe is naturally gluten-free, making it suitable for various dietary needs.

Nutritional Information and Dietary Adaptations

Here’s a brief overview of the nutritional content and some adaptations you can make:

  • Calories: Each serving contains approximately 150-200 calories, depending on toppings and sugar used.
  • Vegan option: Use coconut oil instead of butter and substitute brown sugar with maple syrup.
  • Low-carb alternative: Replace brown sugar with a sugar substitute like erythritol for a keto-friendly dish.

Equipment Recommendations

To make this recipe effortlessly, consider having the following equipment on hand:

  • Sharp knife: For peeling and slicing the apples efficiently.
  • Baking dish: A 9×13-inch dish works perfectly for this recipe.
  • Mixing bowls: For combining ingredients and creating the cornstarch slurry.
  • Measuring cups and spoons: Accurate measurements ensure your recipe turns out just right.

Serving Suggestions

Now that your delicious baked cinnamon apples are ready, here are some delightful ways to serve them:

  • With ice cream: A scoop of vanilla or caramel ice cream on top makes for a decadent treat.
  • As a breakfast topping: Use them as a warm topping for oatmeal or pancakes for a cozy breakfast.
  • With yogurt: Pair with Greek yogurt and a sprinkle of granola for a nutritious snack.
  • On a cheese platter: Serve alongside cheeses for a sweet and savory combination at your next gathering.

In conclusion, baking cinnamon apples is not just about the end result; it’s about the joy of cooking and sharing with loved ones. This recipe promises warmth, comfort, and deliciousness in every bite. So gather your ingredients, preheat your oven, and let’s create some sweet memories together!

Baked Cinnamon Apples

Prep Time 15 minutes
Cook Time 55 minutes
Total Time 1 hour 10 minutes
Servings 4 servings
Calories 250
A warm and comforting dessert featuring tender baked apples infused with cinnamon and vanilla, topped with buttery chunks.

Ingredients

Fruits

  • 6 large apples (peeled, cored, sliced)
  • 0.5 cup brown sugar
  • 1.5 tablespoons cinnamon
  • 1/8 teaspoon sea salt
  • 1 teaspoon vanilla extract
  • 1 tablespoon water
  • 2 teaspoons cornstarch
  • 2 tablespoons unsalted butter (cut into small chunks)

Instructions 

  • Preheat oven to 350°F (175°C).
  • Combine water and cornstarch to make a slurry. Place sliced apples in a baking dish, sprinkle with sugar, cinnamon, vanilla, and salt. Drizzle with slurry and mix.
  • Top with butter chunks, cover loosely with foil, and bake for 45 minutes. Remove foil and stir.
  • Continue baking uncovered for 10-15 minutes until apples are tender. Serve warm.

Notes

For extra flavor, serve with whipped cream or ice cream.
Calories: 250kcal
Cost: $8
Course: Dessert
Cuisine: American
Keyword: Apples, baking, cinnamon

Why Cheese and Herb Muffins are Your New Favorite Breakfast

Have you ever woken up craving something comforting and delicious to start your day? Look no further than these delightful Cheese and Herb Muffins! This easy recipe combines the rich, savory flavors of cheddar cheese and fresh herbs to elevate your breakfast experience. Not only are they a joy to make, but they also offer a range of benefits that will have you reaching for seconds!

Why You’ll Love This Recipe

These muffins are more than just a breakfast option; they’re a versatile choice that fits into various meal occasions. Here are five compelling reasons to love this recipe:

  • Quick and Easy Preparation: With a prep time of just 10 minutes, you can whip up these muffins effortlessly, making them perfect for busy mornings.
  • Versatile Ingredients: The recipe allows for substitutions, so you can customize it with your favorite cheeses and herbs, ensuring your muffins are uniquely yours.
  • Nutritious Start to Your Day: Packed with protein from cheese and enriched with vitamins from fresh herbs, these muffins provide a wholesome breakfast option.
  • Great for Meal Prep: Bake a batch and store them in your fridge or freezer for quick snacks or breakfasts throughout the week.
  • Perfect for Any Occasion: Whether it’s brunch with friends or a quick breakfast on the go, these muffins are a crowd-pleaser!

Ingredients Breakdown

Understanding your ingredients is key to mastering any recipe. Here’s a detailed look at what you’ll need to make these incredible Cheese and Herb Muffins:

  • All-Purpose Flour: 1 cup provides the base for your muffins. You can substitute with whole wheat or gluten-free flour if desired.
  • Baking Powder: 2 tsp acts as the leavening agent to help your muffins rise.
  • Sea Salt: ½ tsp enhances the flavors of the cheese and herbs.
  • Whole Milk: ¾ cup keeps your muffins moist. You can use almond milk or any non-dairy milk for a lactose-free option.
  • Large Egg: 1 egg binds the ingredients together. If you’re vegan, try using a flaxseed egg instead.
  • Shredded Cheese: ½ cup of cheddar or Gruyere adds a delicious cheesy flavor. Feel free to use extra cheese for a cheesier muffin!
  • Chopped Fresh Herbs: ¼ cup of chives or parsley brings freshness and flavor. Don’t hesitate to mix in other herbs like thyme or basil!
  • Melted Unsalted Butter: ¼ cup adds richness; you can replace it with olive oil for a healthier fat option.

How to Make Cheese and Herb Muffins

Juicy, warm Cheese and Herb Muffins with a crumbly top and visible herbs.

Ready to bake? Follow these simple steps for perfect muffins every time:

  1. Preheat your oven to 375°F (190°C).
  2. In a large mixing bowl, whisk together the flour, baking powder, and sea salt until well combined.
  3. In another bowl, mix the milk, melted butter, and egg until smooth.
  4. Gently fold in the cheese and fresh herbs into the wet mixture.
  5. Pour the wet mixture into the dry ingredients and stir gently until just combined. Be careful not to overmix!
  6. Fill your muffin tins two-thirds full with batter.
  7. Bake for 18-20 minutes or until the muffins are golden brown on top and a toothpick inserted into the center comes out clean.

Pro Tips for Perfect Muffins

To ensure your Cheese and Herb Muffins turn out perfectly every time, consider these expert insights:

  • Do Not Overmix: Overmixing can lead to dense muffins. Stir until just combined, and you’ll achieve a light texture.
  • Use Room Temperature Ingredients: Allow your eggs and milk to sit at room temperature for better mixing and texture.
  • Experiment with Cheeses: Mixing different types of cheese can create unique flavor profiles; try mozzarella or feta for a twist.
  • Fresh Herbs Matter: Using fresh herbs rather than dried will significantly enhance the flavor of your muffins.
  • Test for Doneness: Always test with a toothpick to ensure they are perfectly baked inside.
  • Cool Before Storing: Let your muffins cool completely before storing to prevent sogginess.
  • Adjust Baking Time for Mini Muffins: If you’re using a mini muffin tin, reduce the baking time to about 12-15 minutes.
  • Pair with Spreads: Serve with butter, cream cheese, or even a homemade herb spread for an extra flavor boost.

Common Mistakes and Troubleshooting

Even the best chefs can encounter issues. Here’s how to avoid common pitfalls:

  • Muffins Too Dense: This usually results from overmixing. Remember, just mix until the ingredients are combined!
  • Muffins Not Rising: Check the freshness of your baking powder; expired baking powder won’t help your muffins rise.
  • Burnt Tops: If your muffins are browning too quickly, cover them with aluminum foil for the last few minutes of baking.
  • Dry Muffins: Overbaking can lead to dryness. Always keep an eye on your muffins as they approach the end of the baking time.

Delicious Variations

Want to switch things up? Here are four delicious variations to try:

  • Spinach and Feta: Add ½ cup of sautéed spinach and ¼ cup of crumbled feta for a Mediterranean twist.
  • Sun-Dried Tomato and Basil: Incorporate chopped sun-dried tomatoes and fresh basil for a burst of flavor.
  • Jalapeño and Cheddar: For a spicy kick, add diced jalapeños and extra cheddar cheese.
  • Sweet Potato and Sage: Mix in mashed sweet potato and chopped sage for a comforting autumn flavor.

Storage and Make-Ahead Instructions

These muffins are perfect for meal prep! Here’s how to store them:

  • Room Temperature: Store in an airtight container for up to 2 days.
  • Refrigerator: Keep in an airtight container for up to a week.
  • Freezer: Place in a freezer-safe bag or container to freeze for up to 3 months. Reheat in the oven or microwave before serving.

Frequently Asked Questions

If you have questions about making these muffins, you’re not alone! Here are some common queries:

  • Can I use non-dairy milk?: Absolutely! Almond, soy, or oat milk work perfectly in this recipe.
  • What if I don’t have baking powder?: You can make a substitute by mixing 1/2 tsp of baking soda with 1 tsp of vinegar or lemon juice.
  • Can I skip the egg?: Yes, use a flaxseed egg or applesauce as a binding agent.
  • How do I know when my muffins are done?: Insert a toothpick; if it comes out clean, your muffins are ready!
  • Can I add nuts?: Yes, chopped walnuts or pecans can add a nice crunch to your muffins.
  • How do I reheat frozen muffins?: Microwave for 30 seconds or warm in the oven at 350°F until heated through.
  • What herbs work best?: Thyme, rosemary, and dill are excellent choices that can be used alone or in combination.
  • How can I make them spicier?: Incorporate crushed red pepper flakes or diced jalapeños into the batter.

Nutritional Tips and Dietary Adaptations

Maintaining a balanced diet is essential. Here are some nutritional tips:

  • High-Protein Option: Add extra cheese or incorporate protein powder into the batter for a protein boost.
  • Low-Carb Version: Substitute the flour with almond flour for a low-carb alternative.
  • Gluten-Free: Use a gluten-free flour blend to make these muffins suitable for gluten-sensitive individuals.
  • Lower-Fat Option: Replace half of the butter with unsweetened applesauce to reduce fat content.

Essential Equipment for Success

Having the right tools can make all the difference. Here’s what you’ll need:

  • Mixing Bowls: A set of different sizes helps in organizing your ingredients effectively.
  • Whisk: A sturdy whisk is essential for combining your dry and wet ingredients smoothly.
  • Muffin Tin: A non-stick muffin tin ensures easy release of your baked goods.
  • Measuring Cups and Spoons: Accurate measurements are crucial for baking success.
  • Cooling Rack: Allows your muffins to cool evenly and prevents sogginess.

Serving Suggestions

These muffins are versatile and can be served in various ways:

  • Breakfast Delight: Enjoy them warm with a pat of butter and a side of fresh fruit.
  • Brunch Staple: Pair with a refreshing salad or soup for a delightful brunch spread.
  • Snack Time: Perfect as a snack anytime; pack them in lunchboxes for a wholesome treat.
  • Picnic Favorite: Great for outdoor gatherings, they hold up well and can be enjoyed at room temperature.

In Conclusion

Cheese and Herb Muffins are not just a recipe; they are a delightful experience that can fit seamlessly into your daily routine. With their robust flavor, ease of preparation, and versatility, they’re bound to become a staple in your kitchen. Whether you’re enjoying them fresh out of the oven or savoring them later in the week, these muffins are sure to bring comfort and joy to your table. Happy baking!

Cheese and Herb Muffins

Prep Time 10 minutes
Cook Time 20 minutes
Total Time 30 minutes
Servings 8 muffins
Calories 180
Delight in these savory muffins packed with cheese and fresh herbs, perfect for breakfast or snacks.

Ingredients

Dry ingredients

  • 1 cup all-purpose flour
  • 2 tsp baking powder
  • ½ tsp sea salt

Wet ingredients

  • ¾ cup whole milk
  • 1 large egg
  • ½ cup shredded cheddar cheese (or Gruyere)
  • ¼ cup chopped fresh herbs (chives or parsley)
  • ¼ cup melted unsalted butter

Instructions 

  • Preheat oven to 375°F (190°C).
  • Mix dry ingredients in a bowl.
  • Combine milk, egg, and melted butter; mix well.
  • Fold in cheese and herbs into wet mixture.
  • Mix wet and dry ingredients; fill muffin tins and bake 18-20 mins.

Notes

For extra flavor, sprinkle some additional herbs on top before baking.
Calories: 180kcal
Cost: $12
Course: Breakfast
Cuisine: American
Keyword: Cheese, herbs

Discover the Joy of Baking Garlic Rosemary Herb Focaccia

Welcome to your next culinary adventure! If you’ve ever wanted to create a piece of heaven in your kitchen, then baking Garlic Rosemary Herb Focaccia is the perfect start. This traditional Italian bread is not just about its delightful aroma; it’s about the experience of crafting something beautiful and delicious with your own hands. With simple ingredients and a few key techniques, you’ll find yourself not only enjoying the process but also savoring the end result. Let’s dive into everything you need to know about making this wonderful focaccia at home.

Why You’ll Love This Recipe

This focaccia recipe stands out for several reasons:

  • Easy to Make: With minimal ingredients and straightforward steps, both beginners and seasoned bakers can master this recipe.
  • Customizable: The flavor possibilities are endless! You can experiment with various herbs, toppings, and even add cheese or olives.
  • Perfect for Sharing: A warm loaf of focaccia is an excellent centerpiece for gatherings, perfect for tearing and sharing.
  • Great Aroma: The combination of garlic and fresh rosemary fills your kitchen with a mouthwatering scent that will entice anyone nearby.
  • Deliciously Versatile: Serve it as an appetizer, alongside soups, or even as a sandwich base; it complements many dishes.

Ingredient Breakdown

To embark on your focaccia journey, you’ll need the following ingredients:

  • 3 1/2 cups All-purpose flour: This forms the backbone of your dough. You can substitute with whole wheat flour for a healthier option.
  • 2 1/4 tsp Active dry yeast: The magic ingredient that helps the dough rise. Ensure it’s fresh for the best results.
  • 1 1/4 cups Warm water: Temperatures around 100°F (38°C) are ideal for activating the yeast.
  • 1/4 cup Extra virgin olive oil: Adds richness and flavor. You can replace it with melted butter for a different taste.
  • 1 1/2 tsp Sea salt: Enhances flavor and strengthens gluten.
  • 4 cloves Garlic: Minced or roasted garlic infuses the dough with a wonderful aroma.
  • 2 tbsp Fresh rosemary: Chopped finely; this herb provides the signature flavor of rosemary herb focaccia.

Step-by-Step Instructions

Slice of Garlic Rosemary Herb Focaccia showing soft, airy interior and herb toppings.

Follow these steps to create your own Garlic Rosemary Herb Focaccia:

  1. In a large bowl, combine warm water and yeast. Let sit for 5 minutes until bubbly.
  2. Add flour, olive oil, and salt. Stir until a sticky dough forms.
  3. Cover the bowl with a towel. Let dough rise for 1-2 hours in a warm area until doubled in size.
  4. Preheat your oven to 425°F (218°C). Generously oil a sheet pan or cast iron skillet.
  5. Transfer the dough to the pan. Use oiled fingers to stretch and dimple the dough.
  6. Sprinkle minced garlic and rosemary over the top. Drizzle with more olive oil and sea salt.
  7. Bake for 22–25 minutes until golden and crisp on the edges.
  8. Let cool slightly before slicing and serving.

Pro Tips for Perfect Focaccia

Here are some expert tips to elevate your focaccia game:

  • Yeast Activation: Use warm water between 100°F and 110°F to gently awaken the yeast for a perfect rise.
  • Proofing Time: Allow the dough to rise longer to develop deeper flavors; a slow rise in the fridge overnight can enhance taste.
  • Use Quality Olive Oil: Don’t skimp on the olive oil; it’s key for flavor and a crispy crust.
  • Experiment with Toppings: Try adding olives, sun-dried tomatoes, or even cheeses like feta or parmesan for variations.
  • Dimpling Technique: Use your fingers to create dimples in the dough; this not only looks beautiful but helps hold the toppings.
  • Watch the Baking Time: Keep an eye on your focaccia; every oven is different, and you want it golden brown.
  • Cooling Matters: Let the focaccia cool on a wire rack to maintain its crispness.

Common Mistakes and Troubleshooting

Even seasoned bakers face challenges. Here are some common pitfalls and how to avoid them:

  • Dense Texture: This can occur from not allowing the dough to rise adequately. Always let it double in size.
  • Dry Focaccia: Ensure you’re using enough olive oil, both in the dough and on top before baking.
  • Overbaking: Watch closely as baking times can vary. Remove the focaccia once it’s golden brown.
  • Flavorlessness: Don’t forget to season the dough and the top generously with salt and herbs.

Variations to Try

Focaccia is incredibly versatile. Here are some variations to inspire your baking:

  • Cheesy Focaccia: Add shredded mozzarella or parmesan cheese to the top before baking for a cheesy twist.
  • Olive and Herb Focaccia: Mix in chopped olives and a blend of herbs like thyme and oregano.
  • Sun-Dried Tomato Focaccia: Fold in chopped sun-dried tomatoes and sprinkle with goat cheese for a Mediterranean flavor.
  • Sweet Focaccia: Drizzle with honey and sprinkle with coarse sugar for a sweet dessert bread.

Storage and Make-Ahead Instructions

Proper storage can help your focaccia last longer:

  • Storing Leftovers: Keep any leftover focaccia in an airtight container at room temperature for up to 2 days.
  • Freezing Focaccia: Wrap cooled focaccia tightly in plastic wrap and then in foil to freeze for up to 3 months.
  • Reheating: For the best results, reheat in a preheated oven at 350°F (175°C) for about 10 minutes.
  • Make-Ahead: You can prepare the dough a day in advance and let it rise slowly in the fridge overnight.

FAQs: Your Garlic Rosemary Herb Focaccia Questions Answered

Here are some frequently asked questions to further assist your focaccia baking journey:

  • Can I use dried herbs instead of fresh? Yes, but use less—dried herbs are more concentrated than fresh.
  • What if my dough doesn’t rise? Check the yeast’s freshness; it might be inactive. Make sure the water is warm enough, not hot.
  • How can I enhance the flavor? Consider adding more garlic, herbs, or even a sprinkle of cheese on top before baking.
  • Can I make it gluten-free? Yes, substitute with a gluten-free flour blend, but you may need to adjust the liquid.
  • What’s the best way to serve focaccia? It’s great warm, sliced as is, or served with dips like olive oil or balsamic vinegar.
  • How long does it take to make? From start to finish, plan for about 3 hours, including rising time.
  • Can I add toppings before baking? Absolutely! Just be mindful of how they may affect baking time and moisture.
  • Is focaccia suitable for freezing? Yes, it freezes well. Just ensure it’s wrapped tightly.

Nutritional Tips and Dietary Adaptations

Focaccia can be adapted for various dietary needs:

  • Low-Carb Option: Try a cauliflower focaccia for a lower-carb alternative.
  • Vegan Adaptation: This recipe is already vegan-friendly; just ensure your toppings are as well!
  • Healthier Fats: Swap olive oil for avocado oil for a different flavor profile.

Essential Equipment for Focaccia Baking

Having the right tools can make your focaccia baking easier:

  • Mixing Bowl: A large bowl helps to combine ingredients without making a mess.
  • Sheet Pan or Cast Iron Skillet: Either works well for baking focaccia; ensure it’s generously oiled.
  • Spatula: Useful for transferring the dough and spreading it in the pan.
  • Kitchen Towel: To cover your dough while it rises.

Serving Suggestions

Enjoy your garlic rosemary herb focaccia in various ways:

  • As a Side: Pair it with soups or salads for a complete meal.
  • For Dipping: Serve with olive oil, balsamic vinegar, or your favorite spreads.
  • Sandwich Base: Use slices to create delicious sandwiches with your favorite fillings.
  • With Cheese: Serve alongside a charcuterie board for a delightful appetizer.

In conclusion, making Garlic Rosemary Herb Focaccia is not only a rewarding experience but also a delicious way to elevate your meals. With this comprehensive guide, you have all the tools and tips you need to create a loaf that will impress your family and friends. So gather your ingredients, roll up your sleeves, and let’s make magic happen in the kitchen! Happy baking!

Garlic Rosemary Herb Focaccia

Prep Time 15 minutes
Cook Time 25 minutes
Total Time 40 minutes
Servings 8 slices
Calories 250
A flavorful and aromatic focaccia bread infused with garlic and fresh rosemary, perfect for sharing.

Ingredients

For the dough

  • 3 1/2 cups All-purpose flour
  • 2 1/4 tsp Active dry yeast
  • 1 1/4 cups Warm water
  • 1/4 cup Extra virgin olive oil (plus more for drizzling)
  • 1 1/2 tsp Sea salt
  • 4 cloves Garlic (minced or roasted)
  • 2 tbsp Fresh rosemary (chopped)

Instructions 

  • Mix warm water and yeast; let sit 5 minutes until bubbly.
  • Add flour, olive oil, and salt; stir into sticky dough.
  • Let dough rise in a warm area for 1-2 hours until doubled.
  • Preheat oven to 425°F (218°C); oil a pan and transfer dough, stretching with oiled fingers.
  • Top with garlic, rosemary, drizzle olive oil, and sprinkle sea salt; bake 22-25 minutes.
  • Cool slightly before slicing and serving.

Notes

For extra flavor, roast garlic before adding.
Calories: 250kcal
Cost: $12
Course: bread
Cuisine: Italian
Keyword: Focaccia, garlic, Rosemary

Unlock the Secrets of Baking Perfect 100% Whole Wheat Sandwich Bread

Welcome to the wonderful world of baking homemade 100% whole wheat sandwich bread! If you’ve ever wanted to elevate your sandwiches and create a wholesome, hearty loaf that nourishes your family, you’re in the right place. This comprehensive guide will walk you through the entire process, from selecting the best ingredients to baking the perfect loaf. Whether you’re a seasoned baker or a curious beginner, I’m here to share my expertise and passion for creating delightful bread that can transform your meals. Let’s dive in!

Why You’ll Love This Recipe

This recipe for homemade whole wheat sandwich bread is not just about baking; it’s about creating something special for yourself and your loved ones. Here are some compelling reasons to give it a try:

  • Wholesome Ingredients: Using only 100% whole wheat flour means you’re getting all the nutritional benefits of the wheat, including fiber, vitamins, and minerals.
  • Customizable Flavor: You can easily adjust the sweetness and oil content to match your family’s taste, making it a versatile option for various sandwiches.
  • Freshness Guaranteed: There’s nothing quite like the aroma of freshly baked bread filling your kitchen, creating a warm and inviting atmosphere!
  • Cost-Effective: Baking at home is often more economical than buying artisanal bread, especially when you consider the quality of ingredients you can use.
  • Family Connection: Baking together can be a fun and rewarding activity for families, creating lasting memories while enjoying delicious results.

Ingredient Breakdown: What You’ll Need

Before we get started, let’s take a closer look at the ingredients for this recipe. Understanding what you’re using will help you make better choices and substitutions if needed.

  • Whole Wheat Flour: You’ll need 6 to 6½ cups. Look for high-quality, freshly milled flour for the best flavor and texture.
  • Warm Water: 2½ cups at a temperature between 105-110 degrees Fahrenheit is crucial for activating the yeast. Use a thermometer for accuracy!
  • Yeast: 1½ tablespoons of either instant active dry yeast or regular active dry yeast will help your dough rise. Instant yeast doesn’t require proofing, making it convenient.
  • Sweetener: 1/4 to 1/3 cup of honey (or sugar or molasses) adds flavor and helps feed the yeast. Feel free to adjust based on your sweetness preference.
  • Oil: 1/3 cup of vegetable or olive oil keeps the bread moist. You can substitute with melted butter for a richer flavor.
  • Salt: 2½ teaspoons are essential for flavor and controlling yeast activity.
  • Vital Wheat Gluten: 1½ tablespoons (optional) can improve the loaf’s texture if you’re using whole wheat flour that’s low in protein.

Step-by-Step Guide: How to Make Your Whole Wheat Sandwich Bread

Close-up of whole wheat sandwich bread emphasizing the crust and softness.

Now that you have your ingredients ready, let’s go through the steps to create your perfect loaf of bread.

Step 1: Make the Sponge

In a large mixing bowl, combine the warm water, yeast, and 2 cups of whole wheat flour. Stir gently and let it sit for 15-20 minutes.

Step 2: Mix Additional Ingredients

After the sponge has risen and is bubbly, add in the honey, oil, salt, and, if you’re using it, vital wheat gluten. Gradually mix in the remaining 4 cups of flour until the dough starts to clean the sides of the bowl.

Step 3: Knead the Dough

Switch to a dough hook on your mixer, or knead by hand for 6-7 minutes (or 10 minutes by hand). If the dough sticks, add flour a tablespoon at a time to avoid over-flouring.

Step 4: First Rise

Form the dough into a ball and place it in a greased bowl. Cover with a clean cloth and allow it to rise in a warm place for about 60 minutes, or until it doubles in size.

Step 5: Shape the Loaves

Once risen, turn the dough out onto a floured surface and divide it into two portions. Shape each into a loaf, then place them in greased 9×5 inch pans (or 8.5×4.5 inch pans for a better rise).

Step 6: Second Rise

Cover the loaves again and let them rise for another 30-60 minutes until they are about 1 inch above the pan edges. Preheat your oven to 350 degrees Fahrenheit about ten minutes before the rise is complete.

Step 7: Bake the Bread

Bake in the preheated oven for 30 minutes, rotating halfway through if necessary. The bread is done when it sounds hollow when tapped.

Step 8: Cool and Slice

Immediately remove the loaves from the pans and let them cool on a wire rack. Allow them to cool completely before slicing, which helps maintain the texture.

Expert Tips for Perfect Bread

To ensure your homemade whole wheat bread turns out perfectly every time, consider these pro tips:

  • Check Your Yeast: Make sure your yeast is fresh. If in doubt, test it by mixing it with warm water and sugar to see if it bubbles.
  • Temperature Matters: The water temperature is vital for yeast activation. Too hot can kill it, and too cold won’t activate it.
  • Don’t Rush the Rise: Allow the dough to rise fully. Under-proofed bread can lead to a dense texture.
  • Rotate for Even Baking: If your oven has hot spots, rotating the pans halfway through baking ensures even color and texture.
  • Use the Right Pans: Opt for heavier pans that promote even baking and help avoid over-browning.
  • Cool Completely: Cutting into warm bread can lead to gummy slices. Patience is key for perfect results.
  • Experiment with Add-Ins: Consider adding nuts, seeds, or dried fruit for added flavor and texture.
  • Store Properly: Once cooled, store bread in an airtight container to maintain freshness.

Avoiding Common Mistakes

Even experienced bakers can run into issues. Here are some common pitfalls and how to avoid them:

  • Dough Too Sticky: If your dough is overly sticky, add flour gradually until it reaches a workable consistency during kneading.
  • Dense Loaf: This can happen from under-kneading or not allowing enough rise time. Ensure you give the dough time to develop.
  • Uneven Crust: If you notice one side is browning faster than the other, rotate the loaf halfway through baking.
  • Dry Bread: Overbaking can lead to a dry loaf. Keep an eye on oven time, and consider using a thermometer to check for doneness.

Delicious Variations to Try

Once you’ve mastered this basic recipe, why not experiment with different flavors? Here are some fun ideas:

  • Honey Oat Bread: Add 1 cup of rolled oats to the dough for a nutty texture.
  • Herb-Infused Bread: Mix in dried herbs like rosemary or thyme for a savory twist.
  • Cinnamon Raisin Bread: Incorporate 1 cup of raisins and 2 teaspoons of cinnamon for a sweet breakfast option.
  • Nutty Whole Wheat Bread: Fold in a mix of chopped nuts like walnuts or pecans for a hearty addition.

Storage and Make-Ahead Instructions

To keep your homemade bread fresh, consider the following storage tips:

  • Room Temperature: Store your bread in an airtight container at room temperature for up to 3 days.
  • Freezing: Wrap the cooled loaves tightly in plastic wrap and foil, and freeze for up to 3 months. Thaw at room temperature before slicing.
  • Make-Ahead Option: You can prepare the dough ahead of time and let it rise in the fridge overnight. Just bring it to room temperature before shaping and baking.

Frequently Asked Questions (FAQs)

Here are some common questions about making 100% whole wheat sandwich bread:

  • Can I use bread flour instead of whole wheat flour? Yes, but the recipe will no longer be 100% whole wheat. You may also need to adjust the liquid content.
  • What if my dough doesn’t rise? Ensure your yeast is fresh and that the water temperature was adequate. Try placing the dough in a warmer environment.
  • Can I substitute the honey? Absolutely! Feel free to use sugar, maple syrup, or agave nectar as alternatives.
  • How do I know when my bread is done baking? The bread should be golden brown on top and sound hollow when tapped on the bottom.
  • Is it necessary to use vital wheat gluten? It’s optional. If your whole wheat flour is high in protein, you may not need it.
  • Can I make this recipe dairy-free? Yes! Just use vegetable oil instead of butter and ensure any additional ingredients are dairy-free.
  • What’s the best way to slice the bread? Use a serrated knife for clean, even slices once the bread has completely cooled.
  • Can I add seeds to the crust? Absolutely! Sprinkling sesame or poppy seeds on top before baking adds a delightful crunch.

Nutrition Tips and Dietary Adaptations

This recipe is inherently nutritious, but here are some tips to enhance its health benefits:

  • Add Seeds: Incorporating flaxseeds or chia seeds boosts omega-3 fatty acids and fiber.
  • Reduce Sugar: Feel free to cut the sweetener to suit your dietary needs while still achieving great flavor.
  • Gluten-Free Option: Substitute with a gluten-free flour blend and adjust the liquid accordingly for a gluten-free version.

Essential Equipment for Baking

Having the right tools can make baking easier. Here’s what I recommend:

  • Mixing Bowls: A set of mixing bowls in various sizes is essential for combining ingredients and allowing the dough to rise.
  • Dough Hook: A stand mixer with a dough hook will make kneading a breeze.
  • Measuring Cups and Spoons: Accurate measurements are crucial for baking success.
  • Kitchen Thermometer: Ensures your water temperature is just right for yeast activation.
  • Loaf Pans: Invest in sturdy, non-stick pans for even baking.
  • Wire Rack: For cooling your bread properly, a wire rack is a must-have.

Serving Suggestions: Elevate Your Sandwich Game

Your homemade whole wheat sandwich bread is incredibly versatile. Here are some delicious serving ideas:

  • Classic Sandwich: Layer turkey, lettuce, tomato, and mustard for a wholesome lunch.
  • Peanut Butter and Banana: Spread peanut butter on a slice and top with banana for a satisfying snack.
  • French Toast: Dip slices in a cinnamon-egg mixture and pan-fry for a delicious breakfast treat.
  • Grilled Cheese: Use your bread for a classic grilled cheese sandwich with gooey melted cheese.

Conclusion: Your Baking Journey Begins Here

Now that you have all the tools and knowledge to make your own 100% whole wheat sandwich bread, it’s time to roll up your sleeves and start baking! Remember, practice makes perfect, so don’t be discouraged if your first loaf isn’t flawless. Embrace the process, enjoy the aroma of baking bread, and cherish the moments you share around the table with loved ones. Happy baking!

Soft 100% Whole Wheat Sandwich Bread

Prep Time 20 minutes
Cook Time 30 minutes
Total Time 50 minutes
Servings 16 slices
Calories 120
This wholesome bread is perfect for sandwiches, offering a soft texture and rich flavor from whole wheat flour and honey.

Ingredients

Dough

  • 6 to 6½ cups whole wheat flour (*)
  • cups warm water (105-110°F)
  • tablespoons instant active dry yeast ((OR regular active dry yeast))
  • 1/4 to 1/3 cup honey (or sugar or molasses)
  • 1/3 cup oil
  • teaspoons salt
  • tablespoons vital wheat gluten (OPTIONAL (I don't use this anymore))

Instructions 

  • Combine water, yeast, and 2 cups of flour; let sit 15-20 minutes until bubbly.
  • Add honey, oil, salt, (gluten if using), and 4 cups of flour; mix until dough pulls away from sides. Knead 6-7 minutes.
  • Divide dough into two loaves; place in greased pans. Let rise 60 minutes until 1/2 to 1 inch above pans.
  • Preheat oven to 350°F (175°C) ten minutes before baking.
  • Bake for 30 minutes, rotating if needed. Cool on a rack before slicing.

Notes

Ensure proper rising temperature for best results.
Calories: 120kcal
Cost: $15
Course: bread
Cuisine: American
Keyword: Whole Wheat

Elevate Your Breakfast with Fluffy Banana Oat Pancakes

Start your day right with these fluffy banana oat pancakes that are not only delicious but also healthy. Made without added sugar, these pancakes are the perfect choice for anyone looking for a nutritious breakfast option. Whether you’re a busy parent, a fitness enthusiast, or just someone who loves good food, you’ll find joy in making and eating these pancakes. Topped with fresh fruit or a dollop of nut butter, they become a delightful treat that everyone will love!

Why You’ll Love This Recipe

These pancakes are not just another breakfast option; they come packed with benefits that make them a must-try:

  • Healthy Ingredients: Made with rolled oats and ripe bananas, these pancakes are naturally sweetened and packed with nutrients.
  • Quick to Prepare: With minimal prep time and easy cooking steps, you can whip these pancakes up in no time, perfect for busy mornings!
  • Versatile: Customize your pancakes with various toppings or mix-ins, keeping breakfast exciting every time.
  • Dietary Friendly: Suitable for various diets, including vegan and gluten-free options when you make simple substitutions.
  • Kid Approved: These pancakes are a hit with children, making breakfast a fun and healthy experience for the whole family.

Ingredient Breakdown

Let’s dive into what you’ll need to make these delicious pancakes:

  • 1 cup rolled oats: The base of our pancake batter, providing fiber and whole grains.
  • 1 ripe banana, mashed: Acts as a natural sweetener and adds moisture.
  • 1/2 cup unsweetened almond milk: A dairy-free option; you can also use regular milk or any non-dairy milk you prefer.
  • 1 teaspoon vanilla extract: Enhances the flavor of your pancakes.
  • 1 teaspoon baking powder: Essential for fluffiness.
  • 1/2 teaspoon ground cinnamon: Optional, but it adds warmth and depth to the flavor.
  • 1/4 teaspoon salt: Balances the sweetness.
  • 1 large egg (or flax egg for vegan version): Binds the ingredients together.
  • 1 tablespoon olive oil (or melted coconut oil): Adds moisture and flavor.
  • 1/4 cup water (if needed): Adjusts the batter consistency.
  • Toppings of your choice: Fresh fruit, nut butter, or a drizzle of maple syrup can elevate your pancakes even further.

Pro Tips for Perfect Pancakes

A perfectly cooked stack of banana oat pancakes, showcasing their airy texture.

To ensure your pancakes turn out perfectly every time, keep these expert insights in mind:

  • Use Very Ripe Bananas: The riper the banana, the sweeter and more flavorful your pancakes will be.
  • Blend the Oats Thoroughly: Make sure the oats are ground to a fine flour for the best texture.
  • Don’t Overmix the Batter: Stir until just combined; lumps are okay. Overmixing can lead to tough pancakes.
  • Adjust the Consistency: If your batter is too thick, add water a tablespoon at a time until it reaches your desired consistency.
  • Preheat Your Pan: Ensure your skillet is hot before pouring the batter; this helps achieve that golden brown finish.
  • Watch the Heat: Cooking on medium heat prevents burning while allowing the pancakes to cook through.
  • Keep Pancakes Warm: If making a large batch, keep finished pancakes warm in an oven set to low.
  • Experiment with Toppings: Get creative with your toppings to keep breakfast fun and exciting.

Common Mistakes and Troubleshooting

Even seasoned cooks can make a few missteps. Here’s how to avoid them:

  • Pancakes are too thick: Add a little water to thin out your batter.
  • Pancakes are too flat: Ensure your baking powder is fresh for proper leavening.
  • Pancakes stick to the pan: Preheat and lightly grease the skillet before cooking.
  • Pancakes are dry: Make sure not to overcook them; they should be golden brown on both sides.

Delicious Variations

Want to switch things up? Here are some variations to try:

  • Chocolate Chip Pancakes: Add a handful of dark chocolate chips to the batter for a sweet twist.
  • Berry-Infused Pancakes: Mix in fresh blueberries or strawberries for a fruity flavor.
  • Nutty Pancakes: Incorporate chopped nuts like walnuts or pecans for extra crunch and nutrition.
  • Spiced Pumpkin Pancakes: Add pumpkin puree and spices like nutmeg and ginger for a fall-inspired treat.

Storage and Make-Ahead Instructions

If you want to prepare pancakes in advance, here’s how to store them:

  • Refrigerate: Store cooked pancakes in an airtight container in the fridge for up to 3 days.
  • Freeze: Lay pancakes flat in a single layer on a baking sheet, freeze until solid, then transfer to a freezer bag for up to 1 month.
  • Reheat: Use a toaster, microwave, or skillet to warm up pancakes before serving.

FAQs

Here are some common questions about making fluffy banana oat pancakes:

  • Can I use quick oats instead of rolled oats? Yes, but rolled oats provide a better texture.
  • Can I make these pancakes gluten-free? Absolutely! Use gluten-free oats to ensure they are safe for those with gluten sensitivities.
  • How can I make these pancakes vegan? Substitute the egg for a flax egg (1 tablespoon ground flaxseed mixed with 2.5 tablespoons water).
  • What can I use instead of almond milk? Any milk—dairy or non-dairy—will work just fine.
  • Why are my pancakes not fluffy? Make sure your baking powder is fresh and avoid overmixing the batter.
  • Can I add protein powder to this recipe? Yes, you can mix in protein powder for an extra boost.
  • What are some good toppings? Fresh fruits, yogurt, nut butter, or a drizzle of honey or maple syrup work wonderfully.
  • How do I know when the pancakes are done? Look for bubbles forming on the surface and a light golden color when flipping.

Nutritional Tips and Dietary Adaptations

To make these pancakes fit various dietary needs, consider these tips:

  • Low Sugar: Since these pancakes are naturally sweetened, they are perfect for reducing sugar intake.
  • Protein Boost: Enhance nutrition by serving with Greek yogurt or adding protein powder to the batter.
  • Calorie Conscious: Keep track of portion sizes and toppings to maintain a healthy balance.

Equipment Recommendations

For the best results, equip yourself with the following:

  • Blender or Food Processor: Essential for turning rolled oats into oat flour.
  • Non-Stick Skillet or Griddle: Ensures pancakes cook evenly and don’t stick.
  • Mixing Bowl: A medium-sized bowl for combining ingredients is handy.
  • Measuring Cups and Spoons: Accurate measurements are key to successful cooking.

Serving Suggestions

To enhance your pancake experience, consider these delightful serving ideas:

  • Top with Fresh Fruit: Strawberries, blueberries, or banana slices add freshness and color.
  • Drizzle Nut Butter: Almond or peanut butter provides a creamy texture and healthy fats.
  • Maple Syrup: A light drizzle can add a touch of sweetness without overpowering.
  • Yogurt or Cottage Cheese: A dollop can add creaminess and protein.

In conclusion, these fluffy banana oat pancakes are a delightful way to start your day. With their wholesome ingredients and customizable options, they are sure to become a family favorite. So grab your ingredients, follow the steps, and enjoy a delicious breakfast that not only tastes great but is also good for you. Happy cooking!

Fluffy Banana Oat Pancakes (No Sugar Added)

Prep Time 10 minutes
Cook Time 10 minutes
Total Time 20 minutes
Servings 4 pancakes
Calories 250
Enjoy these light and healthy banana oat pancakes, perfect for a nutritious breakfast or snack with customizable toppings.

Ingredients

Dry Ingredients

  • 1 cup rolled oats
  • 1 teaspoon baking powder
  • 1/4 teaspoon salt

Wet Ingredients

  • 1 large ripe banana, mashed
  • 1/2 cup unsweetened almond milk
  • 1 teaspoon vanilla extract
  • 1 large egg (or flax egg)

Cooking Fat

  • 1 tablespoon olive oil (or melted coconut oil)
  • 1/4 cup water (if needed) (to adjust batter consistency)

Toppings of your choice

  • Fresh fruit, nut butter, maple syrup (optional) (for serving)

Instructions 

  • Blend the oats until they form a fine flour.
  • Mix mashed banana, oat flour, almond milk, vanilla, baking powder, salt, egg, and oil until combined. Add water if batter is too thick.
  • Heat a skillet over medium heat and lightly grease. Pour 1/4 cup batter for each pancake. Cook 2-3 minutes until bubbles form, then flip and cook 1-2 minutes until golden.
  • Repeat with remaining batter, adding more oil if needed.
  • Stack pancakes and serve with your favorite toppings like fresh fruit, nut butter, or maple syrup.

Notes

For vegan options, use a flax egg instead of a large egg.
Calories: 250kcal
Cost: $10
Course: Breakfast
Cuisine: American
Keyword: Banana, healthy, oats