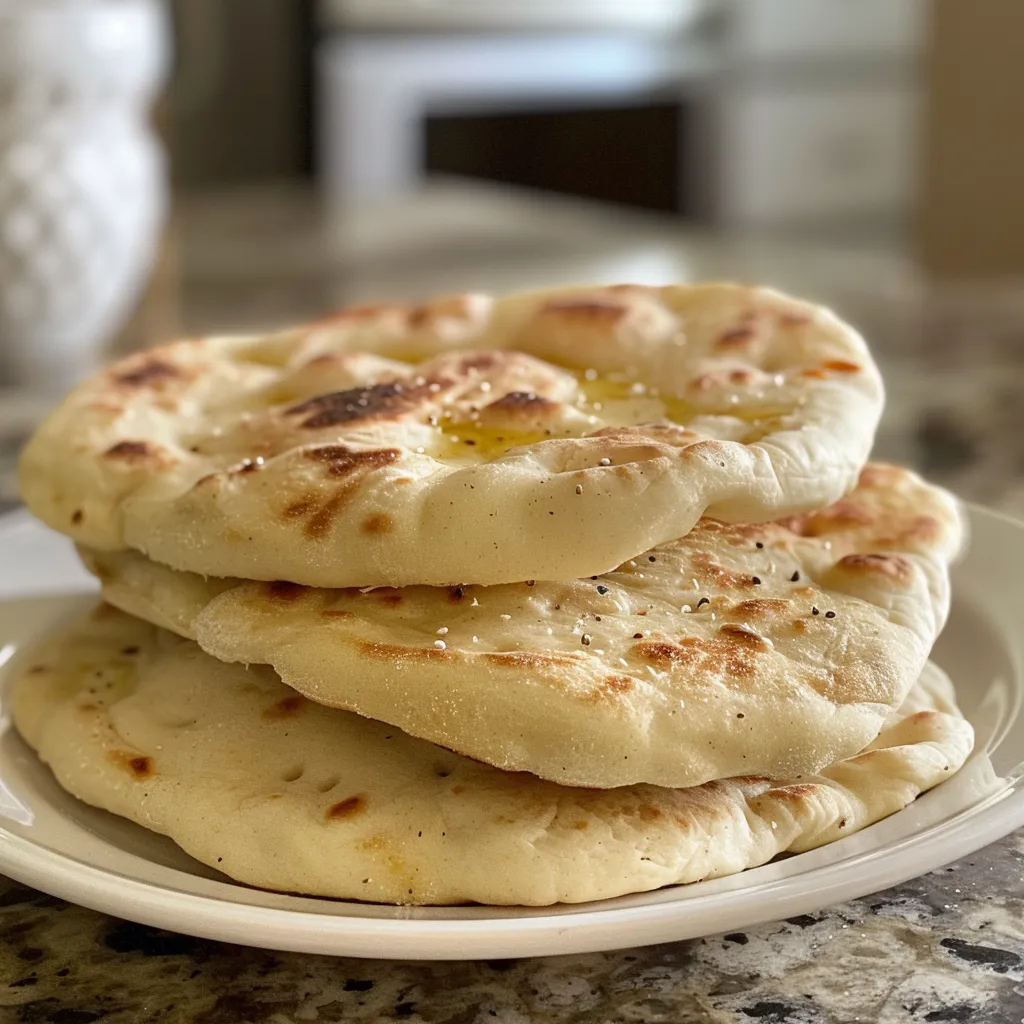
Welcome to your ultimate guide on making homemade pita bread! If you’ve ever savored a warm, fluffy pita fresh from the oven, you know the joy it brings. This recipe is not just about creating a delicious bread; it’s an invitation to explore the comforting art of baking. In this comprehensive guide, I’ll walk you through everything you need to know to make perfect pita bread. From the right ingredients to expert tips, you’ll be equipped to create this staple in your kitchen.
Let’s dive in and discover why making pita bread at home is a delightful endeavor that anyone can master!
Why You’ll Love This Recipe
- Quick and Easy Preparation: This recipe is designed for simplicity, allowing you to whip up delicious pita bread in under two hours, including resting time.
- Fluffy and Soft Texture: Achieve that perfect pocket with a fluffy interior that’s excellent for stuffing with your favorite fillings.
- Versatile Uses: Whether you’re making wraps, dips, or serving alongside a hearty stew, pita bread can elevate any meal.
- Cost-Effective: Making your own pita is not only fun but also budget-friendly compared to store-bought options.
- Customizable Flavors: With this basic recipe, you can experiment with herbs, spices, and even whole grain flours to create unique variations.
Ingredients & Substitutions for Pita Bread
Before we jump into the baking process, let’s break down the key ingredients and possible substitutions:
- All-Purpose Flour: 3⅓ cups. You can substitute with whole wheat flour for a healthier option, but the texture may be denser.
- Lukewarm Water: 1¼ cups. This is essential for activating the yeast. If you don’t have lukewarm water, you can heat water and let it cool to the right temperature.
- Active Dry Yeast: 2 teaspoons. Instant yeast can be used in the same quantity without the need for activation.
- Sugar: 2 teaspoons. This helps with browning and fermentation. You can use honey or agave syrup as a natural alternative.
- Salt: 2 teaspoons. Essential for flavor; don’t skip this ingredient!
- Olive Oil: 2 tablespoons. This adds moisture and flavor. You can substitute with melted butter or a neutral oil.
How to Make Pita Bread
Making pita bread is a straightforward process. Follow these steps to create your delicious bread:
1. Prepare the Dough
Start by combining the lukewarm water, sugar, and yeast in a bowl. Allow it to sit for about 5-10 minutes until it becomes frothy, indicating the yeast is active.
2. Mix the Ingredients
In a large mixing bowl, combine the flour and salt. Make a well in the center and pour in the yeast mixture along with the olive oil. Stir until it forms a shaggy dough.
3. Knead the Dough
Transfer the dough to a floured surface and knead for about 8-10 minutes, until it becomes smooth and elastic. If the dough is too sticky, sprinkle a little more flour as needed.
4. Let the Dough Rise
Place the dough in a lightly oiled bowl, cover it with a damp cloth, and let it rise in a warm place until it doubles in size, about 1 hour.
5. Shape the Pitas
Once risen, punch down the dough to release air. Divide it into 8 equal pieces and shape each piece into a ball. Roll each ball into a flat circle about ¼ inch thick.
6. Preheat the Oven
Preheat your oven to 475°F (245°C) and place a baking sheet or pizza stone inside to heat up. If you have a pizza oven like Ooni, this is the perfect time to use it!
7. Bake the Pitas
Carefully place the rolled-out pita onto the hot baking sheet or stone. Bake for about 5-7 minutes, or until they puff up and turn lightly golden. Keep an eye on them, as they can bake quickly!
8. Cool and Enjoy
Remove the pitas from the oven and cover them with a clean towel to keep them soft as they cool. Enjoy them warm or store them for later!
Pro Tips for Perfect Pita Bread
- Use Fresh Yeast: Always check the expiration date on your yeast for the best results. Fresh yeast will ensure proper rising.
- Monitor Oven Temperature: A hot oven is crucial for puffing the pita. Use an oven thermometer if needed.
- Don’t Overwork the Dough: Knead until smooth, but avoid overworking, which can make the bread tough.
- Shape Consistently: Ensure all pita rounds are the same thickness for even baking.
- Experiment with Flavors: Add herbs or spices to the dough for a unique twist. Garlic powder or za’atar can add an exciting flavor.
- Store Properly: Place cooled pitas in an airtight container to keep them fresh longer.
- Try Different Baking Methods: If you don’t have an oven, you can cook pitas on a skillet over medium-high heat for about 2-3 minutes on each side.
- Perfect Pocket Test: To test if your pita has formed a pocket, gently press the side with your fingers.
Common Mistakes and Troubleshooting
Even seasoned bakers can run into issues. Here are some common mistakes and how to troubleshoot them:
- Pitas Don’t Puff Up: This could be due to insufficient oven temperature or old yeast. Ensure your oven is preheated and your yeast is fresh.
- Dough is Too Sticky: If your dough is too sticky, gradually add more flour during kneading. It should be soft but not tacky.
- Dry or Tough Pitas: This can happen if the dough is overworked or the oven temperature is too high. Keep kneading to a minimum and monitor your bake time.
Variations of Pita Bread
Feel free to get creative with your pita bread! Here are some delicious variations:
- Whole Wheat Pita: Substitute half of the all-purpose flour for whole wheat flour for a nutty flavor and added nutrition.
- Herbed Pita: Add a tablespoon of dried herbs like oregano, rosemary, or thyme to the dough for an aromatic twist.
- Spiced Pita: Mix in spices like cumin or paprika for a flavor kick that complements savory fillings.
- Stuffed Pita: Before baking, fill the rounds with your favorite ingredients (like cheese or sautéed vegetables) for a delicious pocket treat.
Storage and Make-Ahead Instructions
To keep your homemade pita bread fresh:
- Room Temperature: Store cooled pitas in an airtight container at room temperature for up to 3 days.
- Refrigeration: For longer storage, place them in the fridge for up to a week. Just be aware they may dry out slightly.
- Freezing: Wrap individual pitas in plastic wrap and store them in a freezer-safe bag for up to 3 months. Thaw at room temperature or warm them in the oven before serving.
Frequently Asked Questions
Here are some common questions about making pita bread:
- Can I use whole grain flour? Yes, you can substitute whole grain flour, but the texture will be denser.
- What can I serve with pita bread? Serve with dips like hummus, baba ganoush, or stuffed with grilled meats and veggies.
- How do I know when the dough has risen enough? The dough should double in size during the rising process.
- Can I make pita bread without yeast? Yes, you can use baking powder as a leavening agent, but the texture will differ.
- What happens if my pita bread is too thick? It may not puff up properly. Roll them thinner for better results.
- Is it possible to make gluten-free pita bread? Yes, there are gluten-free flour blends available that can be used, though the texture will vary.
- How can I reheat leftover pita bread? Place them in the oven or on a skillet for a few minutes to warm them up.
- Can I use flavored olive oil? Absolutely! Using flavored oils like garlic or herb-infused can add depth to your pita.
Nutrition Tips and Dietary Adaptations
For those conscious about their diet, here are some nutrition tips:
- Whole Grain Options: Use whole wheat flour for added fiber and nutrients.
- Low-Sugar Alternatives: If you’re watching your sugar intake, consider reducing the sugar amount or using a sugar substitute.
- Healthy Fats: Use olive oil or avocado oil for healthier fat options.
- Add Seeds: Incorporate sesame or chia seeds into the dough for a nutritious boost.
Equipment Recommendations
To make the process smoother, here are some recommended tools:
- Mixing Bowls: A large bowl for mixing and a smaller one for proofing yeast.
- Rolling Pin: Essential for rolling out your pita dough evenly.
- Oven Thermometer: To ensure your oven is at the right temperature for baking.
- Baking Sheet or Pizza Stone: A hot surface is crucial for puffing the pita.
Serving Suggestions
Now that you’ve made your pita bread, here are some delicious serving suggestions:
- Wraps: Fill with grilled chicken, lettuce, tomatoes, and tzatziki sauce for a satisfying meal.
- Dips: Serve alongside hummus, tzatziki, or baba ganoush for a great appetizer.
- Breakfast Pita: Stuff with scrambled eggs, avocado, and salsa for a delicious breakfast option.
- Snack: Enjoy warm pita with olive oil and za’atar as a simple snack.
Making homemade pita bread is not only rewarding but also enhances your culinary skills and brings a touch of homemade warmth to your meals. Thank you for joining me on this flavorful journey! I hope you find joy in baking and sharing your pita creations with family and friends. Happy cooking!
Pita Bread
Ingredients
Dough
- 3⅓ cups all-purpose flour
- 1¼ cups lukewarm water
- 2 teaspoons active dry yeast ((or instant dry yeast))
- 2 teaspoons sugar
- 2 teaspoons salt
- 2 tablespoons olive oil
Instructions
- Mix the flour, yeast, sugar, and salt in a bowl.
- Add warm water and olive oil; knead until smooth.
- Let the dough rise for about 1 hour until doubled in size.
- Divide the dough into 8 balls and roll into circles.
- Bake in a preheated oven at 475°F (245°C) for 8-10 minutes until puffed and golden.