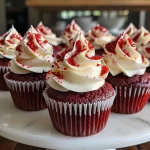
Elevate Your Baking with Classic Red Velvet Cupcakes
Welcome to the wonderful world of baking! Today, we’re diving deep into the art of making classic red velvet cupcakes. These stunning treats are not just a feast for the eyes; they are a delightful combination of rich flavors and textures that will make any occasion special. From their vibrant color to the smooth, creamy cream cheese frosting, red velvet cupcakes are a timeless favorite. Whether you’re an experienced baker or just starting, I’m here to guide you through every step of this delicious journey. Grab your apron, and let’s get started!
Why You’ll Love This Recipe
This classic red velvet cupcake recipe is more than just a dessert; it’s an experience. Here are five reasons you’ll adore these cupcakes:
- Moist and Tender: Thanks to the buttermilk and careful mixing, these cupcakes are incredibly moist and tender, ensuring every bite melts in your mouth.
- Rich Flavor: The hint of cocoa powder adds depth to the flavor profile, making these cupcakes deliciously unique.
- Stunning Presentation: Their vibrant red color and creamy white frosting create an eye-catching contrast that’s perfect for any celebration.
- Versatile Treat: These cupcakes can be enjoyed at birthday parties, weddings, or simply as a sweet treat to brighten your day.
- Easy to Customize: With various frosting options and mix-ins, you can easily adapt this recipe to suit your taste preferences!
Ingredients for the Best Classic Red Velvet Cupcakes
For the perfect red velvet cupcakes, you’ll need the following ingredients. I’ve included some substitutions for those who might need them:
- 2 ½ cups all-purpose flour: You can substitute with gluten-free flour for a gluten-free version.
- 1 teaspoon baking soda: This is essential for achieving the right rise and texture.
- 1 teaspoon unsweetened cocoa powder: Don’t skip this! It provides that subtle chocolate flavor.
- ½ teaspoon salt: Enhances the overall flavor of the cupcakes.
- 1 cup buttermilk, room temperature: If you don’t have buttermilk, mix 1 cup of milk with 1 tablespoon of vinegar or lemon juice and let it sit for 5-10 minutes.
- 1 tablespoon white vinegar: This reacts with the baking soda to create lift.
- 1 teaspoon vanilla extract: A must for flavor!
- 1 cup (2 sticks) unsalted butter, softened: Make sure it’s at room temperature for easy mixing.
- 2 cups granulated sugar: This adds sweetness and moisture.
- 2 large eggs, room temperature: Eggs should be at room temperature for better emulsification.
- 2 tablespoons red food coloring (liquid or gel): The star of the show! This gives the cupcakes their iconic color.
- 1 (8-ounce) package cream cheese, softened: Essential for that luscious frosting.
- ½ cup (1 stick) unsalted butter, softened: For a creamy frosting.
- 4 cups powdered sugar, sifted: This creates a smooth texture for your frosting.
- 1 teaspoon vanilla extract: Just like in the cupcake batter, it enhances flavor.
- 1-2 tablespoons milk (optional, for consistency): Adjust as needed for frosting texture.
How to Make Classic Red Velvet Cupcakes: Step-by-Step

Follow these simple steps to create your classic red velvet cupcakes:
- Preheat your oven to 350°F (175°C) and line a 12-cup muffin pan with paper liners.
- In a medium bowl, whisk together the flour, baking soda, cocoa powder, and salt. Set aside.
- In a liquid measuring cup, combine the buttermilk, vinegar, and vanilla extract. Set aside.
- In a large bowl, cream together the softened butter and granulated sugar with an electric mixer until light and fluffy.
- Beat in the eggs one at a time, mixing well after each addition.
- Stir in the red food coloring until fully incorporated and the batter is a vibrant red.
- Gradually add the dry ingredients to the wet ingredients, alternating with the buttermilk mixture, beginning and ending with the dry ingredients. Mix until just combined, being careful not to overmix.
- Divide the batter evenly among the prepared muffin cups, filling each about two-thirds full.
- Bake for 18-22 minutes, or until a wooden skewer inserted into the center of a cupcake comes out clean.
- Let the cupcakes cool in the pan for a few minutes before transferring them to a wire rack to cool completely.
Creating the Cream Cheese Frosting
While your cupcakes are cooling, let’s prepare the cream cheese frosting:
- In a large bowl, beat the softened cream cheese and butter together with an electric mixer until smooth and creamy.
- Gradually add the sifted powdered sugar, one cup at a time, mixing until fully incorporated and smooth.
- Beat in the vanilla extract. If the frosting is too thick, add milk one tablespoon at a time until desired consistency is reached.
Pro Tips for Baking Perfect Red Velvet Cupcakes
To help you achieve cupcake perfection, here are some expert insights:
- Room Temperature Ingredients: Ensure all ingredients are at room temperature for better mixing and texture.
- Don’t Overmix: Overmixing can lead to tough cupcakes. Mix just until combined.
- Use Quality Food Coloring: Gel food coloring provides a more vibrant color than liquid.
- Check for Doneness: Use the toothpick test—if it comes out clean, they’re done!
- Cool Completely: Ensure cupcakes are completely cool before frosting to prevent melting.
- Customize the Frosting: Feel free to add flavors like lemon zest or chocolate for a twist!
- Use a Piping Bag: For a professional look, use a piping bag to frost your cupcakes.
- Serve Fresh: For the best taste, serve the cupcakes within a few days of baking.
Common Mistakes and Troubleshooting
Even the best bakers make mistakes! Here are some common pitfalls and how to avoid them:
- Dry Cupcakes: This may occur from overbaking or using too much flour. Always measure flour correctly—spoon it into the measuring cup and level it off.
- Flat Cupcakes: Ensure your baking soda is fresh, and double-check your oven temperature for accuracy.
- Frosting Too Runny: If your frosting is too runny, add more powdered sugar until you reach the desired consistency.
- Uneven Bakes: Rotate your cupcake pan halfway through baking for even heat distribution.
Delicious Variations on Your Classic Red Velvet Cupcakes
Once you’ve mastered the classic version, try these fun variations:
- Red Velvet Cake: Use the same batter to create a layered red velvet cake. Adjust the baking time accordingly.
- Red Velvet Brownies: Transform the batter into fudgy brownies for a rich, chocolatey treat.
- Red Velvet Cookies: Adapt the recipe for cookies and add chocolate chips for a delightful twist.
- Red Velvet Whoopie Pies: Sandwich the frosting between two red velvet cookies for a fun dessert.
Storing Your Delicious Classic Red Velvet Cupcakes
To maintain the freshness of your cupcakes:
- At Room Temperature: Store in an airtight container for up to 2 days.
- In the Refrigerator: Keep them in the fridge for up to a week, but allow them to come to room temperature before serving.
- Freezing: You can freeze unfrosted cupcakes for up to 3 months. Thaw them at room temperature before frosting.
Frequently Asked Questions (FAQs)
Here are some of the most common questions about red velvet cupcakes:
- Why are red velvet cupcakes red? The red color comes from the reaction between cocoa powder and acidic ingredients like vinegar and buttermilk.
- Can I use a different type of frosting? Absolutely! Cream cheese frosting is traditional, but you can also try buttercream, whipped cream, or even ganache.
- How do I make the cupcakes more moist? Ensure you’re using enough liquid ingredients and not overbaking them.
- Can I make the batter ahead of time? Yes, you can prepare the batter a day in advance and refrigerate it, but let it come to room temperature before baking.
- What can I do with leftover frosting? Leftover cream cheese frosting can be stored in the refrigerator for up to a week. Use it on other desserts or enjoy it with fruit!
- Are red velvet cupcakes healthy? While not a health food, you can make healthier substitutions like using whole wheat flour or reducing sugar for a lighter version.
- How can I make my cupcakes rise higher? Ensure your leavening agents (baking soda and vinegar) are fresh and that you’re not overmixing the batter.
- Can I use gel food coloring instead of liquid? Yes! Gel food coloring is preferred for a more vibrant and concentrated color.
Nutritional Tips and Dietary Adaptations
If you’re looking to make your red velvet cupcakes a bit healthier, consider these tips:
- Whole Wheat Flour: Substitute half of the all-purpose flour with whole wheat flour for added fiber.
- Reduce Sugar: Cut down the sugar by about 25% without sacrificing taste.
- Non-Dairy Options: Use non-dairy butter and cream cheese to make this recipe vegan-friendly.
- Natural Food Colorings: Explore natural options like beet juice for coloring if you prefer a more natural approach.
Essential Equipment for Baking
To achieve the best results, here’s a quick list of equipment you’ll need:
- Muffin Pan: A standard 12-cup muffin pan is perfect for this recipe.
- Electric Mixer: A stand or handheld mixer will make creaming butter and sugar a breeze.
- Whisk: For mixing dry ingredients and combining wet ingredients.
- Measuring Cups and Spoons: Accurate measurements are crucial for baking success!
- Cooling Rack: To cool your cupcakes evenly and prevent sogginess.
Serving Suggestions
Once your cupcakes are baked and frosted, here are some delightful ways to serve them:
- Garnish: Top with red velvet crumbs, chocolate shavings, or festive sprinkles for an attractive finish.
- Pair with Coffee: Serve alongside a rich cup of coffee to balance the sweetness.
- Make a Dessert Platter: Arrange them with other desserts like brownies and cookies for a fabulous dessert spread.
- Gift Them: Package them beautifully in a box to share with friends or loved ones.
Conclusion
There you have it—your comprehensive guide to baking classic red velvet cupcakes! With their stunning color, delicious flavor, and creamy frosting, these cupcakes are bound to be a hit wherever you serve them. Remember, baking is all about experimenting and having fun. Trust me, with a little practice, you’ll master this recipe in no time. So, roll up your sleeves, gather your ingredients, and enjoy the delightful process of baking. Happy baking!
Classic Red Velvet Cupcakes
Ingredients
Dry Ingredients
- 2.5 cups all-purpose flour
- 1 teaspoon baking soda
- 1 teaspoon unsweetened cocoa powder
- 0.5 teaspoon salt
Wet Ingredients
- 1 cup buttermilk (room temperature)
- 1 tablespoon white vinegar
- 1 teaspoon vanilla extract
- 1 cup unsalted butter (softened)
- 2 cups granulated sugar
- 2 large eggs (room temperature)
- 2 tablespoons red food coloring (liquid or gel)
Frosting
- 8 ounces cream cheese (softened)
- 0.5 cup unsalted butter (softened)
- 4 cups powdered sugar (sifted)
- 1 teaspoon vanilla extract
- 1-2 tablespoons milk (optional, for consistency)
Instructions
- Preheat oven to 350°F (175°C) and line a muffin pan with liners.
- Mix dry ingredients; combine wet ingredients separately.
- Cream butter and sugar, add eggs and food coloring, then alternate dry and wet ingredients.
- Fill cupcake liners two-thirds full and bake for 18-22 minutes.
- Cool cupcakes, then beat cream cheese and butter, add powdered sugar and vanilla to make frosting. Frost cooled cupcakes.