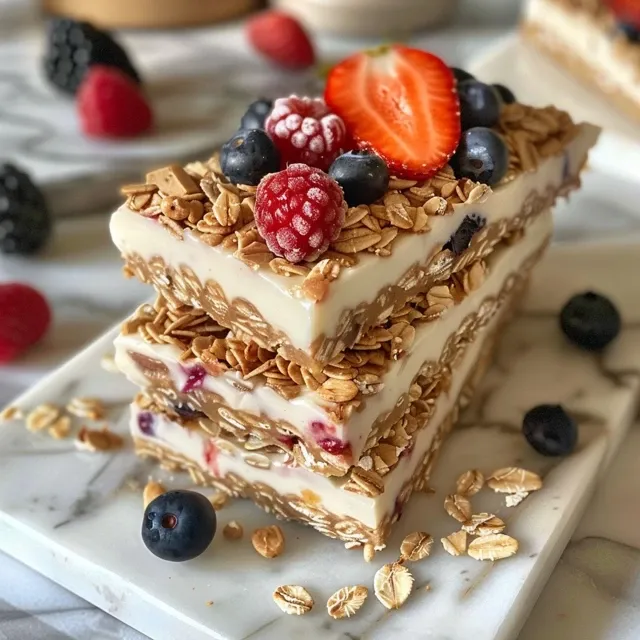
Crafting Your Own Delicious Frozen Yogurt Granola Bars
Welcome to your ultimate guide on making Frozen Yogurt Granola Bars! These delightful snacks are not only a treat for your taste buds but also a wholesome addition to your healthy eating regime. Packed with ingredients like oats, nut butter, and fresh berries, they’re perfect for on-the-go snacking. In this article, we will explore every aspect of crafting these delicious bars, from the benefits to troubleshooting tips. Let’s dive in!
Why You’ll Love This Recipe
This recipe for Frozen Yogurt Granola Bars isn’t just easy to make; it’s also packed with benefits that make it a must-try! Here are a few reasons to love this healthy dessert:
- Healthy Snack Option: These bars are made with real ingredients, ensuring you’re fueling your body with nutrients instead of empty calories.
- Customizable: You can easily swap in your favorite nuts, seeds, or fruits, making these bars uniquely yours.
- Perfect for Meal Prep: Make a big batch at the start of the week, and you’ll have a quick, healthy snack ready whenever you need it.
- No-Bake Convenience: With no baking required, you can whip these bars up in no time and let them set in the freezer.
- Kid-Friendly: These bars are a hit with kids, making them a great way to sneak in some healthy ingredients!
Ingredients You’ll Need
To make your Frozen Yogurt Granola Bars, gather the following ingredients:
- 1 ½ cups old-fashioned rolled oats: Ensure they are gluten-free if needed.
- ⅓ cup nut butter: Almond butter or peanut butter works well!
- 3 tbsp maple syrup or honey: Natural sweeteners that add a touch of sweetness.
- 1 tsp pure vanilla extract: For that lovely aroma and flavor.
- 1 tsp cinnamon: Adds warmth and depth to your bars.
- ½ tsp salt: Enhances all the flavors.
- 2 cups vanilla yogurt or skyr: I love using Siggi’s Vanilla Skyr for its thick, creamy texture.
- ⅓ cup fresh strawberries: Sliced for a burst of flavor.
- ¼ cup fresh blueberries: These little gems pack a nutritional punch.
- ¼ cup raspberries and/or blackberries: Optional, but they add more flavor and color.
Step-by-Step Instructions
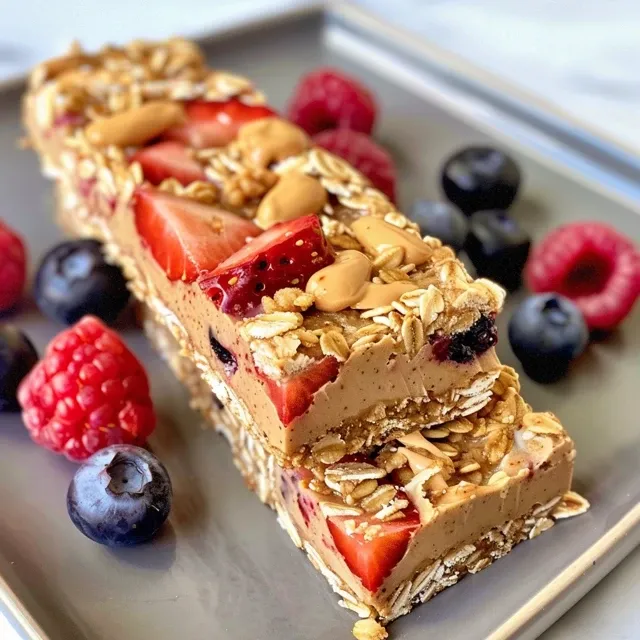
Now, let’s get into the nitty-gritty of making these bars!
- Step 1: Line an 8×8” or 9×9” baking dish with parchment paper. This will help you easily remove the bars once set.
- Step 2: Make the Granola Base: In a large mixing bowl, combine all the granola ingredients. Use a spatula to mix thoroughly, then transfer the mixture to your lined baking dish. Press it down firmly to create an even layer.
- Step 3: Assemble: Spread the vanilla yogurt or skyr over the granola base evenly. Top with strawberries, blueberries, and raspberries/blackberries.
- Step 4: Freeze: Place the dish in the freezer for at least 2 hours or until the yogurt is solid. Once set, remove from the freezer and cut into squares.
- Step 5: Enjoy cold! Store any leftovers in the freezer for future snacking.
Pro Tips for Success
Here are some expert insights to help you get the best results:
- Press Firmly: Ensure you pack the granola base tightly in the dish to prevent the bars from crumbling when cut.
- Use Quality Yogurt: A thick yogurt or skyr will hold better and provide a creamier texture.
- Don’t Rush the Freezing: Allow enough time for the yogurt to set completely; otherwise, the bars may be too soft.
- Mix and Match Fruits: Feel free to use seasonal fruits or whatever you have on hand for variations.
- Experiment with Flavors: Add nuts, seeds, or different spices to the granola base for a unique twist every time.
- Store Properly: Use an airtight container to keep them fresh longer.
- Cut with a Warm Knife: Running your knife under hot water and drying it can help you cut through the bars smoothly.
- Try Different Nut Butters: Each nut butter will give a different flavor profile—experiment to find your favorite!
Common Mistakes and Troubleshooting
Even the best recipes can have hiccups! Here’s how to avoid common pitfalls:
- Too Crumbly? If your bars are crumbly, it’s likely due to not pressing the granola base firmly enough. Don’t hesitate to really pack it in!
- Too Soft? If the bars are too soft after freezing, try letting them set longer in the freezer.
- Flavor Issues? Adjust your sweetener and spices according to your taste preferences. Always taste your mixture before freezing!
- Sticky Bars? If the bars stick to the parchment paper, make sure to use enough paper and press the granola down evenly.
Delicious Variations to Try
Getting creative with your Frozen Yogurt Granola Bars can be a lot of fun! Here are some variations to consider:
- Chocolate Lovers: Add cocoa powder to the granola base or sprinkle dark chocolate chips on top.
- Tropical Twist: Substitute fresh pineapple and coconut for a beachy feel.
- Nutty Delight: Mix in chopped nuts like walnuts or pecans into the granola for extra crunch.
- Spiced Apple: Incorporate diced apples and a pinch of nutmeg for a fall-inspired treat.
Storage and Make-Ahead Instructions
These bars are perfect for making ahead of time. Here’s how to store them:
- Freezing: Store in an airtight container in the freezer for up to 2 months. Just pull a bar out when you need a quick snack!
- Refrigeration: If you prefer them slightly softer, you can keep them in the fridge for up to a week.
- Individual Wrapping: Wrap each bar in parchment paper or plastic wrap for easy grab-and-go options.
FAQs About Frozen Yogurt Granola Bars
Here are some frequently asked questions to help you perfect your Frozen Yogurt Granola Bars:
- Can I use regular yogurt instead of Greek yogurt? Yes, but Greek yogurt provides a thicker consistency, which holds up better when frozen.
- How do I make these bars vegan? Substitute the honey with maple syrup and use a plant-based yogurt.
- Can I add protein powder? Absolutely! Just make sure to adjust the liquid ingredients accordingly to maintain the right consistency.
- What if I don’t have a baking dish? You can use any flat container, as long as it’s lined with parchment paper to assist in easy removal.
- How long do they last in the freezer? These bars can last up to 2 months in the freezer if stored properly.
- Can I use frozen fruits? Yes! Just make sure to thaw and drain excess moisture before adding them to the bars.
- Are these bars gluten-free? They can be made gluten-free by using certified gluten-free oats and nut butter.
- What’s the best way to cut the bars? Use a warm knife for smoother cuts and to prevent crumbling.
Nutritional Tips and Dietary Adaptations
When crafting your Frozen Yogurt Granola Bars, here are some nutritional tips:
- Protein Boost: Consider adding protein powder or using Greek yogurt for added protein content.
- Lower Sugar Option: Reduce the amount of sweetener or use unsweetened yogurt.
- Nut-Free Version: Replace nut butter with sunflower seed butter to keep it nut-free.
- Fiber Increase: Add chia seeds or flaxseeds into the granola base for added fiber.
Equipment Recommendations
Here’s a list of equipment that will make your cooking experience smoother:
- Mixing Bowls: A large bowl for mixing ingredients.
- Spatula: For mixing and packing down the granola.
- Baking Dish: An 8×8” or 9×9” dish works perfectly.
- Parchment Paper: Essential for easy removal of the bars.
- Knife: For cutting the bars into squares.
Serving Suggestions
These Frozen Yogurt Granola Bars are versatile in how you can enjoy them:
- On-the-Go Snack: Perfect for busy mornings or afternoons when you need a quick energy boost.
- Breakfast Option: Pair with a piece of fruit and your favorite beverage for a nutritious breakfast.
- Post-Workout Fuel: Ideal for replenishing energy after a workout.
- Lunchbox Treat: Pack them in your or your kids’ lunchbox for a sweet yet healthy treat.
Your Go-To Healthy Snack Awaits!
Now that you have the ultimate guide to crafting your own Frozen Yogurt Granola Bars, it’s time to get into the kitchen and create a batch of these delicious snacks. Remember, cooking is all about creativity and finding what works best for you. Enjoy making these bars, and share them with friends and family—because good food is best enjoyed together!
Frozen Yogurt Granola Bars
Ingredients
Base ingredients
- 1.5 cups old fashion rolled oats (gluten-free if needed)
- 0.33 cup nut butter (almond or peanut butter)
- 3 tbsp maple syrup or honey
- 1 tsp pure vanilla extract
- 1 tsp cinnamon
- 0.5 tsp salt
- 2 cups vanilla yogurt or skyr (e.g., Siggi's Vanilla Skyr)
- 0.33 cup fresh strawberries (sliced)
- 0.25 cup fresh blueberries
- 0.25 cup raspberries and/or blackberries (cut in half (optional))
Instructions
- Line an 8x8” or 9x9” baking dish with parchment paper.
- Mix oats, nut butter, maple syrup, vanilla, cinnamon, and salt. Press the mixture into the dish firmly.
- Spread yogurt evenly over the pressed granola base. Top with berries.
- Freeze for at least 2 hours until solid. Cut into bars and serve cold.